
Warning: This infobox is missing the following parameters: unit1, unit2, unit4, unit3
- "Maybe this mission doesn't make military sense. But Kanan is family. And we've all lost enough family to the Empire. So rescuing him makes sense to me."
- ―Hera Syndulla, to the other Spectres
The action at Mustafar, was a naval engagement four years before the Battle of Yavin, when the Spectres staged a mission to rescue Kanan Jarrus, their co-leader who had been captured during a mission to infiltrate the Imperial Communications Center at Jalath. With the help of the Devaronian crime lord Cikatro Vizago, the rebels sent Chopper to infiltrate an Arquitens-class command cruiser in order to find Kanan's location. They discovered that Kanan was being transported to the Mustafar system aboard Grand Moff Wilhuff Tarkin's flagship Sovereign.
Using a stolen Gozanti-class cruiser, the rebels managed to infiltrate the Sovereign and used detonators to unleash a massive electro-magnetic pulse that disabled the Star Destroyer. Kanan's Jedi apprentice Ezra Bridger then freed his master. While escaping the ship, Kanan defeated the Grand Inquisitor in a duel which damaged the Star Destroyer's reactor core; setting of a chain-reaction which destroyed the Star Destroyer.
The Spectres managed to escape the stricken vessel before it exploded but were pursued by several TIE fighters. Fortunately for them, several rebel ships from Phoenix Squadron arrived and rescued them. Following Kanan's rescue, the rebels met the former Jedi Ahsoka Tano and learned that they were part of a greater rebellion.
Prelude
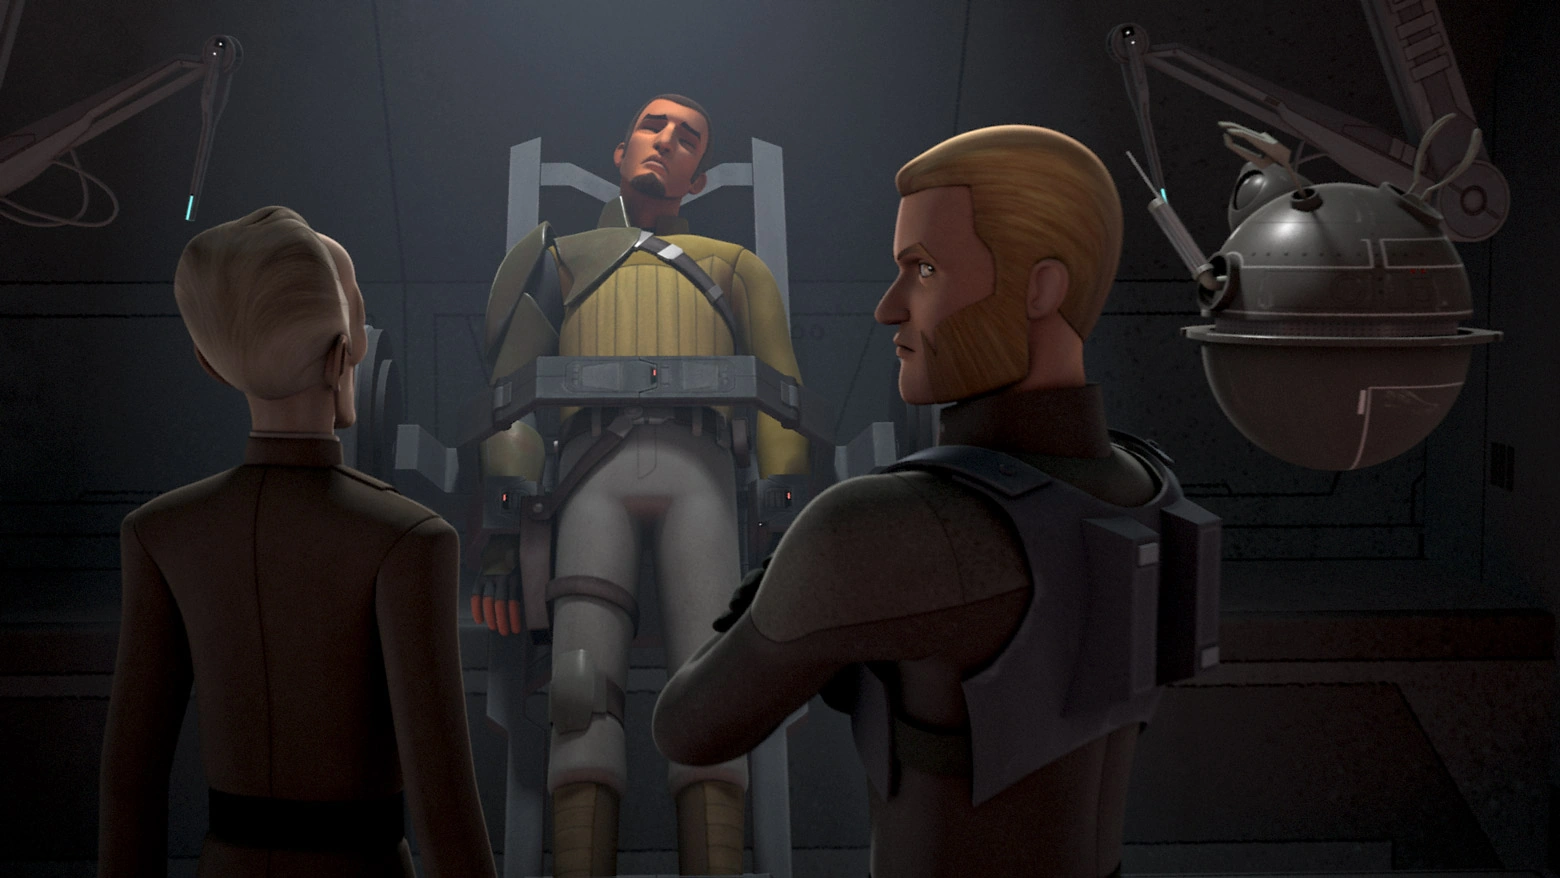
Kanan being interrogated by Imperial officials
Seeking to counteract Imperial propaganda on HoloNet, the Spectres hijacked the Imperial Communications Center at Jalath in order to upload a data spike that would allow them to broadcast a message to the public. However Grand Moff Wilhuff Tarkin, the Governor of the Outer Rim Territories had staged a trap to capture the rebels. Most of the Spectres managed to escape aboard the Phantom, an auxiliary shuttle, but Kanan stayed behind in order to prevent the Imperials from capturing his colleagues. After being cornered by both Agent Kallus and the Grand Inquisitor, Kanan surrendered himself to Grand Moff Tarkin.[1]
Despite Kanan's capture, Ezra managed to deliver a broadcast calling for Lothal to rise up against the Empire. In response, Tarkin had ordered the destruction of the communications tower, disrupting communications throughout Lothal.[1] Aboard Tarkin's flagship the Sovereign, Kanan was interrogated and tortured by Kallus and the Inquisitor but refused to divulge any information about the rebellion. After resisting a mind probe by an interrogator droid, the Grand Inquisitor ordered that Kanan be electrocuted. However, the Jedi still held out and refused to divulge any information on the rebellion and the mysterious Fulcrum. Dissatisfied, Tarkin ordered that Kanan be transferred to the Mustafar system for further interrogation.[4]
The rescue mission
Picking the trail
Hera conferring with Fulcrum
The capture of Kanan Jarrus created a deep sense of despondency among the Spectres.[8] Due to the attention generated by Ezra's broadcast, Fulcrum ordered Hera to abandon Kanan in order to avoid exposing the Rebellion's existence to the Empire. While Hera reluctantly complied with Fulcrum's orders, the other crew member of the Ghost—Ezra Bridger, Sabine Wren, Chopper, and Garazeb Orrelios refused to abandon their co-leader. In a failed attempt to find Kanan, the four rebels had earlier hijacked an AT-DP walker but barely managed to escape empty-handed.[4]
Unwilling to give up on Kanan, the four rebels made a second attempt to find information about Kanan. Working together, Chopper distracted Hera while the other rebels escaped aboard the Phantom, the Ghost's auxiliary vessel. The four rebels managed to find Cikatro Vizago, a Devaronian crime lord who also operated as an information broker. Vizago was initially unwilling to help them, but changed his mind after Ezra used the Force to levitate a crate over him. Vizago then revealed that the Empire was using Imperial communication droids to courier information from Capital City to their Arquitens-class command cruisers above Lothal. Hera caught up with them, but Ezra managed to convince her to support their rescue mission.[4]
Putting their plans into action, the crew of the Ghost disguised Chopper as an Imperial communications droid. Sabine and Zeb managed to ambush an Imperial party and abduct their communications droid; allowing Chopper to take his place. The ruse worked and Chopper was able to board an Imperial light cruiser and download the necessary files. After completing his work, hopper transmitted a signal to the Ghost which launched a feint attack on the light cruiser. Amidst the confusion, Chopper was able through the ship's emergency air lock. Once in space, Chopper managed to used his thrusters to rocket back to the Ghost. While flying back to Lothal, the rebels learned that Kanan was being transported aboard the Sovereign to the Mustafar system for further interrogation.[4]
Assaulting the Sovereign
The Spectres infiltrated the Sovereign with a stolen TIE fighter
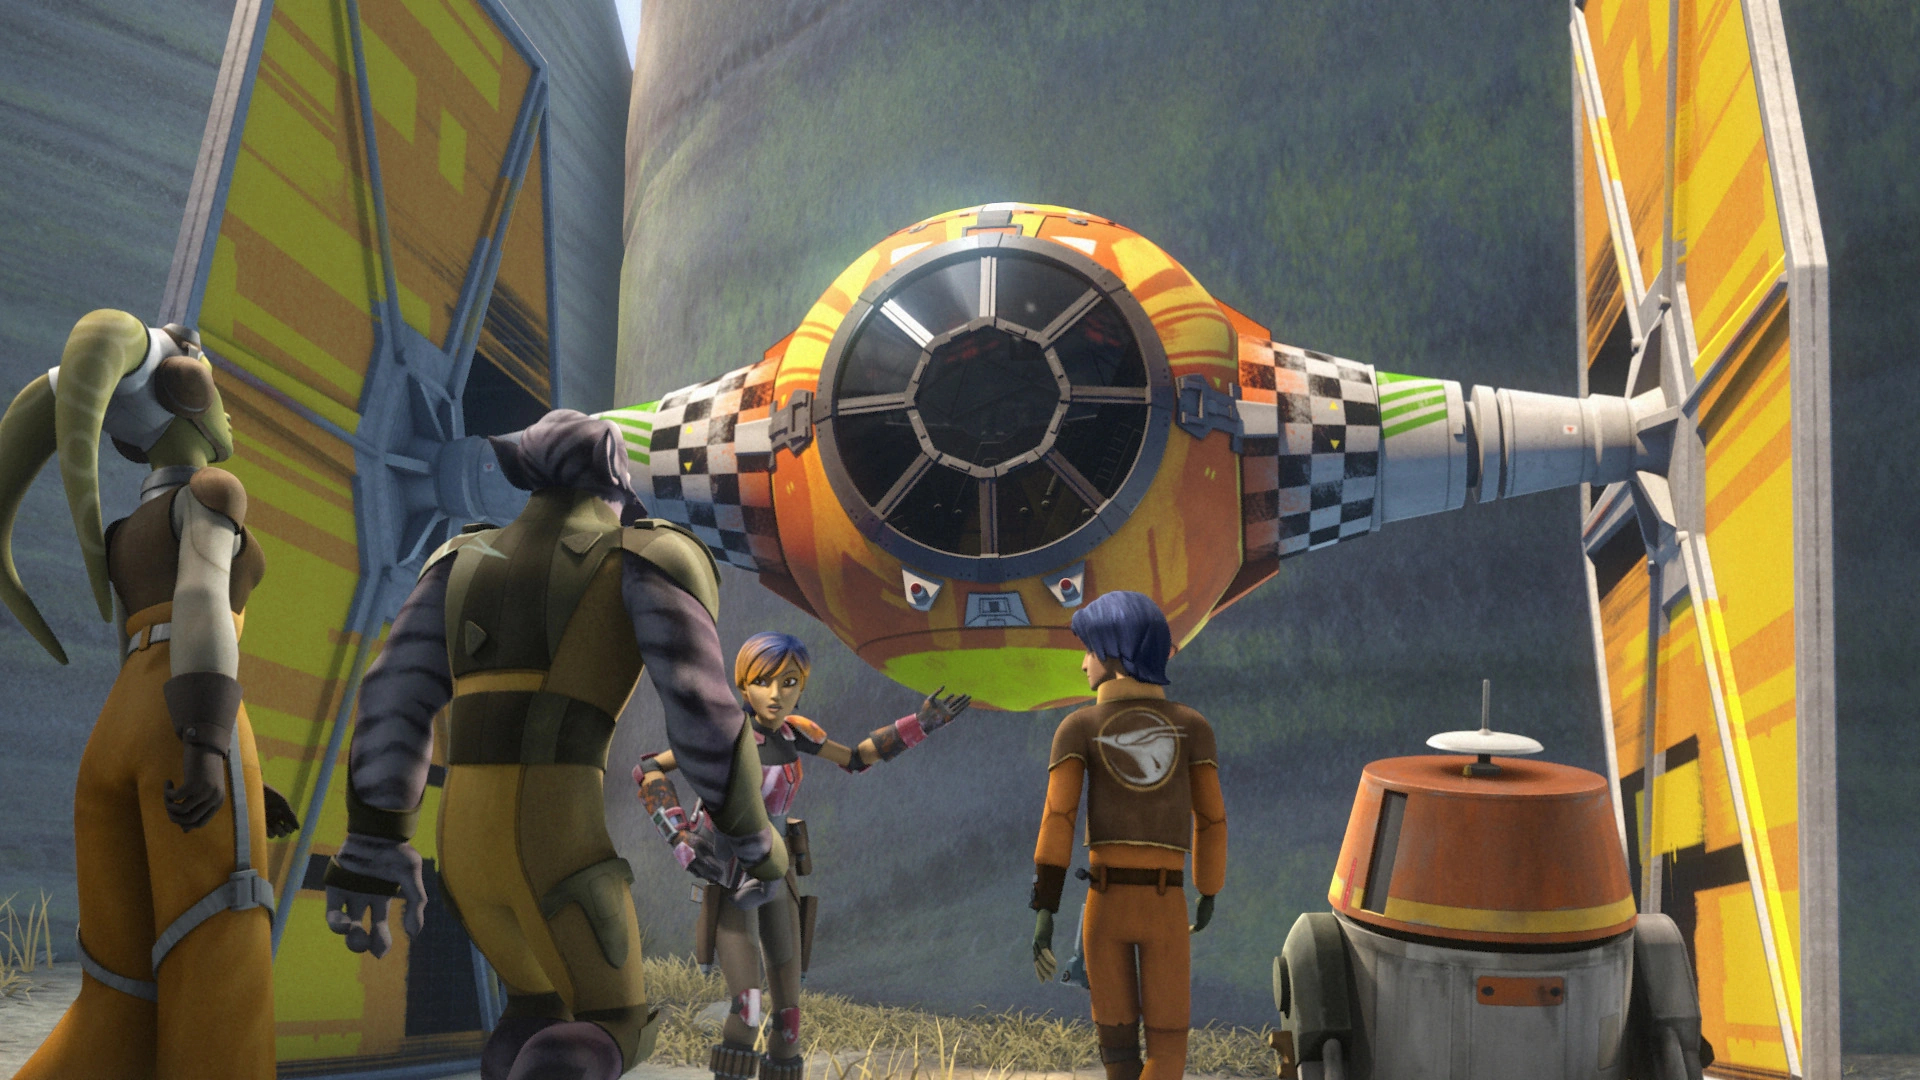
Returning to Lothal, the Spectres decided to leave the Ghost behind since their ship was well-known to the Empire. The rebels stole an Imperial Gozanti-class cruiser and used it to transport a TIE fighter they had captured earlier during a mission to Kathol. Using the stolen Imperial transport, they traveled to the Mustafar system only to find the Sovereign surrounded by several other Imperial-class Star Destroyers. Once Ezra Bridger had established through the Force that Kanan was indeed still alive and aboard the Sovereign, the repainted TIE was dispatched by remote to join a passing TIE squadron that was entering the Sovereign's main hangar. Once inside, the colorful TIE transmitted a massive electro-magnetic pulse that disabled the entire Star Destroyer.[5]
After disabling the Sovereign, the Rebels docked their stolen cruiser with the larger ship and boarded it to find and rescue Kanan, leaving the droid, Chopper in charge of the getaway ship. However, Tarkin had anticipated a rescue attempt. Even as Ezra was freeing Kanan from his cell, stormtrooper reinforcements from the other Star Destroyers were landing in the Sovereign's hangar bay. Spooked by the Imperial reinforcements, Chopper moved the stolen Imperial transport from the Sovereign, effectively cutting off the Rebels' escape. While Sabine, Hera and Zeb fought their way back to the hangar bay to reach their stolen TIE fighter, Ezra and Kanan engaged the Grand Inquisitor in a lightsaber duel in the Star Destroyer's engineering section.[5]
New allies

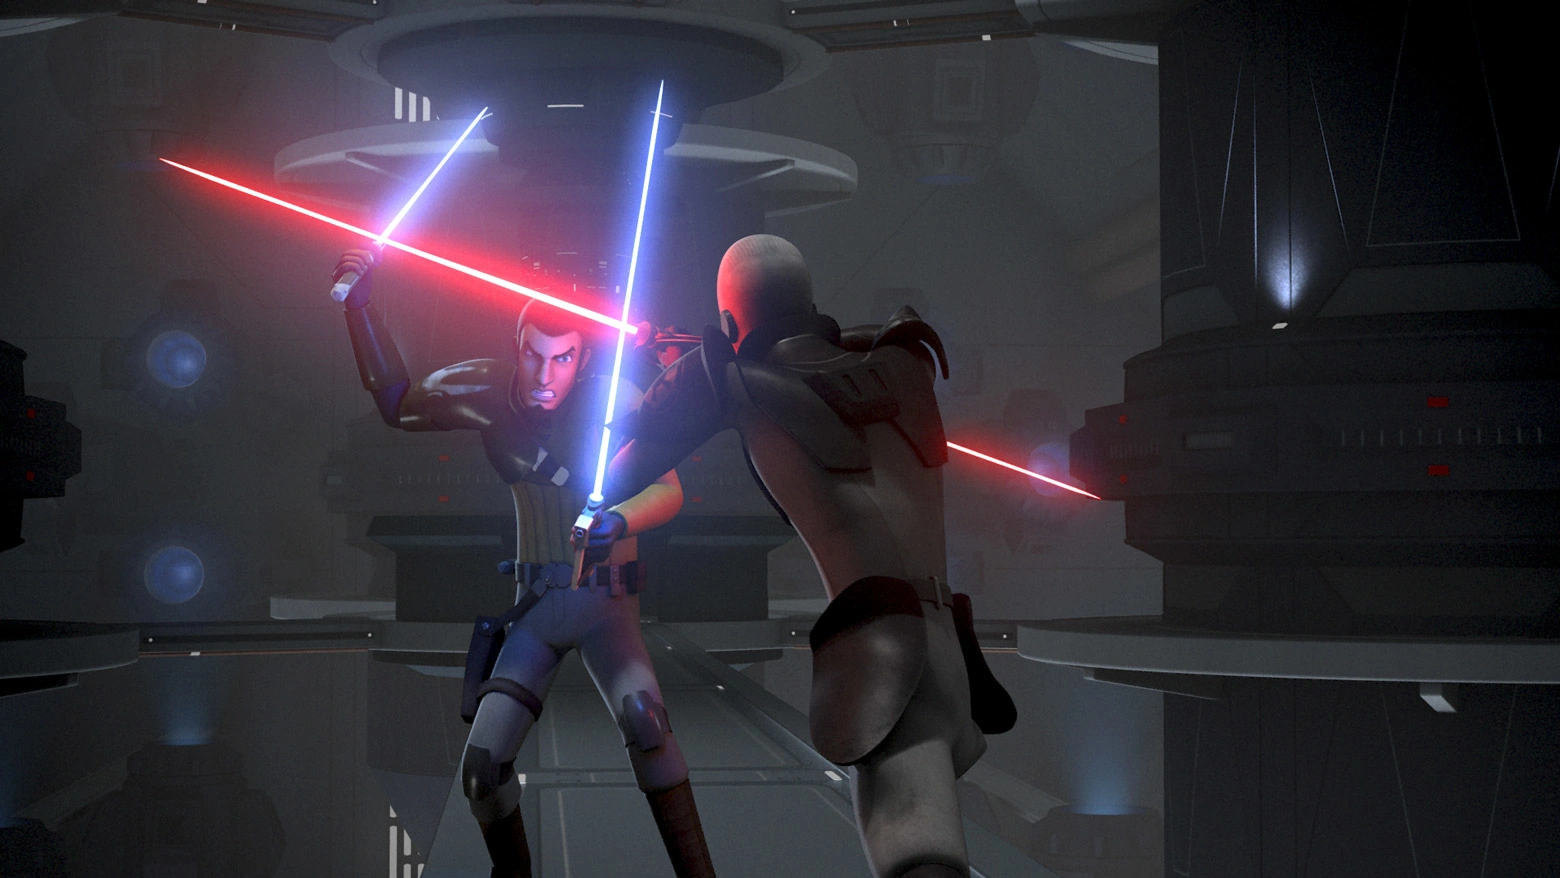
Jarrus and the Inquistor's duel onboard the Sovereign
While Kanan used Ezra's lightsaber to parry with the Inquisitor, Ezra used the Force to levitate Kanan's lightsaber from the Inquisitor's belt. The two Jedi then took on the Grand Inquisitor. After a short, but intense two-on-one fight, the Inquisitor threw Ezra down onto a nearby bridge, knocking him unconscious. Initially horrified, Kanan quickly regained composure, took up Ezra's lightsaber and fought against the Inquisitor. Following a lengthy duel, Kanan managed to push the Inquisitor to the edge of the bridge and destroy his lightsaber. The Inquisitor's lightsaber fell into the Sovereign's reactor core, triggering an explosive chain reaction that eventually destroyed the Star Destroyer. Knowing the punishment he would receive for his failure if he faced his master Darth Vader, the Inquisitor committed suicide by throwing himself into the burning reactor.[5]
Before the ship exploded, the Spectres escaped on their stolen TIE fighter and The Inquisitor's TIE Advanced starfighter. Meanwhile, Tarkin evacuated the stricken Sovereign aboard a Sentinel-class landing craft. Shortly later, the Sovereign exploded above Mustafar and broke into several pieces. Due to the departure of the Chopper's Gozanti cruiser, the rebels were unable to flee into hyperspace. Their starfighters were pursued by a swarm of Imperial TIE fighters. However, when all seemed lost, Chopper suddenly returned aboard the Gozanti cruiser, which was accompanied by the Ghost and three CR90 corvettes. These reinforcements had been sent by the Alderaanian senator Bail Organa and the mysterious rebel operative known as Fulcrum. After the rebel reinforcements destroyed the pursuing TIE fighters, the Spectres docked their stolen TIEs with the Gozanti cruiser. Shortly later, the rebel fleet jumped into hyperspace.[5]
Aftermath
- "Yes the naval action at Mustafar was a short-term win. But the Empire now knows the measure of the Alliance's naval strength."
- ―Senator Mon Mothma writing in her journal
Once aboard the Gozanti cruiser, the rebels made their way back into the Ghost. There, they were greeted by Chopper, who projected a HoloNet feed of Senator Bail Organa, and several rebel soldiers. Hera revealed that their cell was part of a wider rebel network. Shortly later, they were joined by Fulcrum herself, who revealed herself as the Jedi Purge survivor Ahsoka Tano. She complimented the crew of the Ghost, particularly Ezra, for their bravery in taking on the Empire. News of the Sovereign's destruction eventually leaked to the planet Lothal, which stirred some unrest on that planet. In response, the Emperor dispatched his top enforcer, Darth Vader, to deal with the rebel problem. [5]
Behind the scenes
The rescue of Kanan Jarrus first appeared in "Fire Across the Galaxy," the finale of the first season of Star Wars Rebels, which premiered on March 2, 2015 on Disney XD. It later appeared in Michael Kogge's Battle to the End, a chapter book adaptation of the final arc of the first season of Star Wars Rebels.
Appearances
- Lost Stars (Indirect mention only)
 Star Wars Rebels — "Rebel Resolve" (First appearance)
- Star Wars Rebels — "Fire Across the Galaxy"
- Battle to the End
- Servants of the Empire: The Secret Academy (Indirect mention only)
- Star Wars Rebels: The Siege of Lothal (Mentioned only)
- Star Wars Rebels — "Always Two There Are" (Indirect mention only)
- Star Wars Rebels — "Brothers of the Broken Horn" (Mentioned only)
- Star Wars Rebels — "Secret Cargo" (Indirect mention only)
Sources
- "Star Wars Rebels Recounted" — Star Wars Insider 156
- Rebel Resolve on StarWars.com (backup link (tv-shows/star-wars-rebels/rebel-resolve) not verified!)
- Ultimate Star Wars
- Star Wars: Absolutely Everything You Need to Know
- Star Wars Rebels: Visual Guide: Epic Battles
- Star Wars: Galactic Atlas
- Star Wars: Absolutely Everything You Need to Know, Updated and Expanded
- Star Wars: The Rebel Files (First identified as action at Mustafar)
Notes and references
- ↑ 1.0 1.1 1.2
 Star Wars Rebels — "Call to Action"
- ↑ Servants of the Empire: The Secret Academy
- ↑ An email from Martin Fisher, author of "Ocean Rescue," to Wookieepedian LelalMekha reveals that "Ocean Rescue" (which depicts the mission to rescue Janard) takes place between "Fire Across the Galaxy" (which depicts the rescue of Kanan Jarrus) and Star Wars Rebels: The Siege of Lothal.
- ↑ 4.00 4.01 4.02 4.03 4.04 4.05 4.06 4.07 4.08 4.09 4.10 4.11 4.12 4.13 4.14 4.15 4.16 4.17 4.18 4.19 4.20 4.21 4.22 4.23 4.24 4.25 Star Wars Rebels — "Rebel Resolve"
- ↑ 5.00 5.01 5.02 5.03 5.04 5.05 5.06 5.07 5.08 5.09 5.10 5.11 5.12 5.13 5.14 5.15 5.16 5.17 5.18 5.19 5.20 5.21 5.22 5.23 5.24 5.25 5.26 5.27 5.28 5.29 5.30 Star Wars Rebels — "Fire Across the Galaxy"
- ↑ Star Wars: Galactic Atlas
- ↑ Star Wars Rebels: The Siege of Lothal
- ↑ Battle to the End