- "Incoming ships! They are entering the area near buoy B-18."
- ―Outpost D-34 to Imperial starfighters
The Aftermath of Hoth, sometimes referred to as the "Mugaari Campaign",[source?] was a series of Imperial actions in the sectors surrounding the Hoth system, immediately following the destruction of the hidden Rebel base. Having been defeated, Rebel Alliance forces fled their secret base in all directions, assisted by the supposedly neutral Mugaari. During this campaign, Imperial forces searched nearby sectors for fleeing Rebels, encountered various retaliatory strikes, secured their space installation, and staged a counterattack against a local Rebel task force.
The Campaign[]
Patrolling jump point D-34[]
The first phase of the campaign entailed static searches of various vessels traveling through the sector around XQ1 Platform Outpost D-34. Various freight and trade craft moved through the system, permitting the Mugaari opportunities to smuggle fleeing Rebels. Imperial pilots discovered Rebel stowaways aboard Bulk Freighter Onece 3 and Transport Glich as they attempted to pass through Imperially controlled space. Imperial Stormtrooper Transports began a capture operation just as Rebel shuttles arrived to rescue their discovered comrades. In the end, Imperial forces killed or captured all of the Rebels in their attempt to flee.
Red Alert[]

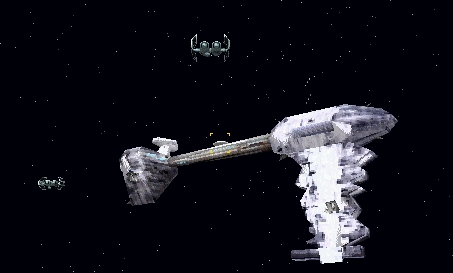
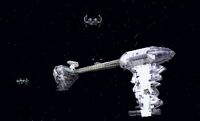
TIE Fighter Alpha 1 engaging Freighter Onece 3.
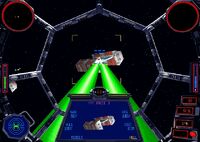
Following the initial discovery of Rebel stowaways, intelligence gathered from the prisoners revealed Rebel intentions to mount an assault on Outpost D-34. In addition to information extracted from Rebel prisoners, members of the Secret Order of the Empire revealed that the Rebels had stolen a Lambda-class shuttle, and the Order expressed their intent to capture any Rebel leadership that may be present aboard this shuttle, should it arrive in the system. As expected, an enemy attack force consisting of X-wings, Y-wings, and Z-95 Headhunters arrived to lay siege to the outpost. Imperial pilots stood by with Assault Gunboats and TIE Fighters to fend off the assault until the arrival of Admiral Flanken aboard the Imperial-class Star Destroyer Hammer. During the fighting, the shuttle Scutz arrived just as expected; Imperial Gunboats quickly intervened, disabling it for capture. To the Empire's surprise, three CR90 corvettes arrived to join the battle just as capture operations of Scutz began. Despite the efforts of the combined Rebel and Mugaari attack, Imperial forces held Outpost D-34 with the assistance of the Imperial Star Destroyer Hammer.
Counter attack[]
After fending off the impending attack on D-34, Admiral Flanken ordered a counterattack on a Rebel and Mugaari cargo loading depot in the Tungra sector. Colonel Vistore, aboard the Nebulon-B Frigate Fogger, oversaw the task of destroying the depot. The Fogger began the assault on the enemy base by launching four flight groups of TIE bombers, covered by one flight group of TIE interceptors. The enemy depot consisted of cargo containers, cargo ferries, transports, shuttles, and Y-wing fighters, and was easily destroyed by proton torpedoes fired from Imperial TIE Bombers. The Imperial surprise attack resulted in the successful destruction of the enemy depot, encountering little resistance from the aging fighters and shuttles.
Outpost D-34 falls[]
TIE Bombers returning to frigate Fogger.
While Imperial forces attacked the supply depot, Rebel forces succeeded in capturing Outpost D-34, forcing Imperial pilots into yet another sortie. Before the battle, agents of the Secret Order advised that spies may be among loyal Imperial forces, and expressed the need to capture additional Rebel prisoners. The frigate Fogger yet again led an assault against the Alliance force, consisting of transports, TIE Bombers, and TIE Interceptors. The Rebels attempted to counter the Imperial onslaught with X-wings, A-wings, Y-wings, the new Escort Shuttle, and transports of their own. Imperial forces again succeeded in repelling the enemy starships, and recaptured their station; moreover, the Secret Order gained additional prisoners from the capture of the Container Transport Gopher.
Attacking a Rebel light cruiser[]
After regaining control of Outpost D-34, Admiral Flanken traced the trail of the attacking Rebel forces back to the Bruanii sector. Flanken ordered Colonel Vistore to send his Assault Gunboats to rally with his own and assault the Rebel stronghold in a two-phase attack. Before the assault on the Rebel forces, Secret Order agents became curious about the source of all the Imperial equipment that was emerging from Rebel hands, and tasked the Imperial pilots to be on the lookout for additional stolen arms.
Five flight groups of Imperial Gunboats emerged from hyperspace to find the Calamari Cruiser Lulsla, her compliment of fighters, and Rebel transports laying a minefield. The Assault Gunboats began the initial task of softening up the cruiser's complement of starfighters, prior to additional forces arriving to destroy the cruiser itself. During the engagement, Imperial pilots did discover Imperial weapons located in one of the cargo containers near the Lulsla. As Gunboats from groups Tau, Rho, Pi, Nu, and Mu succeeded in clearing out enemy fighters, they escaped into hyperspace just as transports and additional Gunboats arrived for the second wave against the Cruiser.

Imperial Assault Gunboats dogfighting with Rebel X-wings near Cruiser Lulsla.
Destroy the Lulsla[]
The transports Sigma and Omega began their attack on the cruiser, flanked by three groups of Assault Gunboats. The Gunboats swiftly moved to destroy incoming enemy fighters and the newly-laid Type B and C minefield. However, the Lulsla still held a respectable resistance with its remaining X-wing, Y-wing, and A-wing fighters. Secret Order agents had forecast the inevitable doom of the cruiser, warning that its officers and crew would flee the damaged vessel before its ultimate destruction. Just as expected, starship groups Starway, Gargon, and Derris emerged from the Lulsla's hangar right before it exploded under fire from Imperial transports and their proton rockets. Imperial Gunboats diverted from the fighting to eliminate the fleeing Rebels, sparing only their commander aboard the shuttle Derris, which was later captured by Transport Zack 1.
The aftermath[]
The Empire finally succeeded in pacifying the local sectors surrounding the Hoth system following the invasion. Imperial pilots played a key role in its success, appropriating valuable intelligence and capturing Rebel forces, speeding the accomplishment of the campaign. As impressive as this accomplishment was, it was also the beginning of Admiral Harkov's defection to the Alliance.
Appearances[]
Sources[]
- TIE Fighter: The Official Strategy Guide
- TIE Fighter Collector's CD-ROM: The Official Strategy Guide