- "The blade of a lightsaber in the correct opening will reveal our path."
"What about the wrong opening?"
"It will bring this temple down on all our heads. May the Force be with me." - ―B'ink Utrila and her Padawan, Rennax Omani
B'ink Utrila was a female lethan Twi'lek who served as an instructor and Master in the Jedi Order. During the Clone Wars, she was the master of the Human Padawan Rennax Omani, who accompanied her and a squad of clone troopers to the moon Draay 2. There, Utrila and her force were to retrieve the ancient Sith artifact the Gauntlet of Kressh the Younger, lest it fall into the hands of Confederacy of Independent Systems leader Count Dooku. Although the Jedi and clones were able to locate the Gauntlet, Utrila was beset by the dark side of the Force upon touching it, and elected to try and leave it on the moon protected. The Republic force was later set upon by the Mandalorian Death Watch led by Pre Vizsla—in the ensuing engagement, the Jedi Temple that stored the Gauntlet was destroyed, which left Utrila satisfied that the device could not be retrieved. As a result of the mission however, Omani elected to leave the Jedi Order.
In 19 BBY, the Galactic Republic's capital, Coruscant, was attacked by the forces of General Grievous, who attempted to abduct Supreme Chancellor Palpatine. Appointed by Master Yoda to assist, Utrila joined Roth-Del Masona, Roron Corobb, Stass Allie, Shaak Ti and Foul Moudama in ferrying Palpatine to a secure bunker, which was nonetheless breached by Grievous and his forces. Although Utrila and her fellow Jedi endeavored to stop Grievous in his tracks, the droid general proved too formidable, and managed to defeat and kill Masona, Corobb, and Moudama in short order. Although Utrila was able to inflict superficial damage on her opponent, Grievous, wielding four lightsabers at once, proved too formidable, and ended Utrila's life by striking her through the heart.
Biography[]
The Gauntlet of Kressh the Younger[]
- "I touched it… and I was overwhelmed by its dark side powers. It's too dangerous to move."
- ―B'ink Utrila
B'ink Utrila was a female Twi'lek who served as a Jedi instructor in the Jedi Order.[3] By the time of the Clone Wars, she had attained the rank of Jedi Master. She elected to wield twin lightsabers in combat, and supervised the tutelage of a Human female Padawan learner, Rennax Omani. As a Jedi Master, she held the rank of Jedi General within the Grand Army of the Republic, and commanded a squad of clone troopers. In 20 BBY, Utrila and Omani, along with their troops were dispatched to the Outer Rim Territories moon of Draay 2. According to a holocron, it was said that the Jedi Temple on the moon stored a dangerous Sith artifact, the Gauntlet of Kressh the Younger—a device that, according to legend, could render its user impervious to all physical harm. The Jedi High Council hoped to prevent the artifact falling into the hands of Confederacy of Independent Systems leader Count Dooku, and so it was Utrila's task to either bring the Gauntlet back to Coruscant or secure it permanently.[2]
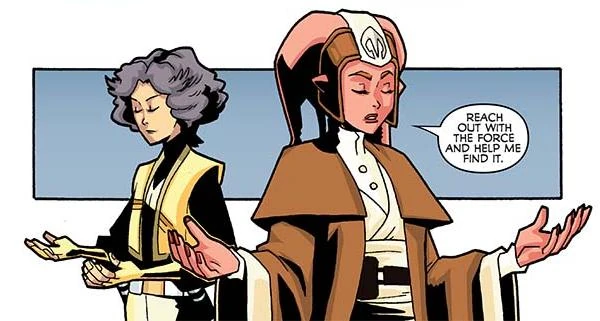
Making their way to the moon, the Jedi were accompanied by the clone troopers Lieutenant "Law", "Cannon", "Glitch," and "Horns." Following the instructions of the holocron, the Republic task force located the planet's Jedi Temple located within a valley. The group gradually made their way down to the temple entrance, which Utrila and Omani were able to pry open with the Force. Law then activated a lamp droid before leading his squad in to secure the temple. Utrila and her Padawan followed into a cavernous hall. The young Human was dejected at the apparent lack of a secret entrance, but Utrila advised patience, calling on her Padawan to reach out with the Force and ascertain how to proceed further.[2]

Utrila and Omani attempt to divine a way into the temple through the Force.
One of the clones, Glitch, believed himself to be Force-sensitive, and attempted to join the Jedi in their meditative state. In doing so, he accidentally activated a |Jedi guard droid disguised as a statue of Lucien Draay,[2] a Jedi Master from thousands of years prior.[4] The droid lashed out at the group, forcing Utrila and Omani to leap for cover. Horns attempted to down the machine with a thermal detonator, but the automaton was impervious. Utrila instructed Law to have his men hold their fire as she and her apprentice attacked in unison with their lightsabers—again, the droid emerged unscathed. Glitch tried in vain to use the Force on the machine—Utrila then realized that the droid was specifically designed to defend the temple from Sith, not Jedi. Ordering Law to resume fire and draw the droid's attention, Utrila and Omani called upon the Force not to attack the droid, but to turn a large mechanism at its core, deactivating the temple's defender immediately.[2]
Utrila's next step was to have Glitch find the panel he had stepped on to activate the droid, and had the wayward clone trooper mark the point. Surmising that the guardian droid had been placed near the entrance to a secret passage, the Jedi Master searched the immediate era, finding a wall panel made up of a multitude of small holes. Familiar with such devices, Utrila explained to her Padawan that the mechanism would open with a lightsaber blade inserted into the correct hole—an insertion into any other hole would bring the entire temple down on their heads. With a flourish, the Twi'lek activated one of her lightsabers and plunged it into one of the holes without hesitation, successfully opening the chamber. Along with Law and the clones, the Jedi began exploring, and Utrila advised Omani to reach out in the Force to detect any future dangers. The Padawan was unsure of how to do this, causing the Jedi Master to despair—she explained that the Force flowed through all living beings and could help them sense the echoes of those who had walked the halls of the temple in the past. Utrila then scolded her Padawan for having forgotten such rudimentary teachings from her days as a Jedi Initiate.[2]
The Jedi then came across a carving in one of the walls, of Lucien Draay doing battle with Sith Acolyte Haazen, who was depicted wielding the Gauntlet of Kressh the Younger.[2][5] Stopping to study the carving in order to determine the location of the Gauntlet, Utrila ordered Glitch to rendezvous with Law and the other clones, who had since moved deeper into the chamber. The Jedi soon caught up with the clones to find them battling blaster-resistant sarls in a chamber that held the Gauntlet. Ordering Omani to assist the troops, Utrila decided to retrieve the Gauntlet herself—the Padawan, however, soon discovered that the creatures were lightsaber-resistant as well. Utrila, deducing that the sarls had become invulnerable after having been exposed to the powerful Gauntlet for so long, used the Force to push them away from the artifact.[2]
The Twi'lek Jedi Master, finding an opening, leaped triumphantly towards the Gauntlet of Kressh the Younger—upon coming into contact with it however, Utrila found herself overwhelmed with the powers of the dark side of the Force. Horrified and aghast at what she had experienced, she urged her troops into immediate retreat, ordering them to clear the chamber as the sarls returned to their protective positions encasing the Gauntlet. Law was curious as to how they would extract the artifact, but Utrila, explaining her brief ordeal with the Gauntlet, decided that it would not be safe to remove it—instead, she was satisfied that they had confirmed its location, and now had to set about ensuring it would not fall into Count Dooku's possession. Still perturbed by the experience of touching the Gauntlet, Utrila decided that the force would make camp in the temple for the night, and in turn she would contact the Jedi High Council in the morning for further instruction.[2]
Death Watch interferes[]
- "Will you recommend someone to guard the canyon?"
"No, I don't think so… I don't think that gauntlet will ever trouble us again." - ―Rennax Omani and B'ink Utrila
Omani sealed the temple by removing her master's lightsaber from the wall device, and offered to take first watch along with Glitch so as to allow Utrila to get some rest, which the Twi'lek welcomed. Utrila slept in a tent within the temple, but the rest was short-lived. Glitch came charging back into the temple holding Omani's lightsaber, urging his compatriots to rouse from their slumber. An explosion thrust the clone trooper into the temple hall, and he was followed by Mandalorian Death Watch commandos, led by Pre Vizsla, who had taken Omani prisoner. Vizsla, having followed the Jedi to the moon in the hopes of retrieving the Gauntlet himself, ordered the Republic force to drop their weapons lest he harm Omani—Utrila and the clones complied. The Mandalorian then demanded that Utrila lead him to the Gauntlet, before being distracted by the markings on the helmet of trooper Horns—those of the Death Watch. Vizsla, challenging Horns to join Death Watch proper, instructed the clone to gun down Utrila—the clone refused, prompting the Mandalorian to raise a blaster to Horns' head.
At that moment, Glitch recovered, wielding Omani's lightsaber, and challenged the Mandalorians. Vizsla, amused, drew his own weapon, the darksaber, and dueled with Glitch. In the ensuing fight, Glitch trod on the panel activating the temple's guardian droid. As the temple's defender rampaged, Utrila swiftly came to Omani's aid, freeing her of the Mandalorian restraints. Glitch, still battling Vizsla, plunged Omani's lightsaber into one of the wrong holes in the wall device, causing the temple to begin falling apart. As Utrila retrieved her Padawan's lightsaber with the Force, she urged the young Human to evacuate the temple with her, leaving Glitch among the rapidly descending rubble. The Mandalorians retreated with the use of their jetpacks, firing on the Republic forces in the process, however the two Jedi were able to defend themselves with their lightsabers. The clones and Jedi made their way to safe ground, before Horns shot one of the Mandalorians out of the sky, forcing the antagonistic Death Watch to retreat.[2]
Utrila and her troops bade a solemn farewell to the fallen Glitch, before departing Draay 2. Before the group were able to return to Coruscant, Omani announced her intention to leave the Jedi Order and return to her homeworld, as she did not feel as though she could pursue the life of a Jedi any further following her experiences on Draay 2 and witnessing the sacrifice of Glitch. Utrila accepted the decision, and told the young Human that her parents should be proud of her. Law then informed the Jedi Master that she was expected on Coruscant—before departing Omani speculated as to what would happen with the Gauntlet of Kressh the Younger, specifically if anyone would be assigned to defend it. Utrila was confident however, that no such measures would need to be taken—what she did not realize was that Glitch had taken the Gauntlet for himself and as such, had survived the temple's destruction. The clone trooper, left alone on Draay 2, affixed the Gauntlet to a heavy rock and threw it into a river.[2]
Another victim of Grievous[]
- "Defend the city, we must."
- ―Yoda


Grievous during the incursion on Coruscant, during which he killed Utrila.
In 19 BBY, the forces of the Confederacy, led by General Grievous descended on the Republic's capital of Coruscant. Supreme Chancellor Palpatine was Grievous's target—Jedi Masters Shaak Ti and Stass Allie had managed to extract Palpatine from his office in the 500 Republica with the assistant of Masters Mace Windu and Kit Fisto, but further assistance was required in getting the Chancellor to his bunker deep within the planet. Master Yoda dispatched Utrila and her fellow Jedi Roth-Del Masona, Roron Corobb and Foul Moudama in a Low Altitude Assault Transport to the Sah'c Canyon to rendezvous with Palpatine and the other masters. As Windu and Fisto departed to pursue Grievous, who was apparently on a heading towards the Senate District, the six remaining Jedi, the Chancellor and his guards departed in the LAAT on a southerly heading, descending deeper into the canyon towards the bunker complex.[1]
Upon reaching the complex, Ti instructed Utrila, Masona, Corobb and Moudama to assist Palpatine's personal Red Guard unit in escorting the Supreme Chancellor to a waiting landspeeder, advising them that she and Allie would accompany them after confirming their arrival with the Jedi Temple. The four Jedi, the Chancellor and his entourage entered a tunnel towards the bunker in the speeder, eventually reaching sanctuary within the heart of the complex. To Utrila and the other Jedi's astonishment, however, the secure door to the bunker opened soon after, revealing Grievous and his IG-100 MagnaGuard bodyguard unit. The Jedi drew their lightsabers as the troops guarding the Chancellor opened fire on the new arrivals to little avail. Grievous activated two of his lightsabers and engaged Utrila and the other Jedi, while the MagnaGuards set about cutting through the troops and Red Guards in the room in order to retrieve Palpatine.[1]
Masona was swiftly decapitated by the droid general, who proceeded to then slay Corobb. A lull in the fighting allowed Utrila and Moudama to step back and appraise the situation briefly, before redoubling their attack on Grievous in unison. The droid general responded by using his in-built repulsorlifts to levitate off the ground and wield two more lightsabers with his feet. Grievous mutilated and felled Moudama quickly, leaving Utrila to battle the general by herself. She was able to strike at the general's droid body several times in the duel, and as such pressed her attack, hoping to remove one of Grievous's limbs. The droid general responded by stabbing Utrila in the heart, killing her instantly. Grievous was able to successfully take Palpatine offworld and hold him on board his flagship, the Providence-class carrier/destroyer Invisible Hand,[1] before the Supreme Chancellor was ultimately rescued by the Jedi Obi-Wan Kenobi and Anakin Skywalker.[7]
Personality and traits[]
- "What's the only thing a Jedi could do, but a Sith would never think to?"
"Of course! Use the Force… but not to attack!" - ―B'ink Utrila and Rennax Omani
As a Jedi Master, B'ink Utrila placed great faith in the power of the Force, allowing it to guide her actions and determine her path when surveying the Jedi Temple on Draay 2. She was of the belief that the Force flowed through all living beings, and that it was natural for a Jedi to refrain from using the Force to attack, another entity, which she identified as a Sith trait. She would constantly utilize real scenarios to help instruct her Jedi Padawan, Rennax Omani, but despaired when the young Human would forget basic teachings from her early days at the Temple. She was nonetheless appreciative and proud of her apprentice's efforts, but acknowledged Omani's desire to leave the Jedi Order after the encounter with the Death Watch and the Gauntlet of Kressh the Younger on Draay 2. Utrila herself had difficulty with the Gauntlet upon coming into contact with it, and was terrified by the Sith artifact's power, to such a degree that she refused to ever touch it again. The Jedi Master was able to acknowledge the power of the Gauntlet, and had faith that the Force would shield it from falling into the wrong hands.[2] Although resolute when facing notorious Jedi killer General Grievous, Utrila displayed palpable fear when faced with the prospect of the droid general wielding four lightsaber blades against her single weapon.[1]
Appearance and attire[]
A red-skinned lethan Twi'lek,[3] Utrila wore the plain robes of a Jedi Master, as well as a simple headpiece.[2]
Powers and abilities[]
- "The Force flows through all living things… with it, we may be able to sense the echoes of those who've come through here before."
- ―B'ink Utrila
B'ink Utrila's command of the Force allowed her to attain the position of Jedi instructor within the Jedi Order.[3] She could use telekinesis to open large doors, manipulate devices such as those in the Draay 2 temple's guardian droid, and summon weapons such as lightsabers to her hands from a distance. She was a wielder of two lightsabers, although she was able to utilize just a single saber in combat if the situation required it,[2] and was wielding one blade as of 19 BBY.[1] Utrila was also adept at deflecting blaster bolts with her lightsaber. Utrila also called on the Force to help her divine danger and detect the movements of those who had walked the same paths as her in the past. To this effect she was able to successfully activate mechanisms in the Draay 2 temple in order to complete her mission. Utrila could also detect the dark side inherent in objects such as the Gauntlet of Kressh the Younger.[2] She was also capable of competing in lightsaber combat, landing blows on General Grievous on Coruscant while defending Supreme Chancellor Palpatine. Utrila lasted longer in the duel than any of the other Jedi involved, before succumbing to Grievous's blades.[1]
Behind the scenes[]
B'ink Utrila first appeared as an unnamed female Twi'lek Jedi in James Luceno's novel Labyrinth of Evil (2005), and was later named in the article "Unknown Soldier: The Story of General Grievous," written by Abel G. Peña for Star Wars Insider 86 (2006). Holocron continuity database official Leland Chee suggested to Peña that the character be consolidated with a depiction of a lethan Twi'lek Jedi instructor in the Power of the Jedi Sourcebook (2002), and provided the character's name.[8] Utrila later appeared as a major character in Justin Aclin's digest comic The Clone Wars: Defenders of the Lost Temple (2013).
Labythinth of Evil's depiction of Palpatine's abduction by Grievous clashes with that shown in "Chapter 24" and "25" of the television series Star Wars: Clone Wars. In Clone Wars, Palpatine is defended in the bunker by Roron Corobb, Foul Moudama, and Shaak Ti—Utrila, Masona, and Allie are not present.
Appearances[]
- The Clone Wars: Defenders of the Lost Temple
- Labyrinth of Evil (First appearance)
Sources[]
- Power of the Jedi Sourcebook (Picture only) (Retcon)
 "Unknown Soldier: The Story of General Grievous" — Star Wars Insider 86 (First identified as B'ink Utrila)
- The Complete Star Wars Encyclopedia
Notes and references[]
- ↑ 1.0 1.1 1.2 1.3 1.4 1.5 1.6 Labyrinth of Evil
- ↑ 2.00 2.01 2.02 2.03 2.04 2.05 2.06 2.07 2.08 2.09 2.10 2.11 2.12 2.13 2.14 2.15 2.16 2.17 2.18 2.19 2.20 2.21 2.22 2.23 2.24 2.25 2.26 The Clone Wars: Defenders of the Lost Temple
- ↑ 3.0 3.1 3.2
 "Unknown Soldier: The Story of General Grievous" — Star Wars Insider 86
- ↑ Star Wars: Knights of the Old Republic Handbook
- ↑ Haazen is revealed as a Sith Acolyte who wielded the Gauntlet of Kressh the Younger in Knights of the Old Republic 33
- ↑
 Star Wars: Clone Wars — "Chapter 23"
- ↑ Star Wars: Episode III Revenge of the Sith
- ↑ "Endnotes for The Story of General Grievous, Part 2: The Knight Slayer" — Only Sith Deal In Absolutes! — Abel G. Peña's StarWars.com Blog (backup link)