Cade Calrayn (talk | contribs) No edit summary Tag: sourceedit |
m (Switching to use /Legends) Tag: apiedit |
||
| Line 62: | Line 62: | ||
Eventually, the [[Hutt/Legends|Hutt]] [[Crime lord/Legends|crime lord]] Jabba Desilijic Tiure came into possession of the B'omarr's temple, bringing with him a motley crew of gamblers, [[Bounty hunter/Legends|bounty hunter]]s, and other criminally active individuals. The B'omarr were not fazed at this development, and continued to live out their lives as before.<ref name="Illustrated" /> The presence of Jabba and his henchmen, however, would make the B'omarr far more involved with the other occupants of their monastery. While many feared the eerie spider droids and gave them a wide berth,<ref name="TessekTale">''[[A Free Quarren in the Palace: Tessek's Tale]]''</ref> some of Jabba's men took an interest in the B'omarr, learning and taking advice from both the embodied and the disembodied monks who frequented the palace.<ref name="BibTale" /><ref name="BuboTale" /> |
Eventually, the [[Hutt/Legends|Hutt]] [[Crime lord/Legends|crime lord]] Jabba Desilijic Tiure came into possession of the B'omarr's temple, bringing with him a motley crew of gamblers, [[Bounty hunter/Legends|bounty hunter]]s, and other criminally active individuals. The B'omarr were not fazed at this development, and continued to live out their lives as before.<ref name="Illustrated" /> The presence of Jabba and his henchmen, however, would make the B'omarr far more involved with the other occupants of their monastery. While many feared the eerie spider droids and gave them a wide berth,<ref name="TessekTale">''[[A Free Quarren in the Palace: Tessek's Tale]]''</ref> some of Jabba's men took an interest in the B'omarr, learning and taking advice from both the embodied and the disembodied monks who frequented the palace.<ref name="BibTale" /><ref name="BuboTale" /> |
||
| − | Although many sought to learn more from the B'omarr, others saw the potential for exploitation, and hired many of the B'omarr as spies. Jabba's period on Tatooine saw many monks abandon their principles and engage in unsavory activities. Some worked for Jabba himself, such as the corrupt monk named [[Grimpen]], who transferred wanted criminals' brains into other bodies, usually unsuspecting monks or any of Jabba's captives.<ref name="GoF" /> Jabba also forced the monks to remove the brains of those who had failed him; they wandered the corridors of the palace aimlessly for years after.<ref name="Illustrated" /> The majority of monks who found themselves working with the palace's criminally minded occupants acted as spies or informants; Jabba's main rival, the [[Whiphid]] Lady Valarian, had at least one B'omarr spy stationed in the palace.<ref name="JQuilleTale" /> The monk was later killed by another spy of Valarian's, [[J'Quille/Legends|J'Quille]], after a misunderstanding. Although the corpse was discovered by one of Jabba's [[Gamorrean/Legends|Gamorrean]] guards, J'Quille managed to persuade him that the monk had in fact entered a trance.<ref name="GartoggTale">''[[And Then There Were Some: The Gamorrean Guard's Tale]]''</ref> Others acted as informants for [[Ephant Mon/Legends|Ephant Mon]]<ref name="EGC" /> and [[Bib Fortuna/Legends|Bib Fortuna]], two of the most prominent members in the Hutt's court.<ref name="BibTale" /> |
+ | Although many sought to learn more from the B'omarr, others saw the potential for exploitation, and hired many of the B'omarr as spies. Jabba's period on Tatooine saw many monks abandon their principles and engage in unsavory activities. Some worked for Jabba himself, such as the corrupt monk named [[Grimpen]], who transferred wanted criminals' brains into other bodies, usually unsuspecting monks or any of Jabba's captives.<ref name="GoF" /> Jabba also forced the monks to remove the brains of those who had failed him; they wandered the corridors of the palace aimlessly for years after.<ref name="Illustrated" /> The majority of monks who found themselves working with the palace's criminally minded occupants acted as spies or informants; Jabba's main rival, the [[Whiphid/Legends|Whiphid]] Lady Valarian, had at least one B'omarr spy stationed in the palace.<ref name="JQuilleTale" /> The monk was later killed by another spy of Valarian's, [[J'Quille/Legends|J'Quille]], after a misunderstanding. Although the corpse was discovered by one of Jabba's [[Gamorrean/Legends|Gamorrean]] guards, J'Quille managed to persuade him that the monk had in fact entered a trance.<ref name="GartoggTale">''[[And Then There Were Some: The Gamorrean Guard's Tale]]''</ref> Others acted as informants for [[Ephant Mon/Legends|Ephant Mon]]<ref name="EGC" /> and [[Bib Fortuna/Legends|Bib Fortuna]], two of the most prominent members in the Hutt's court.<ref name="BibTale" /> |
Much of the information on the B'omarr available to [[The galaxy/Legends|the galaxy]] at large was compiled by [[Shi'ido]] [[Senior Anthropologist]] [[Mammon Hoole]] during Jabba's stay in the B'omarr's domain. On his first visit to the palace, Hoole mingled and interacted with the monks, learning of their beliefs and customs. Hoole, however, left the monks when they offered to guide him to enlightenment.<ref name="Illustrated" /> On his second visit studying the monks, Hoole brought his two surrogate children, [[Tash Arranda|Tash]] and [[Zak Arranda]]. Jabba wanted Hoole to translate an ancient book he had taken from the B'omarr monks, though the visit to the palace proved far more eventful. Tash Arranda's brain was swapped with a criminal's by a corrupt monk, though it was eventually restored to her body and Hoole managed to escape with the children.<ref name="GoF" /> |
Much of the information on the B'omarr available to [[The galaxy/Legends|the galaxy]] at large was compiled by [[Shi'ido]] [[Senior Anthropologist]] [[Mammon Hoole]] during Jabba's stay in the B'omarr's domain. On his first visit to the palace, Hoole mingled and interacted with the monks, learning of their beliefs and customs. Hoole, however, left the monks when they offered to guide him to enlightenment.<ref name="Illustrated" /> On his second visit studying the monks, Hoole brought his two surrogate children, [[Tash Arranda|Tash]] and [[Zak Arranda]]. Jabba wanted Hoole to translate an ancient book he had taken from the B'omarr monks, though the visit to the palace proved far more eventful. Tash Arranda's brain was swapped with a criminal's by a corrupt monk, though it was eventually restored to her body and Hoole managed to escape with the children.<ref name="GoF" /> |
||
Revision as of 15:15, 9 July 2016
| | |
Warning: This infobox has missing parameters: affiliation, restore and unrecognized parameters: era, members, imageBG
- "You have progressed rapidly on your spiritual path, Brother Fortuna. Your quest is at an end. Prepare yourself for enlightenment."
- ―B'omarr Monk, to Bib Fortuna
The B'omarr Order, which consisted of the B'omarr Monks, was a mysterious religious order that moved to the planet Tatooine around 700 BBY. The B'omarr believed that cutting themselves off from all physical sensation would further their studies, and allow them to ponder the galaxy and achieve enlightenment. When a monk became enlightened, his brain was removed through a special procedure, and was placed in a nutrient-filled jar. The brains were held in very high regard by the lower, embodied monks, who saw to their every need, though the brains rarely did anything other than think and wonder. When they did need to travel around their monastery on Tatooine, the brains were transferred into specially modified BT-16 perimeter droids.
The order was established sometime prior to 700 BBY, though they transported their followers to Tatooine soon thereafter. They constructed a giant monastery, where they lived for centuries, though they were rarely the only inhabitants; over the years, many bandits and criminals occupied the palace, including Alkhara and Jabba Desilijic Tiure. After Jabba's death in 4 ABY, the monks took their palace back by force, recruiting new members without their consent. They then locked up Jabba's Palace and continued to practice their beliefs for many years.
Practices and beliefs
- "I'm not sure anyone pretends to understand the B'omarr Order. From what I've heard, when they reach their greatest state of enlightenment, each monk undergoes some kind of surgery that removes his brain and places it in a life-support jar. It keeps them from being distracted by physical diversions, leaving them to ponder the great mysteries."
- ―Luke Skywalker, on the B'omarr Order
The B'omarr centered their religion on isolating themselves from all feeling and emotion, so they could focus and enhance the power of their minds. They embarked on mental journeys that were impossible to comprehend while one was focused on the physical world.[1] The B'omarr cared little for personal comforts and wore the simplest of garments. As a monk came closer and closer to enlightenment, he began to shed the use of speech,[4] preferring to communicate either with solitary words or images, which the monks alone could fully understand. Other B'omarr were able to telepathically communicate, speaking directly into the subject's mind. Eventually, a monk would require none of his senses, at which point he was said to have achieved enlightenment.[1] The monks were also adept healers, and offered aid to any who stumbled upon any of their outposts on Tatooine.[12]
There were several stages that marked the spiritual growth of a B'omarr monk; after each stage, a monk was given a test to check his knowledge of the subject. There were many different types of tests: some were designed to gauge a monk's understanding of logic, others to test one's knowledge of sacred B'omarr texts, and others still determined a monk's ability to cut himself off from the physical world, by putting him through painful tasks and observing how much pain he felt.[8] Eventually, after many years of study and practicing distancing himself from the physical world,[1] as well as successfully completing each stage's test,[8] a monk would become enlightened; he had pure mental power, and was at peace with the cosmos. As enlightened monks no longer required their bodies, lesser monks would help them shed their body through surgical means. After their enlightened brain was carefully removed, the monks were transferred into a nutrient-filled jar, freed from the distractions of life.[1] The process of removing a monk's brain was very delicate, and the surgeons had to be extremely well-trained and careful when performing the transplant. They made use of reliable anesthesia to ensure the process was painless, and through experience, as well as various forms of apparatuses developed over the centuries, the monks were able to keep the brain functioning and alive long enough to transfer it into a nutrient jar. One small mistake and the brain was lost; they were usually discarded along with the lifeless body, before being eventually disposed of.[4]
Occasionally, however, a monk's brain would be removed before he had truly achieved enlightenment. Assuming the operation went well, the monk would survive, though there were several side effects. The separation of the body and the brain could often induce psychosis, and the brain would then mentally scream, usually for days on end, without pausing for breath. Monks going through this transition were generally kept separate from the other disembodied monks, whom they usually disturbed. Eventually, in most cases, the brain would cease to scream, and could be returned to where the rest of the brains were located. Although incredibly rare, a brain could be transplanted back into a body, be it the monk's original body or that of someone or something else. However, the B'omarr had little technology to aid this procedure, so it was considerably more dangerous than the original process. For this reason, as well as the fact that the majority of monks were at peace when separated from their bodies, this was not widely practiced by the B'omarr.[4]


A BT-16 spider droid.
After a successful operation, brains were transferred to the Great Room of the Enlightened, where they sat on shelves, meditating and pondering the infinite for centuries.[7] The names of the enlightened ones were documented in the B'omarr Registry, a thick manuscript which included some of their greatest philosophical ideas, ponderings, and musings.[13] With their every need catered to by the embodied monks, the enlightened brains rarely had use for moving around the monastery, though they did have means to do so when necessary: BT-16 perimeter droids.[4] These droids were reported to have been designed by the B'omarr themselves, though similar models were in existence almost four thousand years earlier.[14] The BT-16 droids possessed only the simplest of processors and technology; their main function was to react to the enlightened monks' telepathic messages. The droids would travel to the Great Room of the Enlightened at a monk's request and transfer a monk's brain-jar into a brain support unit, which was at the center the droid's legs. The brain support unit allowed the monks to survive without being connected to the special equipment in the deepest parts of the citadel,[4] though they were initially difficult to use, and most monks preferred to stay in their jars.[7] Towards the time of the Galactic Civil War, embodied monks began to experiment with the walkers, resulting in several of the newer models bearing five or six legs.[4] The spiders would rarely leave the monastery, though some were known to roam the deserts surrounding the citadel, attacking anyone they came into contact with.[15]
The B'omarr acolytes rarely congregated or spoke to each other, though they occasionally gathered in tea rooms, where they consumed their only form of nourishment whatsoever—potent teas made from strong herbs. These meetings rarely lasted long, the monks busy attempting to further their studies and understanding of the mind.[1] Although part of the teaching of the B'omarr stated that possessions and comforts were unnecessary distractions, many monks veered from the order's way,[16] accepting bribes to spy on the palace's criminal occupants.[17] During Jabba Desilijic Tiure's time in their place of worship, many B'omarr acted as spies, while some were even on the payroll of his greatest rival, Lady Valarian.[16]
History
- "Centuries before a few hardy colonists arrived to scrape out a living in the desert, the mysterious religious order of the B'omarr monks moved their followers to Tatooine. Out in the harsh wastelands, the monks sought a place of suitable isolation among the crags; there, over the generations, the monks carved for themselves a labyrinthine palace of grim solitude."
- ―Mammon Hoole documents the B'omarr's arrival on Tatooine
The details surrounding the founding of the B'omarr were largely unknown, though their practices did change throughout the centuries. The order originally consisted only of Humans,[4] though in time it encompassed a great many species.[1] They had sought a world where they would be met with little distraction from any settlers, eventually choosing the monastery that one day became Jabba's Palace, in the desert world of Tatooine,[4] in the Outer Rim Territories. At some point, they also lived in a monastery on the Wild Space world of Teth[2] and had established a Temple on the Mid Rim world of Danuta.[3] Tatooine was inhabited by no one but primitive salvagers, and was forgotten by the records of the Galactic Republic. The leaders of the order relocated their followers to Tatooine, arriving in about half a dozen cargo ships, which were the basis for the colossal structure they built in the planet's Dune Sea. Their structure slowly adapted to the planet's climate; the monks built a roof after they encountered their first Tatooine windstorm, while the building was enclosed after their first encounter with the Tusken Raiders.[4] Many rumors surrounded the citadel; it was even said that the monks received help from the Tusken Raiders when building it, though these were simply unproved legends.[1]
The B'omarr kept to themselves for the next few centuries, though civilization began to grow on Tatooine, with several small towns being established. Eventually, the palace became a haven for a small number of bandits and criminals, who used it as both a hideout and a shelter in the middle of the barren desert. The monks were happy to accommodate the bandits, though they ensured that the deepest parts of the citadel were reserved for housing the brains of the enlightened monks. Around one hundred and fifty years after they moved to Tatooine, the period of B'omarr isolation ended. A well-known pirate named Alkhara, who had incurred the wrath of both the local Tusken population and the Human authorities, sought refuge in the B'omarr's palace. Alkhara and his followers were welcomed with open arms by the monks, and quickly made the building their base of operations.[4]
A B'omarr healer.
Eventually, the Hutt crime lord Jabba Desilijic Tiure came into possession of the B'omarr's temple, bringing with him a motley crew of gamblers, bounty hunters, and other criminally active individuals. The B'omarr were not fazed at this development, and continued to live out their lives as before.[1] The presence of Jabba and his henchmen, however, would make the B'omarr far more involved with the other occupants of their monastery. While many feared the eerie spider droids and gave them a wide berth,[18] some of Jabba's men took an interest in the B'omarr, learning and taking advice from both the embodied and the disembodied monks who frequented the palace.[7][5]
Although many sought to learn more from the B'omarr, others saw the potential for exploitation, and hired many of the B'omarr as spies. Jabba's period on Tatooine saw many monks abandon their principles and engage in unsavory activities. Some worked for Jabba himself, such as the corrupt monk named Grimpen, who transferred wanted criminals' brains into other bodies, usually unsuspecting monks or any of Jabba's captives.[8] Jabba also forced the monks to remove the brains of those who had failed him; they wandered the corridors of the palace aimlessly for years after.[1] The majority of monks who found themselves working with the palace's criminally minded occupants acted as spies or informants; Jabba's main rival, the Whiphid Lady Valarian, had at least one B'omarr spy stationed in the palace.[16] The monk was later killed by another spy of Valarian's, J'Quille, after a misunderstanding. Although the corpse was discovered by one of Jabba's Gamorrean guards, J'Quille managed to persuade him that the monk had in fact entered a trance.[19] Others acted as informants for Ephant Mon[17] and Bib Fortuna, two of the most prominent members in the Hutt's court.[7]
Much of the information on the B'omarr available to the galaxy at large was compiled by Shi'ido Senior Anthropologist Mammon Hoole during Jabba's stay in the B'omarr's domain. On his first visit to the palace, Hoole mingled and interacted with the monks, learning of their beliefs and customs. Hoole, however, left the monks when they offered to guide him to enlightenment.[1] On his second visit studying the monks, Hoole brought his two surrogate children, Tash and Zak Arranda. Jabba wanted Hoole to translate an ancient book he had taken from the B'omarr monks, though the visit to the palace proved far more eventful. Tash Arranda's brain was swapped with a criminal's by a corrupt monk, though it was eventually restored to her body and Hoole managed to escape with the children.[8]
Occasionally, Jabba interacted with the monks, allowing them access to prisoners they dubbed "interesting." One such event occurred when Han Solo was imprisoned following his release from carbonite, and he consented to tell his story to a young monk.[6]
In 4 ABY, Jabba Desilijic Tiure was killed by Princess Leia Organa aboard his sail barge above the Great Pit of Carkoon, with most of his henchmen dying in the destruction of the Khetanna. Many of Jabba's former allies scrambled to pick up the pieces of the Hutt's criminal empire and claim it for themselves; the B'omarr took this opportunity to emerge from the shadows of their monastery, recruiting many new members by force, and killing those that resisted. Among the new "initiates" was Bib Fortuna, Jabba's former majordomo.[7] The B'omarr remained in the palace, and although several attempts to make use of the vast building were made, the monks remained mostly in solace for many years.[11]
For over twenty years after Jabba's demise, various thieves—among them agents of Lady Valarian, Jabba's old rival—arrived at the B'omarr monastery, hoping to plunder whatever wealth remained from Jabba's reign. The B'omarr were far too numerous for any petty criminals to fight off, so their ranks swelled considerably when thief after thief was enlightened, their brains placed in jars. In order to encourage more robbers to arrive, thus giving them further subjects to induct into their order, the monks allowed several to leave the Palace unharmed, taking with them hoards of Jabba's valuables. These stories attracted many more visitors; the B'omarr let none of them escape.[4]
Locations
The Tatooine Monastery

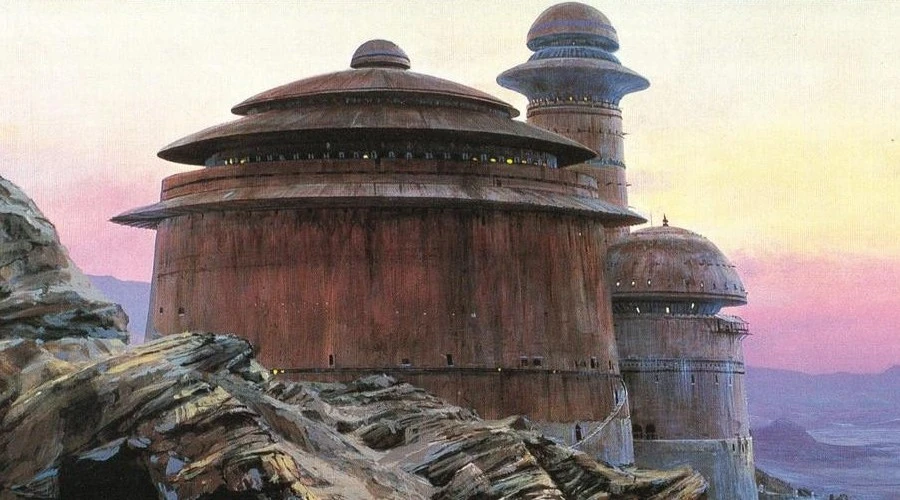
The palace built by the B'omarr, in the Dune Sea.
The palace which was later known as Jabba's Palace was built by the B'omarr approximately seven hundred years before the Battle of Yavin. Located in the Dune Sea, the palace was originally a simple construction made out of the chassis of several freighters, though after attacks by the vicious natives, the monks decided to build a more secure place for their studies. They built a huge round palace, which stood for several centuries, with many types of criminals and bandits occupying it, though the B'omarr always remained, lurking in the deepest and darkest portions of the citadel.[4] Whenever a new band of mercenaries took over the building, they added to the complex building, constructing an observation tower, sewer systems, and even a series of subterranean tunnels.[1] Eventually, the palace came into the possession of Jabba the Hutt, who had his main architect tweak it to suit his needs.[20]
Jabba had his architect, Derren Flet, make many adjustments, though he was ultimately unhappy with the lack of prison space, and had Flet killed.[20] The Hutt gangster had a vast hangar and garage—used to house his many pleasure yachts and sail barges—built beside the original palace,[1] as well as stables used to keep his many vicious pets, which included the fearsome rancor. Jabba also installed a vigilant security system, and could locate any potential visitors from up to ten kilometers away. The hub of the palace during Jabba's time was his massive throne room, which housed his accountants, assassins, bounty hunters, and various other unsavory individuals.[20]
After Jabba's death, the palace was turned into the Tatooine Retirement Home for Aged Aliens, though a shortage of government funds allowed the B'omarr to remain alone in the palace once again. Jabba's father Zorba became the owner.[21]
The Teth Monastery


The Teth Monastery
At some point, the Order constructed and lived in a monastery on the jungle world of Teth, on the top of a large mesa. It shared many design features with the Tatooine monastery and like that, had a throne room.[2] It also had a room that housed a jungle rancor.[22]
By the time of the Clone Wars, the monastery had long been abandoned. During the conflict, the captured Huttlet Rotta was taken to the monastery by the Confederacy of Independent Systems. The Galactic Republic sent a group of clone troopers, as well as the Jedi Knight Anakin Skywalker and his Padawan Ahsoka Tano, to free the baby Hutt, which instigated the Battle of Teth in and around the monastery.[2]
The Danuta Temple
At some point, the Order also established a temple in the city of Trid on Danuta, which was primarily populated by Hutts during the days of the Old Republic, but later went under control of the Galactic Empire.[23] Like thousands of other religions within the Empire, the monks were tolerated by the Imperials as long as they remained apolitical.[24] In addition to embodied and disembodied monks who lived within the Temple, some supporters of their religion lived within the city of Trid and only visited the Temple during the regular ceremonies and prayers. One such visitor was Meck Odom, an Imperial officer whose position in the Imperial Military forced him to keep his religious beliefs a secret.[3]
Other locations
The B'omarr had several other places of worship on Tatooine, though none were as famous or well used as Jabba's Palace. The B'omarr outpost was situated very near to Jabba's Palace, and was the home of the Most Perfect Order of K'vin.[25] Another location was the Citadel of B'omarr; similar in design to the B'omarr Monastery, the citadel was the home of both embodied and enlightened monks. The citadel was also an outpost for those needing medical attention, who would always be treated by the embodied B'omarr healers. The healers made no distinction between patients who had been injured in the line of illegal activities and those who were not, offering their help and expertise to all who sought it.[12] Although the connection between it and the order is unknown, the B'omarr Flats were a large expanse of land, located near the Great Mesra Plateau. The Great Pit of Carkoon was located in the flats.[26]
Notable members
Bib Fortuna's brain, located in his spider droid, alongside Firith Olan.
Evilo Nailati was a B'omarr monk who had had his brain removed some time before or during the reign of the Galactic Empire. He was extremely different to most other members of the B'omarr, in that he did not seek abstract concepts such as "truth" and "enlightenment," but rather, he longed to amass as much knowledge as possible. Knowing his efforts would not last long in his original body, he joined the monks, eventually being deemed "enlightened" by the senior monks. After then, he took a frog-dog named Buboicullaar as an underling of sorts, teaching him of the galaxy. Bubo's species were thought brutish and unintelligent, though in truth they were capable of extraordinary intellect, though they kept it a secret. For years before he wound up on Tatooine, Bubo was a spy and an assassin, and was eventually part of a plot on Jabba's life. He took an interest in the B'omarr, and after the Hutt's death, willingly allowed them to transfer his brain into a jar.[5]
Sai'da was a keen B'omarr historian, with a particular interest for information from the outside world. This isolated him from the other monks, who felt that his time would be better spent contemplating the infinite. Nevertheless, he continued studying as a historian, and became very knowledgeable in the Galactic Civil War. When one of the most prominent players in that war, Han Solo, found himself jailed in Jabba's dungeon, Sai'da could not resist the temptation to speak with him. Sai'da acquired entry into Solo's cell; in return for the Rebel's life story, Sai'da would have to ensure that his companion, Leia Organa, was safe. He agreed, and left their meeting thinking of concepts like companionship, bravery, and humor, to which he had offered little thought previously.[6]
A disembodied brain calling himself K'vin was the leader of the Most Perfect Order of K'vin, which he claimed the B'omarr Order was a splinter sect of; in truth, he had left the order to start his own. K'vin lived on Tatooine at the B'omarr outpost, and like the B'omarr, his order had their brains removed so they could ponder the infinite for ever more. K'vin, however, sought more; when a bounty hunter entered his temple searching for Han Solo, the brain pleaded with the bounty hunter to shoot his vat, which would free him and expand his knowledge of the universe. Despite the efforts of the other monks, the bounty hunter did; K'vin's brain died soon thereafter.[25]
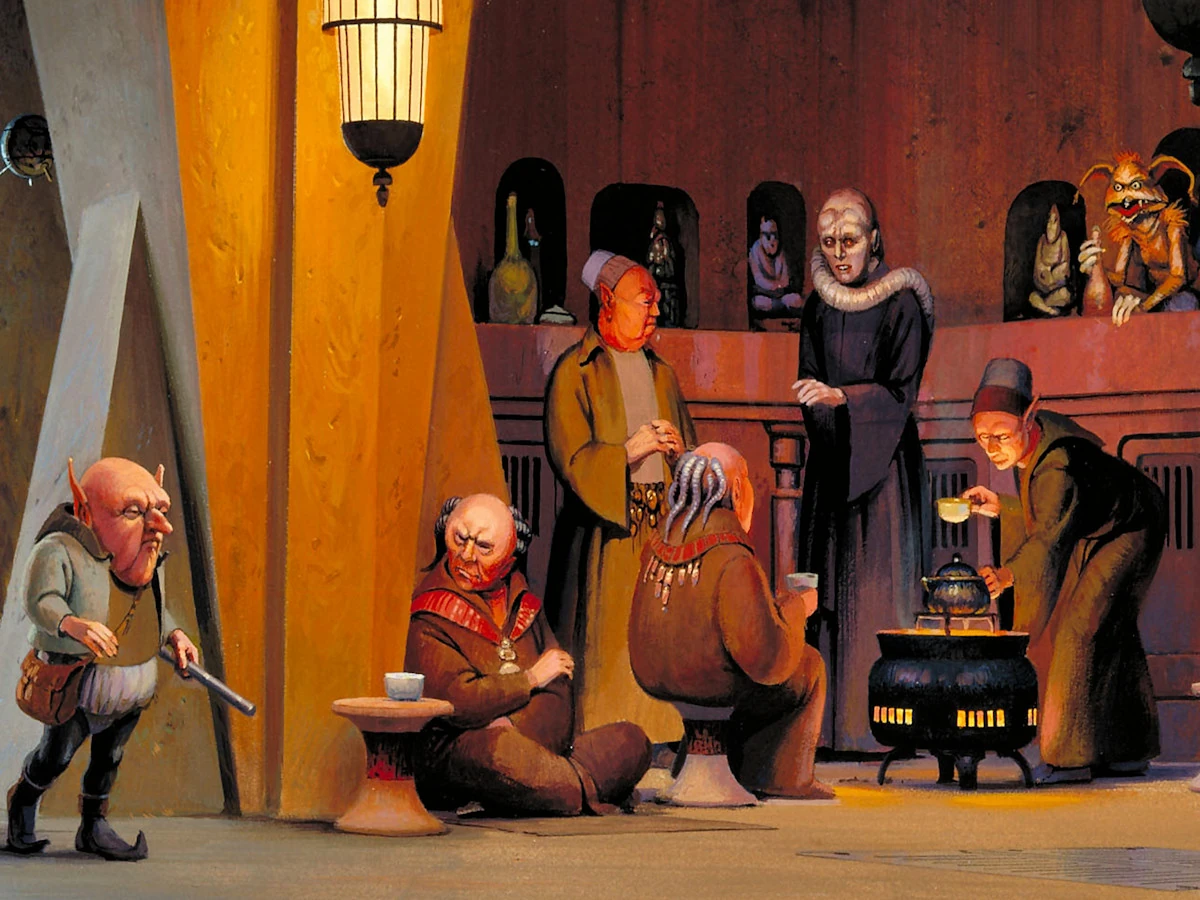

Salacious B. Crumb spies on Bib Fortuna and several embodied B'omarr.
Hedon Istee left the order after being branded a "sensualist," taking with him a sacred scroll belonging to the B'omarr. The monks were unhappy, and sent one of the less law-abiding occupants of Jabba's Palace after Istee, to take back the scroll. Fearing for his safety, Istee hired a spacer to defeat the Gamorrean sent after him. The spacer succeeded, and was paid 3,000 credits for his efforts. The B'omarr, however, resorted to more extreme measures, and had a bounty hunter attempt to track down Istee, though, like before, the spacer managed to defeat him. Eventually, Istee buckled under the pressure, though, and had the spacer return the scroll to the B'omarr citadel.[27]
Meck Odom was already interested in the B'omarr Order during his time as a Cadet in the Academy of Carida, though his position in the Galactic Empire forced him to keep his beliefs a secret. After his graduation, he was assigned to the Trid research facility on Danuta and began secretly visiting the B'omarr Temple located there, participating in their ceremonies. Shortly before the Battle of Yavin, his best friend and former roommate Kyle Katarn was sent by the Alliance to Restore the Republic on a mission to steal the partial set of Death Star plans from the research facility. Using his knowledge on Odom's beliefs, he was able to contact him through the help of the B'omarr Monks and convinced him to help him steal the plans of the battlestation.[3]
Bib Fortuna was always interested by the B'omarr, and used them as informants during his time in Jabba's Palace. He was not ready to have his brain removed after his master's death, however, though the B'omarr monks did so regardless; Fortuna's brain screamed for days, though eventually he adjusted. Fortuna longed to escape, as did his friend and fellow B'omarr, Nat Secura. Nat had been sentenced to death by Jabba the Hutt; desperate to save his friend, Bib had the B'omarr remove Nat's brain.[7] Eventually, Fortuna had his brain transplanted into the body of Firith Olan, and escaped the monastery.[28]
Jabba's Quarren accountant Tessek had no interest in joining the B'omarr, though he was forced to when they recaptured their palace. Tessek was transferred to a brain walker, though he found that he had far more freedom in his new life.[18] J'Quille was another of Jabba's henchmen that joined the order, though he did so by his own choice. A former lover of Lady Valarian, J'Quille had been sent to Jabba's Palace to assassinate the Hutt, though he soon found himself without the means to do so.[16] After Jabba's death, Valarian was furious at J'Quille, and promised him she would put a bounty on his head if he ever left Tatooine. Confined to a life of misery under Tatooine's hot suns, J'Quille opted to join the B'omarr, knowing he would not survive long if he attempted to flee Tatooine.[29]
Behind the scenes
The B'omarr first appeared in Return of the Jedi, in the form of brains attached to spider droids. The droids were based upon sketches by Ralph McQuarrie, which later appeared in The Illustrated Star Wars Universe. Although they first appeared in Return of the Jedi, the B'omarr played a minor role: they only appeared in the form of brain spiders, and were not given their name. The Illustrated Star Wars Universe was the first Star Wars work that named them, and it also provided much of the information known about the order.
The B'omarr were labeled as among "The Bad" in Who's Who in Jabba's Palace, an article appearing in Star Wars Insider 60. The B'omarr have generally been portrayed as neither villains nor heroes, though in Galaxy of Fear: The Brain Spiders, they play a more sinister role.
Disembodied brains in analogous devices to those of the B'omarr Monks have appeared in a number of other sources, such as Wanted by Cracken (seen here), Shadows and Light, and Star Wars: Empire: Idiot's Array; however, these have not been tied to the order canonically.
In the non-canon video games LEGO Star Wars II: The Original Trilogy and LEGO Star Wars: The Complete Saga, B'omarr spider droids wander around Jabba's Palace and can be used as mountable rides.
Appearances
Sources
- Star Wars: The Power of the Force (1995)
 Star Wars Customizable Card Game — Jabba's Palace Limited (Card: B'omarr Monk) (backup link)
- The Essential Guide to Characters
- The Far Orbit Project (Picture only)
- The Illustrated Star Wars Universe
- "Who's Who in Jabba's Palace" — Star Wars Insider 60
- Star Wars Miniatures: Universe
- Secrets of Tatooine
- Handbook 1: X-Wing Rogue Squadron
- Star Wars: The Action Figure Archive
- The Official Star Wars Fact File 7 (BOM1-2, B'omarr Brain Walker)
- The Official Star Wars Fact File 136 (Surgical Technology)
- "Secrets of Mos Eisley" — Star Wars Gamer 7
- "The Anzati" — Star Wars Gamer 1
- Hero's Guide
- Star Wars Galaxies: An Empire Divided Quick Reference Guide
- Star Wars Saga (Pack: Jabba's Palace Court Denizens) (backup link (sw04ultradenizens.asp) not verified!)
- Inside the Worlds of Star Wars Trilogy
- Star Wars: The Ultimate Visual Guide
- Star Wars: Complete Locations
- Star Wars Galaxies: The Total Experience: Prima Official Game Guide
- Star Wars: The Official Starships & Vehicles Collection 6
- Star Wars: The Official Starships & Vehicles Collection 7
- Star Wars: The Clone Wars: The Visual Guide
- Star Wars Galaxies Trading Card Game — Champions of the Force (Card: B'omarr Monk Greeter) (backup link)
- "25 Years of Return of the Jedi!" — Star Wars Insider 105
- Star Wars Galaxies Trading Card Game — Squadrons Over Corellia (Card: B'omarr Monk) (backup link)
- Star Wars Galaxies Trading Card Game — Squadrons Over Corellia (Card: B'omarr Monk Vendor) (backup link)
- The Complete Star Wars Encyclopedia
- The Clone Wars Campaign Guide
- Rebellion Era Campaign Guide
- The Essential Atlas
- Star Wars: The Official Starships & Vehicles Collection 26
- "A Long Time Ago, In a Toy Aisle Not So Far Away...." — Star Wars Insider 120 (Picture only)
- Star Wars Character Encyclopedia
- Bib Fortuna in the Databank (content now obsolete; backup link)
- Jabba the Hutt in the Databank (content now obsolete; backup link)
- Jabba the Hutt's Palace in the Databank (content now obsolete; backup link)
- Rotta the Hutt in the Databank (content now obsolete; backup link)
- Tessek in the Databank (content now obsolete; backup link)
- Twilight in the Databank (content now obsolete; backup link)
- Star Wars: The Ultimate Visual Guide: Updated and Expanded
- The Essential Reader's Companion
.JPG)
.JPG)
.JPG)
Notes and references
- ↑ 1.00 1.01 1.02 1.03 1.04 1.05 1.06 1.07 1.08 1.09 1.10 1.11 1.12 1.13 The Illustrated Star Wars Universe
- ↑ 2.0 2.1 2.2 2.3 2.4 Star Wars: The Clone Wars film
- ↑ 3.0 3.1 3.2 3.3 3.4 Dark Forces: Soldier for the Empire audio drama
- ↑ 4.00 4.01 4.02 4.03 4.04 4.05 4.06 4.07 4.08 4.09 4.10 4.11 4.12 Secrets of Tatooine
- ↑ 5.0 5.1 5.2 5.3 Tongue-tied: Bubo's Tale
- ↑ 6.0 6.1 6.2 Star Wars Journal: Hero for Hire
- ↑ 7.0 7.1 7.2 7.3 7.4 7.5 7.6 Of the Day's Annoyances: Bib Fortuna's Tale
- ↑ 8.0 8.1 8.2 8.3 8.4 Galaxy of Fear: The Brain Spiders
- ↑ Star Wars: Republic: Outlander
- ↑ Star Wars: Episode VI Return of the Jedi
- ↑ 11.0 11.1 Darksaber
- ↑ 12.0 12.1 The Jabba Tape
- ↑
 "Secrets of Mos Eisley" — Star Wars Gamer 7
- ↑ "Shadows and Light" — Star Wars Tales 23
- ↑ Star Wars: Galactic Battlegrounds: Clone Campaigns
- ↑ 16.0 16.1 16.2 16.3 Let Us Prey: The Whiphid's Tale
- ↑ 17.0 17.1 The Essential Guide to Characters
- ↑ 18.0 18.1 A Free Quarren in the Palace: Tessek's Tale
- ↑ And Then There Were Some: The Gamorrean Guard's Tale
- ↑ 20.0 20.1 20.2 Jabba the Hutt's Palace in the Databank (content now obsolete; backup link)
- ↑ Zorba the Hutt's Revenge
- ↑ Star Wars: The Clone Wars (junior novelization)
- ↑ "Kyle Katarn's Tale, Mission 2" (original article link) on Wizards.com (content now obsolete; backup link)
- ↑ Dark Forces: Soldier for the Empire
- ↑ 25.0 25.1 Star Wars Missions 5: The Hunt for Han Solo
- ↑ Inside the Worlds of Star Wars Trilogy
- ↑ Star Wars Galaxies
- ↑ Star Wars: X-Wing Rogue Squadron: Battleground: Tatooine
- ↑ Epilogue: Whatever Became Of...?
External links
- Along Came a Monk on Hyperspace (content removed from StarWars.com and unavailable)
- Along Came a Spider on Hyperspace (content removed from StarWars.com and unavailable)
- B'omar on Memory Alpha