m (5.1 Corrected spelling/grammar) |
|||
| Line 87: | Line 87: | ||
As the rest of the Rebel fighters engaged Vader's forces, three [[Y-wings]] from [[Gold Squadron]] began their attack run on the trench. They were followed by Vader in his [[TIE/Advanced starfighter|TIE/Advanced]] and two [[TIE fighter]] escorts. Vader shot down [[Tiree]] (Gold Two) and [[Jon Vander]] (Gold Leader) in the trench, then shot down [[Davish Krail]] (Gold Five) as he attempted to escape.<ref name="ANH" /> |
As the rest of the Rebel fighters engaged Vader's forces, three [[Y-wings]] from [[Gold Squadron]] began their attack run on the trench. They were followed by Vader in his [[TIE/Advanced starfighter|TIE/Advanced]] and two [[TIE fighter]] escorts. Vader shot down [[Tiree]] (Gold Two) and [[Jon Vander]] (Gold Leader) in the trench, then shot down [[Davish Krail]] (Gold Five) as he attempted to escape.<ref name="ANH" /> |
||
| − | A second bombing run was made by [[Red Squadron (Rebel Alliance)|Red Squadron]], with [[Garven Dreis]] (Red Leader) making the attack itself, while Red 10 and Red 12 attempted to hold off Vader and his fighters. While both his companions were shot down, Red Leader succeeded in making the run, but his proton torpedoes exploded on the exhaust port's surface.He ordered [[Luke Skywalker|Luke]] (Red Five), [[Biggs Darklighter|Biggs]] (Red 3), and [[Wedge Antilles|Wedge]] (Red 2) to make a third run shortly before Vader shot him down.<ref name="ANH" /> |
+ | A second bombing run was made by [[Red Squadron (Rebel Alliance)|Red Squadron]], with [[Garven Dreis]] (Red Leader) making the attack itself, while Red 10 and Red 12 attempted to hold off Vader and his fighters. While both his companions were shot down, Red Leader succeeded in making the run, but his proton torpedoes exploded on the exhaust port's surface. He ordered [[Luke Skywalker|Luke]] (Red Five), [[Biggs Darklighter|Biggs]] (Red 3), and [[Wedge Antilles|Wedge]] (Red 2) to make a third run shortly before Vader shot him down.<ref name="ANH" /> |
Like the previous run, Luke made the actual attack, while Biggs and Wedge covered for him. Once again, Vader and his escorts moved in to intercept the [[X-Wings]]. Wedge was hit and forced to disengage, while Biggs was killed when his starfighter was shot down, leaving Luke alone with Vader in the trench. |
Like the previous run, Luke made the actual attack, while Biggs and Wedge covered for him. Once again, Vader and his escorts moved in to intercept the [[X-Wings]]. Wedge was hit and forced to disengage, while Biggs was killed when his starfighter was shot down, leaving Luke alone with Vader in the trench. |
||
Revision as of 17:55, 3 January 2012
| | |
Warning: This infobox is missing the following parameters: unit2, civilian, unit1
- "This will be a day long remembered. It has seen the end of Kenobi; it will soon see the end of the rebellion."
- ―Darth Vader
The Battle of Yavin was a major battle of the Galactic Civil War that led to the destruction of the first Death Star and Luke Skywalker's first step to becoming a fully-fledged Jedi. It was one of the Rebellion's first major victories.
Prelude
- "Any attack made by the Rebels against this station would be a useless gesture, no matter what technical data they've obtained."
- ―Conan Motti
With the imminent completion of the Death Star, the Alliance anticipated a major Imperial offensive. To unify command coordinate a defense, the Mon Calamari Star Cruiser Independence carried members of the Alliance High Command to Yavin 4.[1] Upon arrival, the Independence sent Red, Gold and Blue Squadron to Yavin Base. Their numbers were augmented by veteran pilots as the Alliance gathered its resources in preparation for the coming battle.[2]
Jan Dodonna briefs rebel pilots on the Death Star plans.
Battle plans were completed after the crew and passengers of the Millennium Falcon successfully rescued Princess Leia Organa from the Death Star, along with detailed technical plans of the massive space station. To facilitate their escape,Obi-Wan Kenobi had confronted his former Padawan and Leia's father, Darth Vader, and sacrificed himself in the process.[3]
However, as Leia suspected, the Empire allowed them to escape after planting a homing beacon aboard the Millennium Falcon, thus leading Imperial forces to the previously hidden main Rebel base on Yavin 4.[3]
Studying the plans provided by R2-D2, the Rebels learned that the station had a small exhaust port by which a well-placed proton torpedo could reach the main reactor and destroy the station. However, the port was only 2 meters wide and situated in a narrow trench protected by turbolaser batteries. The trench would have to be navigated to allow the Rebel targeting system to lock on to the port, and perfect accuracy was required for the torpedo to enter the exhaust port. Under such conditions, there was little confidence that the weakness could be exploited.[3]
Battle
- "Lock S-foils in attack position."
- ―Garven Dreis

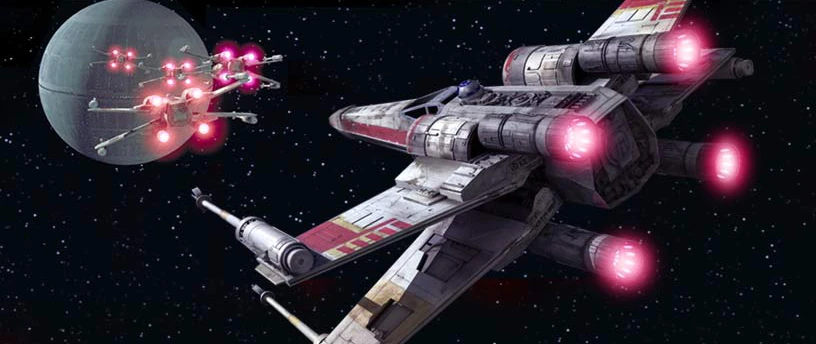
Rebel X-wings commence their attack run on the Death Star
The Death Star arrived in system escorted by a small support fleet consisting of the Nebulon-B frigate Divad and two CR90 corvettes BB 45 and SB 35. While the Death Star prepared to fire its main weapon, a communications satellite was deployed to coordinate defenses. The Rebels, still planning their attack, knew that any delay to the Death Star's approach could spell the difference between victory and defeat. Therefore they planned a small attack to destroy the communications satellite and disrupt operations. A trio of X-wings, including Keyan Farlander, and a pair of R-22 Spearheads were dispatched to destroy the comsat. While Farlander's wingmen held off Imperial fighters, Farlander ignored the threat and headed straight for the satellite, destroying it with a proton torpedo. The mission was a success, preventing the Empire calling for reinforcements and disrupting their defenses, although two of the Rebel X-wings were shot down and the pilots had to be rescued later.[2]
Farlander was quickly dispatched again in one of two X-wings charged with clearing some of the defenses around the trench. They succeeded in destroying several laser batteries as well as some small surface hangars, limiting the Death Star's ability to launch fighters.[2]
Meanwhile, down on the ground X2, Shara, and other Rebel soldiers fought off Imperials attacking from space, preventing them from taking the Great Temple.
The Trench Run
- "We've analyzed their attack, sir, and there is a danger. Should I have your ship standing by?"
"Evacuate? In our moment of triumph? I think you overestimate their chances!" - ―Moradmin Bast and Wilhuff Tarkin
Following the preliminary attacks, a fleet of 22 X-wing, 8 Y-wing, and 2 R22 Spearhead starfighters scrambled to assault the station. The Death Star attempted to use its batteries to defend itself, but the defenses were designed primarily to fight off capital ships, not the small and agile Rebel ships. The fighters destroyed several turrets and a rookie hotshot known as Rookie One destroyed a giant ion cannon mounted on the Station, in order to set the stage for the main phase of the assault.[4]
However, although they managed to infiltrate the Death Star, they needed to destroy the deflector shield towers onboard the Death Star protecting the trench.[5]


Turbolasers defend the Death Star during the Battle of Yavin
The station commander, Grand Moff Wilhuff Tarkin, dismissed the attack as futile and refused to deploy the station's vast TIE squadrons. But Darth Vader, realizing the material threat, ordered his personal fighter squadron to scramble on his own authority. The TIE Fighter squadrons attacked the Rebel forces soon after they realized that their laser batteries were failing. An order was passed on, to stop all turbolasers from firing, letting the TIEs do the job, and to avoid the risk of Imperial fighters being shot down by friendly fire.[3]
As the rest of the Rebel fighters engaged Vader's forces, three Y-wings from Gold Squadron began their attack run on the trench. They were followed by Vader in his TIE/Advanced and two TIE fighter escorts. Vader shot down Tiree (Gold Two) and Jon Vander (Gold Leader) in the trench, then shot down Davish Krail (Gold Five) as he attempted to escape.[3]
A second bombing run was made by Red Squadron, with Garven Dreis (Red Leader) making the attack itself, while Red 10 and Red 12 attempted to hold off Vader and his fighters. While both his companions were shot down, Red Leader succeeded in making the run, but his proton torpedoes exploded on the exhaust port's surface. He ordered Luke (Red Five), Biggs (Red 3), and Wedge (Red 2) to make a third run shortly before Vader shot him down.[3]
Like the previous run, Luke made the actual attack, while Biggs and Wedge covered for him. Once again, Vader and his escorts moved in to intercept the X-Wings. Wedge was hit and forced to disengage, while Biggs was killed when his starfighter was shot down, leaving Luke alone with Vader in the trench.
To the Rebel Command, all seemed hopeless; the Death Star had reached firing position, almost all the fighters were lost, and the remaining pilot able to make the run, Skywalker, had deactivated his targeting computer. Skywalker, however, was advised by the spirit of Obi-Wan Kenobi to use the Force to make the seemingly impossible shot.[3]
The Death Star is destroyed.
Vader, sensing that the last pilot was strong in the Force, prepared to kill him (not knowing then that the pilot was his son). However, at the last moment, Han Solo and Chewbacca of the Millennium Falcon surprised Darth Vader and, with a laser blast, destroyed one of his wingmen. In the confusion, the other wingman panicked and collided with Vader's fighter, sending himself crashing into the trench and Vader careening out of control and into space. Luke made the shot, and with the Force aiding him, his torpedoes entered the port perfectly. The Death Star exploded just seconds before its main gun would have destroyed Yavin 4. Grand Moff Tarkin and the battle station's entire crew, except for Vader, were killed. The Rebel Alliance had won a spectacular victory.[3]
Aftermath
- "Great shot, kid! That was one in a million!"
- ―Han Solo
As a result of this battle, the Rebel Alliance gained instant credibility as a legitimate military opponent to the Empire. Between the effects of the battle and the dissolution of the Imperial Senate, thousands of star systems openly joined the Alliance in the months following the Death Star's destruction. As a result, the Empire began occupying worlds it had allowed to remain untouched earlier, both actions resulting in an escalation of the war.
TIE bombers attack the Rebel base on Yavin 4.
A few months after the Battle of Yavin, the Empire launched a number of small raids at the Yavin moon, in an attempt to destroy the Core Group of the Rebellion.[6]
These raids were carried out by small TIE squadrons launched from a small base near the Yavin system. They often maintained reconnaissance patrols rather than retaliatory attacks. The Rebel Alliance still had to evacuate Yavin 4 to escape retaliation from the Imperial Starfleet and eventually settled on Hoth. The last raid carried out by the Empire was a crushing assault consisting of a planetary blockade along with the remnants of the 501st Legion, TIE Fighters and AT-STs. General Jan Dodonna, mastermind of Yavin's defense, was not able to escape and was captured by Imperial forces and later imprisoned.[7]
The newly launched Executor was dispatched to destroy the Rebel fleet. But Admiral Griff's squadron of Star Destroyers came out of lightspeed and collided with the Executor. By the time the crew regained control, the last Rebel ship jumped into hyperspace.
Few Rebel pilots escaped with their lives from the battle: Luke Skywalker, Wedge Antilles, Rookie One, Ru Murleen, Merrick Simms, Jake Farrell, X2, Shara and Keyan Farlander.[3]
Calendrical impact
25 years later, it was decided by the New Republic Historical Council to set a new calendar. Some already used a calendar that set year 0 as the fall of Palpatine. However, due to the significance of the destruction of the Death Star, and its significance in the eventual overthrow of the Empire, the Council set year 0 as the year when the Battle of Yavin happened; therefore they established the BBY/ABY calendar.
The Galactic Alliance, as the legal successor to the defunct New Republic, continued to use this calendar, but it is unknown what calendar was used by the Fel Empire or the new Sith Empire.
Squadrons
Rebel squadrons
32 Rebel starfighters launched from Yavin IV. The whole fleet was composed of Red, Gold, Blue, and Green Squadrons. The known pilots assigned to them are:
- Red Squadron (12 T-65 X-wings):
- Red Leader - Garven Dreis†
- Red Two - Wedge Antilles
- Red Three - Biggs Darklighter†
- Red Four - John D. Branon†
- Red Five - Luke Skywalker
- Red Six - Jek Tono Porkins†
- Red Seven - Elyhek Rue†
- Red Eight - Bren Quersey†
- Red Nine - Naytaan†
- Red Ten - Theron Nett†
- Red Eleven - Wenton Chan[8]†
- Red Twelve - Unknown†
- Gold Squadron (7 BTL Y-wings):
- Gold Leader - Jon Vander†
- Gold Two - Tiree†
- Gold Three - Ryle Torsyn†
- Gold Four - Lepira†
- Gold Five - Davish Krail†
- Gold Six - Hol Okand†
- Gold Seven - Keyan Farlander[9]
- Blue Squadron (T-65 X-wings, R-22 Spearhead)
- Blue Leader - Merrick Simms (T-65 X-wing)
- Blue Two - Ru Murleen (T-65 X-wing)
- Blue Three - 'Rookie One' (T-65 X-wing)
- Blue Four - Thurlow Harris† (T-65 X-wing)
- Green Squadron (T-65 X-wings, BTL Y-wings)[8]
- Pilots unknown
- Other pilots (squadrons unknown):
- Hamo Blastwell (T-65 X-wing)
- Fin Danglot
- Jake Farrell (R-22 Spearhead)
- Ernek Marskan
- Naeco
- Samuel Raider
- Doyle Skims† (BTL Y-wing)[10]
- Travis
- X2
- Shara
- Millennium Falcon
Imperial squadron
Only a single elite squadron of TIE fighters was deployed. The members of the squadron were formed by, and under the direct command of, Darth Vader.
- Black Squadron (8 TIE/ln starfighers, 1 TIE Advanced x1):
- Darth Vader
- Qorl
- Black Two - "Mauler" Mithel†
- Black Three - "Backstabber"†
- Black Four - "Dark Curse"†
- Black Eight - unknown†
Casualties and survivors
Rebel Alliance
- "Attacking that battle station ain't my idea of courage. It's more like suicide."
- ―Han Solo
- The Alliance's desperate assault on the Death Star was successful, but costly. Of the twelve members of Red Squadron, only two—Luke Skywalker and Wedge Antilles—survived the assault. All members of Gold Squadron except Keyan Farlander reportedly died as well.
- Commander Hamo Blastwell was presumed dead by other pilots following the battle, but was officially listed as missing in action. Blastwell had in fact survived, as later reports placed him working as an undercover agent for the Alliance, posing as an Imperial officer.
- A number of other Rebels stationed at Yavin 4 were either unable or unwilling to participate in the battle. Both Jal Te Gniev and Derek Klivian were grounded due to illness. Wes Janson would have joined the pilots at Yavin 4 some time before the battle, but stayed behind at his previous assignment due to illness. His replacement, Jek Porkins, was killed in the battle. Tyler Lucian fled Yavin 4 prior to the Death Star's impending arrival, fearing for his life.
- A Rebel Sullustan named Dr'uun Unnh was killed on the ground by a TIE Fighter that crashed into the jungle during the battle; the TIE fighter pilot died.
The Empire
- "When the Death Star was destroyed about half of the 501st legion were still in the hanger getting into their ships. Of those who made it out another third were caught in the explosion. I'd fought with some of those men for 20 years."
- ―Entry from the Journal of the 501st
- All personnel onboard the Death Star were killed when the station exploded, including Tarkin, General Cassio Tagge, Admiral Conan Antonio Motti and other high ranking officers on Tarkin's staff. Thousands of other officers, troops and staff were killed as well.
- Nearly all Imperial fighter pilots involved in the battle itself were killed. Exceptions included Darth Vader, whose fighter was sent hurtling off into space, and a TIE Fighter pilot named Qorl, who crashed on the surface of Yavin 4. Qorl would survive alone in the jungles for decades before being discovered by students from Luke Skywalker's Jedi Praxeum.
- Maximilian Veers was on his way to report to the Death Star for his new assignment when the battle began. His command shuttle was attacked and crash landed on Yavin 4. He was rescued by Imperial forces some time after the battle.
- About half of the 501st Legion were still onboard the Death Star when it was destroyed. Another third were killed when their ships were destroyed by the explosion.
- A small band of deserters escaped the Death Star shortly before it was destroyed. They include Villian Dance, Teela Kaarz, Celot Ratua Dil, Kornell Divini and Memah Roothes.
Behind the scenes

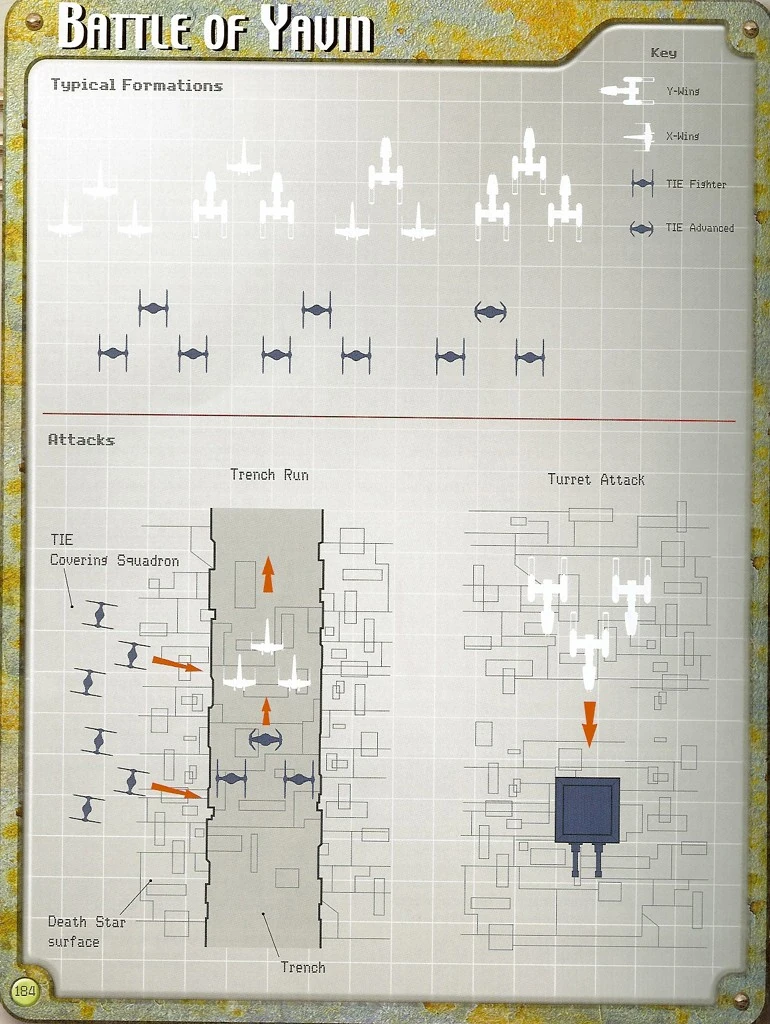
Battle Plan from The New Essential Guide to Vehicles and Vessels.
The battle is based heavily on the battle scenes in the British war film The Dam Busters.
In the novelization of the film, Luke Skywalker's X-wing squadron is called "Blue Squadron", while the Y-wing squadron is called "Red Squadron". In the film, these colors are changed to Red and Gold, respectively. This change was necessitated because the blue paint on the X-wings had to be removed for blue screen purposes.
The Farlander Papers reveals that Keyan Farlander is the pilot of the Y-wing fighter seen leaving the Death Star alongside Luke, Wedge and the Millennium Falcon.
The 1998 Star Wars Encyclopedia places Commander Narra and his Renegade Flight at the Battle of Yavin. Lucasfilm's Leland Chee has since confirmed this as an error on the StarWars.com forums [1]
The Battle (and alternative versions of it) has appeared so many times in EU sources that have contributed many retcons and new elements, it seems that the events shown in the film are actually a very limited portion of the 'actual' battle. The movie describes the battle only from the point of view of some members of Red Squadron and Gold Squadron, only a fraction of the thirty ships mentioned and seen in the film.
These sources also suggest that the Rebels had to pass through Imperial forces before reaching the Death Star. Rebel Assault showed the Death Star was orbited by a Star Destroyer from which a TIE Fighter wave was launched and a surface cannon had to be neutralized before the trench run. X-wing showed other Imperial vessels as well like the Divad.
The novelization of A New Hope also mentions two additional squadrons—Yellow and Green—providing cover to those we see in the film. Though these other squadrons are not seen in the film, the number of fighters shown does suggest more than two squadrons.
Concept art by Ralph McQuarrie.
A Blue Squadron at Yavin 4 is mentioned in X-wing: The Official Strategy Guide. Blue Squadron actually appears in the game Rebel Assault, though the specific details from that game (the player's character from Blue destroying the Death Star) are not canonical. The characters from that game do appear in Rebel Assault II, the storyline of which has been referred to in sources that are considered to be canon.
The fourth squadron had not been referenced in any other source besides the novelization for many years, and fans speculated that the fourth squadron mentioned above could be named Green Squadron, since every other color used in the novelization has been used in other incarnations (assuming "Yellow" is just a substitute for Gold). Green Squadron at Yavin was finally referenced in The Complete Star Wars Encyclopedia in 2008.
Though the film only shows us three surviving fighters, X-wing and Rebel Assault both show others flying away from the exploding Death Star, while the novelization mentions that "several" X-wings and Y-wings escaped. On StarWars.com's Q&A pages, Steve Sansweet says, it's "pretty definite" that more ships survived and just aren't visible on screen.
A-wings are shown taking part in the Battle of Yavin in X-wing and Rebel Assault, though other sources indicate the fighters were introduced some time after the battle. The A-wings in these games have been retconned into R-22 Spearheads, a forerunner of the later vessel, only nicknamed "A-wing". Writers created the Spearhead to specifically resolve this discrepancy, and the A-wing's appearance in Droids. Inside the Worlds of Star Wars shows an R-22 in the Rebel base shortly before the battle.
The timeline of Star Wars fiction is most often based upon this event, where events are dated as happening so many years "before the Battle of Yavin" (BBY) or "after the Battle of Yavin" (ABY).
In the Lego Star Wars & Rogue Squadron games, many more TIE Fighters beyond Black Squadron are depicted, probably for a bigger challenge.
Appearances
Non-canon appearances
- LEGO Star Wars: The Complete Saga
- LEGO Star Wars II: The Original Trilogy
- Star Wars Infinities: A New Hope
- Tag & Bink Are Dead
- The Long, Bad Day
- Star Wars: Rogue Squadron
Sources
- Galaxy Guide 2: Yavin and Bespin, First Edition (First mentioned)
- Galaxy Guide 3: The Empire Strikes Back
- Rebel Alliance Sourcebook
- Super Empire Strikes Back Official Game Secrets
- Star Wars: The Roleplaying Game, Second Edition
- Galaxy Guide 2: Yavin and Bespin, Second Edition
- Rebel Alliance Sourcebook, Second Edition
- Heroes & Rogues
- Star Wars: The Roleplaying Game, Second Edition, Revised and Expanded
- Star Wars: The Power of the Force (1995)
- Shadows of the Empire Sourcebook
- Star Wars Gamemaster Screen, Revised
- Star Wars: Power of the Jedi
- The Essential Guide to Characters
 "Meet Wedge!" — Star Wars Kids (1997) 4
- Star Wars: Rebellion: Prima's Official Strategy Guide
- Starships of the Galaxy (2001)
- Star Wars: Rogue Squadron II: Rogue Leader
- Star Wars: Rogue Squadron III: Rebel Strike
- "J't'p'tan: Temples and Tybis" (original article link) on Wizards.com (content now obsolete; backup link)
- Hero's Guide
- The New Essential Chronology
- The New Essential Guide to Vehicles and Vessels
- X-wing: The Official Strategy Guide
- Shadows of the Empire Sourcebook
- The Forgotten War: The Nagai and the Tofs on Hyperspace (article) (content removed from StarWars.com and unavailable)
- Star Wars Customizable Card Game — [[Unknown set: No set defined!]]
- Star Wars Customizable Card Game — [[Unknown set: No set defined!]]
- Star Wars Customizable Card Game — [[Unknown set: No set defined!]]
- Star Wars Customizable Card Game — [[Unknown set: No set defined!]]
- Star Wars Customizable Card Game — [[Unknown set: No set defined!]]
- "Running the Belt" — Star Wars Gamer 9
- Star Wars Trading Card Game — [[]] (Card: Imperial II-Class Star Destroyer) (backup link (http://www.wizards.com/swtcg/swtcg_autocard.asp?name=Imperial%5BII-Class%5BStar%5BDestroyer) not verified!)
- Star Wars Trading Card Game — [[]] (Card: Kuat Lancer-Class Frigate) (backup link (http://wizards.com/swtcg/images/esb/kuat_lancer_class_frigate.jpg) not verified!)
- Star Wars Trading Card Game — [[]] (Card: X-wing Rogue Seven) (backup link (http://www.wizards.com/swtcg/images/esb/x_wing_rogue_seven.jpg) not verified!)
- Star Wars: The Ultimate Visual Guide
- "Hapes: Ladies First" (original article link) on Wizards.com (content now obsolete; backup link)
- "The Pau'ans" (original article link) on Wizards.com (content now obsolete; backup link)
- The Force Unleashed Campaign Guide
- The Complete Star Wars Encyclopedia
- Starships of the Galaxy, Saga Edition
- Tinker, Tailor, Soldier, Praji on Hyperspace (article) (content removed from StarWars.com and unavailable)
- The Battle of Turak IV
- Rebellion Era Campaign Guide
- The Essential Atlas
- Xim Week: The History of Xim and the Tion Cluster on Hyperspace (article) (content removed from StarWars.com and unavailable)
- "Bartyn's Landing" — Star Wars Gamer 7
- The Written Word
- The Unknown Regions
- Millennium Falcon Owners' Workshop Manual
Notes and references
- ↑ Star Wars: X-wing
- ↑ 2.0 2.1 2.2 X-wing: The Official Strategy Guide
- ↑ 3.0 3.1 3.2 3.3 3.4 3.5 3.6 3.7 3.8 Star Wars Episode IV: A New Hope
- ↑ Rebel Assault
- ↑ Star Wars: Rogue Squadron II: Rogue Leader
- ↑ Battlefront
- ↑ Star Wars: Galactic Battlegrounds
- ↑ 8.0 8.1 The Complete Star Wars Encyclopedia
- ↑ Star Wars Blueprints: Rebel Edition
- ↑ Alliance Operative Field Dossier - Skimmer
External links
- Official Star Wars Soundboards - Battle of Yavin on StarWars.com (content now obsolete; backup link)
Template:Operation Skyhook