m (Cleanup and formatting fixes) |
m (Cleanup and formatting fixes) |
||
| (One intermediate revision by the same user not shown) | |||
| Line 43: | Line 43: | ||
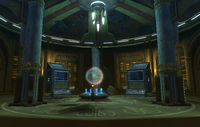
[[File:Council Chamber.png|thumb|left|200px|Tarnis set up the Planet Prison in the heart of the Temple.]] |
[[File:Council Chamber.png|thumb|left|200px|Tarnis set up the Planet Prison in the heart of the Temple.]] |
||
| − | However, when the Knight and T7-O1 [[Raid on the Black Sun headquarters|raided]] [[Black Sun Headquarters|Black Sun's headquarters]] to find Tarnis, the two discovered that the doctor was in fact a [[Sith Lord/Legends|Sith Lord]] who had been masquerading as a Republic scientist. Tarnis had stolen the [[Planet Prison]] [[Superweapon/Legends|superweapon]],<ref name="The Rescue">{{TORcite|type=class|Jedi Knight|The Rescue|Coruscant}}</ref> a device that supercharged a [[Planet/Legends|planet's]] [[Atmosphere/Legends|atmosphere]] and turned it into an enormous [[Ion cannon/Legends|ion cannon]],<ref name="Stolen Secrets">{{TORcite|type=class|Jedi Knight|Stolen Secrets|Coruscant}}</ref> and he now planned to activate it on Coruscant. Teaming up with the Padawan [[Kira Carsen]], the Knight [[Mission to Justicar territory|tracked Tarnis]] to the [[Justicar territory|territory]] of the paramilitary [[Justicars' Brigade]], and learned that Tarnis had tricked the project research team into bringing him the real prototype before [[Death/Legends|murdering]] them. From a dying scientist named [[Jonkan]], the two [[Jedi/Legends|Jedi]] learned that the device needed [[Time/Legends|time]] to charge up to full capacity, and that it generated immense amounts of heat while doing so. Thanks to Jonkan's information, the Knight and Carsen were able to locate the device in the ruins of the [[Jedi Temple]],<ref name="Tracking Down |
+ | However, when the Knight and T7-O1 [[Raid on the Black Sun headquarters|raided]] [[Black Sun Headquarters|Black Sun's headquarters]] to find Tarnis, the two discovered that the doctor was in fact a [[Sith Lord/Legends|Sith Lord]] who had been masquerading as a Republic scientist. Tarnis had stolen the [[Planet Prison]] [[Superweapon/Legends|superweapon]],<ref name="The Rescue">{{TORcite|type=class|Jedi Knight|The Rescue|Coruscant}}</ref> a device that supercharged a [[Planet/Legends|planet's]] [[Atmosphere/Legends|atmosphere]] and turned it into an enormous [[Ion cannon/Legends|ion cannon]],<ref name="Stolen Secrets">{{TORcite|type=class|Jedi Knight|Stolen Secrets|Coruscant}}</ref> and he now planned to activate it on Coruscant. Teaming up with the Padawan [[Kira Carsen]], the Knight [[Mission to Justicar territory|tracked Tarnis]] to the [[Justicar territory|territory]] of the paramilitary [[Justicars' Brigade]], and learned that Tarnis had tricked the project research team into bringing him the real prototype before [[Death/Legends|murdering]] them. From a dying scientist named [[Jonkan]], the two [[Jedi/Legends|Jedi]] learned that the device needed [[Time/Legends|time]] to charge up to full capacity, and that it generated immense amounts of heat while doing so. Thanks to Jonkan's information, the Knight and Carsen were able to locate the device in the ruins of the [[Jedi Temple]],<ref name="Tracking Down" /> which had been destroyed in the [[Sacking of Coruscant]] by the Empire [[3653 BBY|over ten years]] earlier.<ref name="Deceived">''Deceived (cinematic trailer)''</ref> |
Since the fastest way to reach the ruins of the Temple was through [[The Works/Legends|The Works]], the industrial sector of the planet, Carsen led the Knight to the closest [[Turbolift/Legends|access elevator]] in the Justicars' Sector.<ref name="Race to the Ruins" /> Within The Works, the two Jedi fought their way through rogue [[Droid/Legends|droids]] and Imperial forces in order to venture into the Temple.<ref name="Race to the Ruins" /> |
Since the fastest way to reach the ruins of the Temple was through [[The Works/Legends|The Works]], the industrial sector of the planet, Carsen led the Knight to the closest [[Turbolift/Legends|access elevator]] in the Justicars' Sector.<ref name="Race to the Ruins" /> Within The Works, the two Jedi fought their way through rogue [[Droid/Legends|droids]] and Imperial forces in order to venture into the Temple.<ref name="Race to the Ruins" /> |
||
| Line 66: | Line 66: | ||
{{Quote|I will inflict unimaginable suffering on your people. Billions will die because of you.''"<br />"''We already control your secret weapons facilities. All that power is ours, now.''"<br />"''My son's death will be avenged on the entire Republic—and you will bow down before I let you die.|Darth Angral and Nefarid introduce the plot line of Act I for the Jedi Knight class|Star Wars: The Old Republic}} |
{{Quote|I will inflict unimaginable suffering on your people. Billions will die because of you.''"<br />"''We already control your secret weapons facilities. All that power is ours, now.''"<br />"''My son's death will be avenged on the entire Republic—and you will bow down before I let you die.|Darth Angral and Nefarid introduce the plot line of Act I for the Jedi Knight class|Star Wars: The Old Republic}} |
||
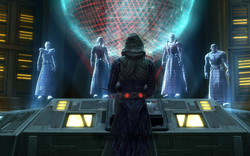
[[File:Holo.png|thumb|250px|right|The quest introduces four of the main characters of Act I: {{C|Left to right}} Lord Nefarid, Lord Sadic, Darth Angral, and Lord Praven.]] |
[[File:Holo.png|thumb|250px|right|The quest introduces four of the main characters of Act I: {{C|Left to right}} Lord Nefarid, Lord Sadic, Darth Angral, and Lord Praven.]] |
||
| − | The duel in the Jedi Temple ruins was created for ''[[Star Wars: The Old Republic]]'', a [[Wikipedia:Massively multiplayer online role-playing game|massively multiplayer online role-playing game]] released by [[BioWare]] and [[LucasArts]] on [[December 20]], [[2011]]. It appears in the Jedi Knight class story mission "Race to the Ruins", the finale of the Jedi Knight's storyline on Coruscant and the Jedi Knight class' Prologue.<ref name="Race to the Ruins" /> After the player discovers that Tarnis has taken the Planet Prison to the Jedi Temple,<ref name="Tracking Down |
+ | The duel in the Jedi Temple ruins was created for ''[[Star Wars: The Old Republic]]'', a [[Wikipedia:Massively multiplayer online role-playing game|massively multiplayer online role-playing game]] released by [[BioWare]] and [[LucasArts]] on [[December 20]], [[2011]]. It appears in the Jedi Knight class story mission "Race to the Ruins", the finale of the Jedi Knight's storyline on Coruscant and the Jedi Knight class' Prologue.<ref name="Race to the Ruins" /> After the player discovers that Tarnis has taken the Planet Prison to the Jedi Temple,<ref name="Tracking Down" /> the player must make their way through The Works, a map accessible by an elevator in the Justicars' Sector map. As the Jedi Temple [[Air taxi/Legends|taxi]] pad is only accessible once the player has unlocked the taxi pad at the end of The Works, the player must make their way through The Works to the taxi pad at the far end of the map.<ref name="Race to the Ruins" /> Throughout the area, the player must fight rogue droids, which are expanded on in the general mission "Meltdown!",<ref name="Meltdown!">{{TORcite|type=general|Meltdown!|Coruscant}}</ref> and later Imperial soldiers in the second half of The Works and the Jedi Temple map itself. The Imperials' presence is explained in the Heroic mission "Enemies of the Republic", where the players must recover a navicomputer from the ruins of the Temple, for which the Imperials are also searching.<ref name="Enemies of the Republic">{{TORcite|type=heroic|Enemies of the Republic|Coruscant}}</ref> |
The mission itself features only one alignment-based choice; namely, whether to ask Tarnis to surrender or not. Asking for Tarnis' surrender gains the player fifty [[Light side of the Force/Legends|light side]] points, but the other options do not result in any alignment points. Regardless of the player's choice, Tarnis will still fall in the duel, and events proceed as they do above.<ref name="Race to the Ruins" /> The mission itself introduces many of the main characters for the class' Act I storyline, and serves as the main event that drives the plot of the next Act. Tarnis' death causes Darth Angral to declare war upon the Republic, and Act I consists of the player attempting to find and destroy the Republic superweapon projects<ref name="Act I">{{TORcite|Jedi Knight Storyline, Act I}}</ref>—or, in the case of Taris, the former Republic scientist [[Nasan Godera]]<ref name="The Architect of Annihilation">{{TORcite|type=class|Jedi Knight|The Architect of Annihilation|Taris}}</ref>—which have been captured by Angral's three apprentices: Sadic,<ref name="The Power Guard Project">{{TORcite|type=class|Jedi Knight|The Power Guard Project|Nar Shaddaa}}</ref> Praven,<ref name="The Shock Drum">{{TORcite|type=class|Jedi Knight|The Shock Drum|Tatooine}}</ref> and Nefarid.<ref name="The Death Mark">{{TORcite|type=class|Jedi Knight|The Death Mark|Alderaan}}</ref> The player also receives their [[Defender-class light corvette|personal ship]] at the end of this mission, as Suthra sends them to Ord Mantell to investigate a Sith base.<ref name="Race to the Ruins" /> The duel is briefly mentioned in the [[2012]] reference guide ''[[Star Wars: The Old Republic Encyclopedia]]'', in the summary of the Jedi Knight class storyline.<ref name="Encyclopedia">''[[Star Wars: The Old Republic Encyclopedia]]''</ref> |
The mission itself features only one alignment-based choice; namely, whether to ask Tarnis to surrender or not. Asking for Tarnis' surrender gains the player fifty [[Light side of the Force/Legends|light side]] points, but the other options do not result in any alignment points. Regardless of the player's choice, Tarnis will still fall in the duel, and events proceed as they do above.<ref name="Race to the Ruins" /> The mission itself introduces many of the main characters for the class' Act I storyline, and serves as the main event that drives the plot of the next Act. Tarnis' death causes Darth Angral to declare war upon the Republic, and Act I consists of the player attempting to find and destroy the Republic superweapon projects<ref name="Act I">{{TORcite|Jedi Knight Storyline, Act I}}</ref>—or, in the case of Taris, the former Republic scientist [[Nasan Godera]]<ref name="The Architect of Annihilation">{{TORcite|type=class|Jedi Knight|The Architect of Annihilation|Taris}}</ref>—which have been captured by Angral's three apprentices: Sadic,<ref name="The Power Guard Project">{{TORcite|type=class|Jedi Knight|The Power Guard Project|Nar Shaddaa}}</ref> Praven,<ref name="The Shock Drum">{{TORcite|type=class|Jedi Knight|The Shock Drum|Tatooine}}</ref> and Nefarid.<ref name="The Death Mark">{{TORcite|type=class|Jedi Knight|The Death Mark|Alderaan}}</ref> The player also receives their [[Defender-class light corvette|personal ship]] at the end of this mission, as Suthra sends them to Ord Mantell to investigate a Sith base.<ref name="Race to the Ruins" /> The duel is briefly mentioned in the [[2012]] reference guide ''[[Star Wars: The Old Republic Encyclopedia]]'', in the summary of the Jedi Knight class storyline.<ref name="Encyclopedia">''[[Star Wars: The Old Republic Encyclopedia]]''</ref> |
||
Revision as of 18:34, 13 October 2019
- "You return to me as a hero of the Empire, my son. Our victory is complete."
"I wouldn't count on that." - ―The Jedi Knight interrupts Tarnis' father, Darth Angral
During the Cold War between the Galactic Republic and the Sith Empire, Jedi Master Orgus Din's former apprentice and the Padawan Kira Carsen dueled the Sith Lord Tarnis in the ruins of the Jedi Temple. In 3643 BBY, during a mission to rescue the Republic scientist "Doctor Eli Tarnis" from the Black Sun criminal syndicate, Din's fomer student—now a Jedi Knight—learned that the scientist was in fact a Sith Lord, and that he had stolen the Planet Prison superweapon in an attempt to unleash it upon the Republic capital of Coruscant.
Having located the Planet Prison's heat signature in the ruins of the Jedi Temple, the Knight and Kira Carsen raced through the planet's industrial sector and fought their way through the Imperial-occupied Temple until they reached the Council chambers. There, in front of a live transmission to Tarnis' father Darth Angral and Angral's three Sith apprentices, the Knight and Carsen battled the traitorous Sith scientist and defeated him. Having watched the Knight cut down his son in front of him, Angral declared an unending war of vengeance upon the young Jedi and the Order as a whole, sparking the Desolator crisis. Using information Tarnis had transmitted to them, Angral's apprentices would seize control of the Republic's superweapon projects as part of their master's crusade against the killer of Tarnis, a conflict that would only end when the Knight defeated Angral aboard the warship Oppressor above Tython.
Prelude
- "Running a thermal scan… whoa, the technician wasn't kidding. Something's really lighting up. Tracking… Here we go. Sector 167, coordinates 8863… Oh, you've got to be kidding me. The signal's coming from the ruins of the Jedi Temple."
- ―Kira Carsen
In 3643 BBY,[4] during the Cold War between the Galactic Republic and the Sith Empire, a young Jedi Knight was sent to the Republic capital of Coruscant by the Jedi Council.[5] The Knight, who was the former apprentice of Jedi Master Orgus Din, and the astromech droid T7-O1's tried to rescue the Doctor Eli Tarnis from members of the Black Sun criminal syndicate when the scientist was kidnapped from the Senate Building, and the pair learned that Tarnis had been taken to the gang's territory.[6]

Tarnis set up the Planet Prison in the heart of the Temple.
However, when the Knight and T7-O1 raided Black Sun's headquarters to find Tarnis, the two discovered that the doctor was in fact a Sith Lord who had been masquerading as a Republic scientist. Tarnis had stolen the Planet Prison superweapon,[7] a device that supercharged a planet's atmosphere and turned it into an enormous ion cannon,[8] and he now planned to activate it on Coruscant. Teaming up with the Padawan Kira Carsen, the Knight tracked Tarnis to the territory of the paramilitary Justicars' Brigade, and learned that Tarnis had tricked the project research team into bringing him the real prototype before murdering them. From a dying scientist named Jonkan, the two Jedi learned that the device needed time to charge up to full capacity, and that it generated immense amounts of heat while doing so. Thanks to Jonkan's information, the Knight and Carsen were able to locate the device in the ruins of the Jedi Temple,[1] which had been destroyed in the Sacking of Coruscant by the Empire over ten years earlier.[9]
Since the fastest way to reach the ruins of the Temple was through The Works, the industrial sector of the planet, Carsen led the Knight to the closest access elevator in the Justicars' Sector.[3] Within The Works, the two Jedi fought their way through rogue droids and Imperial forces in order to venture into the Temple.[3]
The duel
- Jedi Knight: "Don't do this, Tarnis. You can still surrender."
- Lord Tarnis: "You'll forgive me if I don't offer you the same opportunity."
- Darth Angral: "Channel your rage, my son. Don't let this Jedi steal your moment of triumph."
- Lord Tarnis: "Your blood flows through my veins, Father. I cannot fail."
- ―Tarnis, Darth Angral, and the Knight, just before the duel[src]
Deep within the Temple, the duo found the remains of the High Council Chamber, which was guarded by almost a dozen Imperial saboteurs. After defeating the surprised Imperials, the duo found Tarnis in the chamber itself amidst the tangle of wires, computers, and generators that formed the Planet Prison. The Sith Lord was standing before a holoterminal, deep in discussion with four figures: a Pureblood Sith, a masked humanoid figure, a short robed Human, and a red-robed older Human. The older man, clearly the leader of the four, praised Tarnis on his work, and astonished the two Jedi by calling Tarnis his son. As the Knight and Carsen stormed into the room and confronted him, Tarnis revealed to the intruders the identity of his red-robed father: Darth Angral,[3] the architect of the Sacking of Coruscant, and a personal enemy of the Knight's Master.[10] Tarnis also informed the pair the Planet Prison was minutes away from being ready to fire, and that they would not be able to stop it.[3]


Praven's training was not enough to prevent Tarnis' death at the hands of the Knight.
At his father's urging, Tarnis refused the Knight's request that he surrender and drew his red-bladed lightsaber. The Sith Lord attacked the two Jedi, dueling them before the holoterminal in clear view of Angral and the others. Unleashing a blast of violet lightning, Tarnis also attempted to choke one of the Jedi, but the other was able to break the Sith's concentration by engaging Tarnis with their lightsaber.[3] However, despite Tarnis' training by his master Lord Praven—one of Darth Angral's apprentices and the Pureblood Sith who was watching the fight[11]—and the strength in the dark side he inherited from his father, the Sith Lord was no match for the Knight and Carsen together. Angral was forced to watch as the Knight struck down his son before his very eyes, driving the Sith into a furious rage. Angral declared an undying hatred for the Knight, warning the Jedi that the Sith would receive retribution no matter how many had to die in the process. His companions promised to avenge Tarnis in an attempt to please their master, and warned the Knight that they already controlled the Republic's weapon facilities. With a final warning for the Knight to take to the Council, Angral abruptly ended the conversation.[3]
Aftermath
- "You've no idea what you've unleashed, Jedi. There's no place in the galaxy to hide from my wrath."
- ―Darth Angral


Darth Angral, Tarnis' father
Fortunately for Coruscant, the Planet Prison had not yet completed its startup sequence, and the two Jedi were able to disable the device and destroy it. But upon returning to the Senate Tower and speaking with General Var Suthra, the Mon Calamari who had started the Planet Prison project, the two Jedi realized something terrible.[3] Earlier, one of the analysts from the Strategic Information Service, the Republic's primary intelligence agency, had decrypted datafiles recovered by the Knight and T7-O1 from Tarnis' agents previously.[8] In doing so, she discovered that the files contained information on all of the Republic's weapon projects.[7] The SIS had traced a transmission from Tarnis to Angral before the former's death containing the project files, and Var Suthra feared the Sith Lord was already making his move. Declaring war on the Jedi in transmissions across all Republic channels, Angral began to seize control of the Republic weapons projects. While the Empire officially disowned Angral and stated that he was no longer acting with their interests, many in the Republic doubted their sincerity.[3]
Suthra asked the Jedi to go to Ord Mantell, where his agents had traced the signal to a secret listening post[3] The Knight also took Kira Carsen on as an official Padawan, assuming the role of Carsen's teacher at the behest of Grand Master Satele Shan.[2] From there, the two Jedi and T7-O1 would travel across the galaxy in an attempt to destroy the superweapon projects now under Sith control. The conflict with Angral would only end after the Sith Lord used the Desolator superweapon—a combination of the stolen Republic weapons technologies—to devastate the agriworld of Uphrades. Having successfully tested the weapon, which he had integrated into his personal flagship Oppressor,[12] Angral headed to the Jedi Order's homeworld of Tython intending to destroy it as well. The Knight and Carsen intercepted Angral's ship above Tython and disabled the Desolator before facing their enemy in a duel aboard the warship's bridge—a duel that ended with Angral's death and the destruction of the Oppressor.[13]
Behind the scenes
- "I will inflict unimaginable suffering on your people. Billions will die because of you."
"We already control your secret weapons facilities. All that power is ours, now."
"My son's death will be avenged on the entire Republic—and you will bow down before I let you die." - ―Darth Angral and Nefarid introduce the plot line of Act I for the Jedi Knight class

The quest introduces four of the main characters of Act I: (Left to right) Lord Nefarid, Lord Sadic, Darth Angral, and Lord Praven.
The duel in the Jedi Temple ruins was created for Star Wars: The Old Republic, a massively multiplayer online role-playing game released by BioWare and LucasArts on December 20, 2011. It appears in the Jedi Knight class story mission "Race to the Ruins", the finale of the Jedi Knight's storyline on Coruscant and the Jedi Knight class' Prologue.[3] After the player discovers that Tarnis has taken the Planet Prison to the Jedi Temple,[1] the player must make their way through The Works, a map accessible by an elevator in the Justicars' Sector map. As the Jedi Temple taxi pad is only accessible once the player has unlocked the taxi pad at the end of The Works, the player must make their way through The Works to the taxi pad at the far end of the map.[3] Throughout the area, the player must fight rogue droids, which are expanded on in the general mission "Meltdown!",[14] and later Imperial soldiers in the second half of The Works and the Jedi Temple map itself. The Imperials' presence is explained in the Heroic mission "Enemies of the Republic", where the players must recover a navicomputer from the ruins of the Temple, for which the Imperials are also searching.[15]
The mission itself features only one alignment-based choice; namely, whether to ask Tarnis to surrender or not. Asking for Tarnis' surrender gains the player fifty light side points, but the other options do not result in any alignment points. Regardless of the player's choice, Tarnis will still fall in the duel, and events proceed as they do above.[3] The mission itself introduces many of the main characters for the class' Act I storyline, and serves as the main event that drives the plot of the next Act. Tarnis' death causes Darth Angral to declare war upon the Republic, and Act I consists of the player attempting to find and destroy the Republic superweapon projects[16]—or, in the case of Taris, the former Republic scientist Nasan Godera[17]—which have been captured by Angral's three apprentices: Sadic,[18] Praven,[19] and Nefarid.[20] The player also receives their personal ship at the end of this mission, as Suthra sends them to Ord Mantell to investigate a Sith base.[3] The duel is briefly mentioned in the 2012 reference guide Star Wars: The Old Republic Encyclopedia, in the summary of the Jedi Knight class storyline.[21]
Appearances
- Star Wars: The Old Republic (First appearance)
- Template:TOR (Mentioned only)
Sources
Notes and references
- ↑ 1.0 1.1 1.2
 Star Wars: The Old Republic — Jedi Knight Mission: "Tracking Down the Traitor" on Coruscant
- ↑ 2.0 2.1 Star Wars: The Old Republic — Jedi Knight Mission: "New Intelligence" on Ord Mantell
- ↑ 3.00 3.01 3.02 3.03 3.04 3.05 3.06 3.07 3.08 3.09 3.10 3.11 3.12 3.13 3.14 3.15 3.16 3.17 3.18 3.19 3.20 3.21 3.22 3.23 3.24 3.25 3.26 3.27 3.28
 Star Wars: The Old Republic — Jedi Knight Mission: "Race to the Ruins" on Coruscant
- ↑ 4.0 4.1
STAR WARS: The Old Republic - Question ! :) - Page 3 on The Old Republic's official website (backup link) places Star Wars: The Old Republic about ten to twelve years after the signing of the Treaty of Coruscant, which is dated to 3653 BBY by Star Wars: The Old Republic Encyclopedia. The Old Republic—The Lost Suns 2 takes place ten years after the treaty, one week after the mission to Nar Shaddaa, and around the time of the SpecForce Incident. Since the mission and the incident are respectively part of Act I of the Jedi Knight and Republic Trooper's storylines, and the Trooper's Act I occurs concurrent to Act I of the Smuggler storyline, the general events of Act I for all classes can be assumed to occur in 3643 BBY.
The Prologue for each class immediately precedes Act I, and The Old Republic Encyclopedia places the Battle of Ilum at the end of Act III in 3640 BBY. Assuming that in-universe chronology of the Star Wars: The Old Republic events roughly aligns with the release of story content in real-life as with Forums: Dear Story Team, What Year Are We Currently In? on The Old Republic's official website (backup link), the Act III Epilogue must take place near the end of 3640 BBY since it was the chronologically latest story of the The Old Republic base game, which was released toward the end of 2011. Therefore, assuming that The Old Republic takes place over the course of three years per the former of the two aforementioned swtor.com posts, Act I takes place near the end of 3643 BBY.
- ↑ Star Wars: The Old Republic — Jedi Knight Mission: "The Jedi Envoy" on Coruscant
- ↑ Star Wars: The Old Republic — Jedi Knight Mission: "Kidnapped!" on Coruscant
- ↑ 7.0 7.1 Star Wars: The Old Republic — Jedi Knight Mission: "The Rescue" on Coruscant
- ↑ 8.0 8.1 Star Wars: The Old Republic — Jedi Knight Mission: "Stolen Secrets" on Coruscant
- ↑ Deceived (cinematic trailer)
- ↑ The Old Republic, Threat of Peace Act 1: Treaty of Coruscant
- ↑ Star Wars: The Old Republic — Codex: "Praven"
- ↑ Star Wars: The Old Republic — Jedi Knight Mission: "Uphrades" on Uphrades
- ↑ Star Wars: The Old Republic — Jedi Knight Mission: "Fate of the Jedi" on the Oppressor
- ↑ Star Wars: The Old Republic — Mission: "Meltdown!" on Coruscant
- ↑ Star Wars: The Old Republic — Mission: [Heroic] "Enemies of the Republic" on Coruscant
- ↑ Star Wars: The Old Republic — Jedi Knight Storyline, Act I
- ↑ Star Wars: The Old Republic — Jedi Knight Mission: "The Architect of Annihilation" on Taris
- ↑ Star Wars: The Old Republic — Jedi Knight Mission: "The Power Guard Project" on Nar Shaddaa
- ↑ Star Wars: The Old Republic — Jedi Knight Mission: "The Shock Drum" on Tatooine
- ↑ Star Wars: The Old Republic — Jedi Knight Mission: "The Death Mark" on Alderaan
- ↑ Star Wars: The Old Republic Encyclopedia