| | |
- "Empty your magazine, fall back, reload, and do it again. When you've retreated back as far as station 3-7, sprint for the evacuation area and find transport. And hope that none of those mechanical monsters arbitrarily decides to pick on you in the process."
- ―Colonel Ledick Firest's orders during the Battle of Hoth
Colonel Ledick Firest was a Human male field commander in the Rebel Alliance Army whose men survived more battles than any other group during the Galactic Civil War. By 3 ABY, Firest was stationed at the Rebellion's secret headquarters of Echo Base on the remote ice planet Hoth, where he was responsible for carrying out the orders of base commanders General Carlist Rieekan and Major Bren Derlin to Rebel troops in the field. During the Battle of Hoth, Firest used to a maximum the previous combat experience he gained while training as a field commander with the Laramus Base Irregulars mercenary group to help direct the Rebels' defensive evacuation strategy against an Imperial invasion force in order to buy enough time for Echo Base's evacuation transports to escape Hoth.
Firest was left with only five companies of Special Forces soldiers and two flights of snowspeeders to meet an overpowering force of Imperial All Terrain Armored Transport walkers. Knowing that the Empire's primary target during the battle would be Echo Base's power generators to neutralize the Rebels' planetary shield protecting the base from orbital bombardment, Firest organized his defensive forces in such a way that funneled the AT-ATs toward the power generators, effectively giving the Empire what it wanted while surreptitiously leading the Imperials away from the base's highly vulnerable evacuation staging area, where the transports were lifting off. Although the Rebels suffered heavy casualties during the Battle of Hoth, Firest's efforts helped many of Echo Base's personnel, including the Alliance High Command, escape the planet. Firest himself survived the battle and escaped aboard the last evacuation transport, the GR-75 medium transport Bright Hope.
Biography[]
Battle of Hoth defensive strategy[]
- "I say again. Code Red Alert! Imperial Walkers sighted on north ridge, 2 klicks from Echo! General Rieekan!"
"I copy, Colonel. Initiate Evac Rearguard Action 101. You have five companies defense troops, a couple of flights of Speeders at your disposal—followed by whatever else we can scrape together."
"Roger that. Five companies, two flights. That's not much to hold off an Assault Group…"
"That's all we have, Colonel Firest…and Ledick—it's all or nothing this time." - ―Colonel Ledick Firest and General Carlist Rieekan
The Human[1] male Ledick Firest served as a colonel in the Rebel Alliance Army during the early course of the Galactic Civil War. Firest's previous combat experience, acquired while training as a field commander with the Laramus Base Irregulars mercenary group, would prove invaluable to him during one of the Rebellion's most trying campaigns of the war.[2] By 3 ABY,[5] Firest was stationed at the Alliance High Command's secret headquarters of Echo Base on the Outer Rim Territories ice planet Hoth. He was chiefly responsible for executing Echo Base's troop movements in the field, as directed by base commanders General Carlist Rieekan and Major Bren Derlin. When the Galactic Empire discovered the existence of the base by way of a remote-reconnaissance Viper probe droid[2] in 3 ABY,[5] the Rebellion prepared for the imminent Imperial invasion, and the responsibility fell to Firest to carry out Rieekan's preplanned defensive evacuation strategy, Evac Rearguard Action 101.[2]

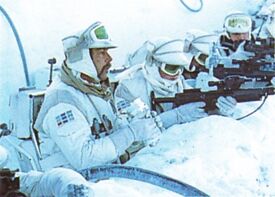
On Hoth, Ledick Firest was responsible for carrying out Rebel troop movements in the field, as ordered by the Echo Base command staff.
Rieekan ordered a full evacuation of Echo Base, leaving only five companies of Special Forces troopers and two snowspeeder flights under Firest's command to defend the Alliance's retreat against the Imperial invasion force. Both Rieekan and Firest knew immediately that the base's defensive forces could never hope to stop the Imperial advance. Rather, Rieekan's orders were simply to delay the Imperial forces long enough to allow all of Echo Base's evacuation transports time to escape Hoth. But Firest also realized that his forces would not be able to hold the base's perimeter for long. If he could not stop the Imperial invasion, Firest instead hoped to manipulate it. He suspected that the Empire's primary target would be the base's power generators, in order to bring down the powerful planetary shield protecting Echo Base from orbital bombardment. So, Firest planned to let the Empire have the generators as it wanted, organizing his defenses to make it seem like the Rebels were chiefly concerned with defending the shield and not the highly vulnerable evacuation staging area on the far side of the base, where the Rebels' transports would be lifting off.[2]
To keep the Imperial invasion force's advancing All Terrain Armored Transport walkers away from the departing transports, Firest's men created a lightly defended corridor leading straight to the power generators, while placing heavy gun emplacements to the side, which would effectively funnel the Imperial forces down the path Firest wanted them to take. At the same time, Firest knew the Imperial probe droid that had discovered Echo Base had most likely relayed the base's defensive formations back to the invasion force, so Firest had to create the impression that his defenses were just as the probe had reported, when in reality they were only slightly different to lead the AT-ATs away from the transports. Firest's defenses would keep the advancing AT-ATs clustered together in a relatively tight grouping, which was imperative for the base's snowspeeders, the most vital element of the Rebels' defensive strategy, to have any effect.[2]
Firest ordered the men under his command, combat veterans and green recruits alike, to continually empty their blasters and fall back, until they reached Echo Station 3-7, where they would then sprint for transport at the evacuation staging area and hopefully escape before the AT-ATs brought them down.[2] But he also issued the caveat for his men to avoid frontal engagement with the walkers, which would bring the full might of the AT-ATs' blasters to bear on them. Instead, he instructed them to outmaneuver the walkers and get in behind them.[4] Still, Firest knew his orders would mean the deaths of many of the Rebellion's finest soldiers.[2]
Successful evacuation[]
- "Come on!"
- ―Colonel Ledick Firest orders his men to storm the downed AT-AT walker Blizzard 2

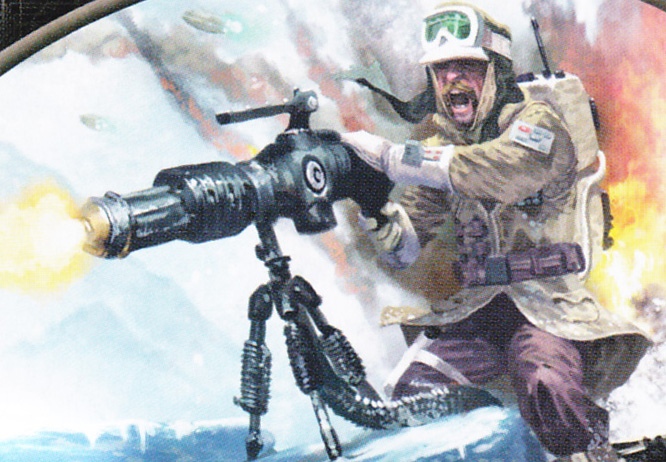
Ledick Firest fights during the Battle of Hoth.
Firest worked alongside his men, helping to set up equipment in and around Echo Base's defensive ice trenches in preparation for the upcoming engagement.[1][6] While the Rebel defenders waited for the onset of battle, Firest used Model TD2.3 electrobinoculars[7][8] to scan the horizon for signs of the approaching enemy.[7] When the first call came from Outpost Beta on Echo Base's external defensive perimeter announcing the presence of Imperial AT-AT walkers only two kilometers from Hoth's North Ridge,[2] Firest, to his shock, sighted the immense walkers heading straight for the shield generators.[7] He then announced the formal Code Red Alert to the base by way of communication with Rieekan,[4] which first initiated the Battle of Hoth.[2] As Rieekan emphasized the dire need for the Rebels to evacuate quickly while still under the protection of the base's deflector shield, Firest responded that he would not let Rieekan and the rest of Echo Base down.[4]
Firest monitored the battle from his entrenched position through his electrobinoculars.[1] As the fighting raged, Rogue Group pilot Wedge Antilles downed the AT-AT Blizzard 2 using his snowspeeder's harpoon and tow cable to trip the walker's legs, the first AT-AT neutralized during the battle.[9] Upon seeing the walker fall, Firest immediately signaled his men to storm the downed machine.[1] However, as two of Firest's soldiers,[1] Corporal Vildar Blin and an assistant,[10] charged forward,[1] a snowspeeder pilot fired on the crippled AT-AT from overheard, destroying it. The two men were killed in the resulting massive explosion.[10] At some point during the battle, Firest manned a Mark II medium repeating blaster cannon with great ferocity.[11]
The Battle of Hoth proved to be the Rebel Alliance's worst ground defeat of the Galactic Civil War. The Rebellion suffered heavy casualties and the loss of Echo Base,[12] but Firest's defensive strategy worked. By clustering his forces together and unleashing maximum concentrated firepower on the advancing AT-AT line, Firest prevented the walkers from deviating toward the evacuation staging area and held off the Imperial invasion from destroying the power generators long enough for many of the base's transports and personnel, including the Alliance High Command, to safely evacuate.[2]
While the Rebellion lost many—only one of the sergeants in Firest's five companies, Reyé Hollis, survived[10]—the casualties would have been much higher if not for Firest's efforts. Firest himself survived the battle and escaped Hoth aboard the final evacuation transport,[2] the GR-75 medium transport Bright Hope.[12]
Personality and traits[]
- "Look. Those Walkers' blasters are murder. You can't go toe-to-toe with 'em. You gotta outmaneuver 'em—get in behind. 'Cause if they get a decent shot off, you've had it."
- ―Colonel Ledick Firest, commanding Echo Base's ground defenses

During the Battle of Hoth, Firest used to great effect the harsh combat experience he gained previously while training with mercenaries.
Colonel Ledick Firest was known for the development of his subordinate officers and commanders serving under him while with the Rebellion. His men survived more battles than any other group during the Galactic Civil War.[13] Firest used his experience while training as a field commander with the Laramus Base Irregulars to a maximum during the Rebellion's evacuation at the Battle of Hoth. His instructions to the men serving under his command at Hoth—to keep emptying and reloading their blasters until they had fallen back far enough to retreat, all the while hoping none of the AT-AT walkers decided to target them in the process—were terrifying simple, according to Rebel Alliance historian Voren Na'al. Firest owed his ability to give such orders to his harsh combat experience and military training, though he nonetheless appreciated their full consequence—that those same orders would mean the deaths of many of his best and brightest soldiers.[2]
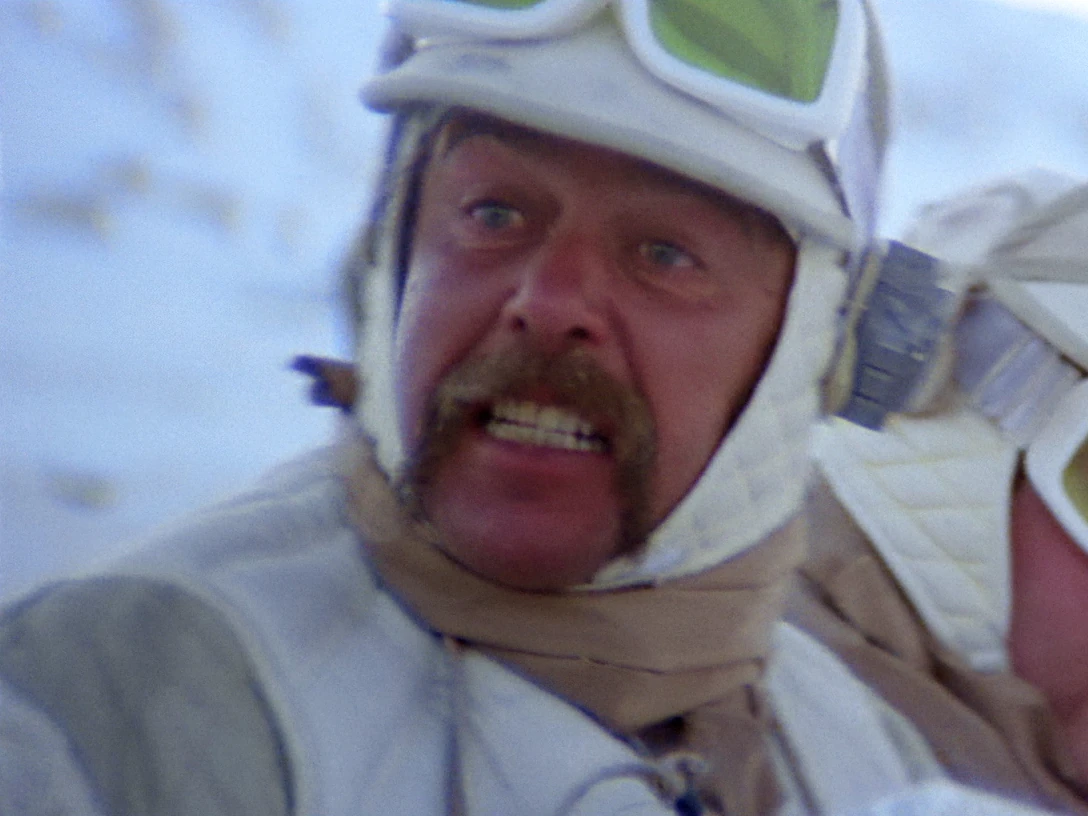
Firest had brown hair,[1][3] blue eyes, and light skin. He sported a large mustache that grew down both sides of his chin. By the start of the Hoth battle, Firest had a healed scar just below his right eye.[1]
Equipment[]
During the Battle of Hoth, Firest wore the standard cold-weather armor of Echo Base's field troops.[1][6] His outfit included the set's headgear, anti-glare goggles, scarf, padded vest, thermal flak jacket, gloves,[7] belt,[11] leggings, boots,[6] and backpack.[7] Firest's equipment also included an A295 blaster rifle,[14] a standard-issue DL-21 blaster pistol sidearm, which he wore holstered at his right hip,[6] Model TD2.3 electrobinoculars, and a pair of smaller binoculars.[7]
Behind the scenes[]
Character development[]
The character Colonel Ledick Firest first appeared in a set of brief quotation narratives in the rule book supplement of the 1988 West End Games board game Assault on Hoth, in which he is identified as the field officer in command of the Echo Base defensive forces during the Battle of Hoth.[4] Firest later received mention in the first edition of the 1989 West End Games sourcebook Galaxy Guide 3: The Empire Strikes Back, written by Michael Stern.[15] The Firest character was again mentioned in the 1996 second edition of Galaxy Guide 3, as part of a major expansion on the sourcebook by Pablo Hidalgo, in which Firest was provided greater biographical details concerning his performance during the battle and full roleplaying statistics for use with Star Wars: The Roleplaying Game.[2]
In 2013, the fifth issue of De Agostini's relaunched The Official Star Wars Fact File serial publication established Firest to be a mustachioed Rebel trench officer appearing in the 1980 film Star Wars: Episode V The Empire Strikes Back.[16] The trench officer appears fleetingly during the Battle of Hoth following the downing of the first Imperial walker, shouting "Come on!" to his troops.[1] The Empire Strikes Back novelization, published just prior to the film and which includes a version of this scene, is therefore now retroactively considered to be the Firest character's first appearance in Star Wars canon.[17]
According to author Stephen J. Sansweet in his book Star Wars: The Action Figure Archive, the mustachioed "Rebel Commander" action figure from Kenner's original 1980 The Empire Strikes Back toy line is based on Ledick Firest.[7] Note, however, that the figure's packaging features an image of Echo Base Rebel Jeroen Webb.[14] In that toy line's assembly instructions for the 1981 Imperial Cruiser figure, the figure was depicted as a captive in the cruiser's rear compartment.[18] One year later, the toy line released a figure for the CAP-2 Captivator, with packaging showing bounty hunter Bossk using the vehicle to capture Firest, delivering the Rebel to Dark Lord of the Sith Darth Vader.[19]
Inconsistencies[]
The earliest incarnation of the Firest character, as retroactively established by The Official Star Wars Fact File 5, appears in The Empire Strikes Back novelization,[16][17] which includes a version of the character's scene that differs from the corresponding film scene.[1][17] The novel explains that, following the toppling of the Imperial walker, a Rebel officer leaps out of his snow trench and signals his men to follow him in a boisterous charge on the fallen machine before they are thrown backward in the walker's explosion.[17] However, the film only shows Firest as signaling his men forward and remaining in his trench to monitor the situation through his electrobinoculars while two other soldiers charge the walker.[1] Additionally, the two soldiers who charge the walker are established to have been killed in the explosion, according to the Star Wars Insider 74 article Who's Who in Echo Base.[10] Given the predominance of film material over all other elements of continuity,[20] this article treats The Empire Strikes Back novelization as an inconsistency.
Both editions of Galaxy Guide 3 include a quote said by Firest to his troops regarding what they are to do during the battle—meet the Imperial invasion, fall back, and eventually retreat to find transport to escape Hoth.[2][15] However, in the 1993 The Movie Trilogy Sourcebook by West End Games, which compiles information from Galaxy Guide 1: A New Hope, Galaxy Guide 3, and Galaxy Guide 5: Return of the Jedi, Firest's quote is altered from the way it appears in both Galaxy Guide 3 editions: "Fight as hard as you can, fall back if you must, and take down as many of them as possible. When you've retreated back as far as station 3-7, sprint for the evacuation area and find transport. And watch your back for incoming walker fire." The original quote can be found at the top of this article.[21]
Appearances[]
- Star Wars: The Empire Strikes Back novelization (First appearance) (Retcon)
- Star Wars: Episode V The Empire Strikes Back junior novelization (Retcon)
- Star Wars: Episode V The Empire Strikes Back (Retcon)
Sources[]
Notes and references[]
- ↑ 1.00 1.01 1.02 1.03 1.04 1.05 1.06 1.07 1.08 1.09 1.10 1.11 1.12 1.13 1.14 1.15 1.16 Star Wars: Episode V The Empire Strikes Back
- ↑ 2.00 2.01 2.02 2.03 2.04 2.05 2.06 2.07 2.08 2.09 2.10 2.11 2.12 2.13 2.14 2.15 2.16 Galaxy Guide 3: The Empire Strikes Back, Second Edition
- ↑ 3.0 3.1 Star Wars: The Official Starships & Vehicles Collection 10
- ↑ 4.0 4.1 4.2 4.3 4.4 4.5 Assault on Hoth
- ↑ 5.0 5.1 The New Essential Chronology dates the Battle of Hoth to 3 ABY.
- ↑ 6.0 6.1 6.2 6.3 Star Wars Technical Journal of the Rebel Forces
- ↑ 7.0 7.1 7.2 7.3 7.4 7.5 7.6 Star Wars: The Action Figure Archive
- ↑ The New Essential Guide to Weapons and Technology
- ↑ Star Wars: Complete Locations
- ↑ 10.0 10.1 10.2 10.3
 "Who's Who in Echo Base" — Star Wars Insider 74
- ↑ 11.0 11.1
 Star Wars: The Card Game — Core Set (Card: Heavy Blaster Emplacement) (backup link)
- ↑ 12.0 12.1 The Complete Star Wars Encyclopedia, Vol. II, p. 62 ("Hoth, Battle of")
- ↑ The Complete Star Wars Encyclopedia, Vol. I, p. 275 ("Firest, Colonel Ledick")
- ↑ 14.0 14.1 Star Wars: The Empire Strikes Back (Pack: Rebel Commander) (backup link)
- ↑ 15.0 15.1 Galaxy Guide 3: The Empire Strikes Back
- ↑ 16.0 16.1 The Official Star Wars Fact File (2013) Part 5 (HOT5, The Battle of Hoth)
- ↑ 17.0 17.1 17.2 17.3 Star Wars Episode V: The Empire Strikes Back novelization
- ↑ Star Wars: The Empire Strikes Back (Pack: Imperial Cruiser)
- ↑ Star Wars: The Empire Strikes Back (Pack: CAP-2 (Captivator)) (backup link)
- ↑ "What'd I say again? Select posts by me regarding continuity" — Keeper of the Holocron's Blog — Leland Chee's StarWars.com Blog (backup link)
- ↑ The Movie Trilogy Sourcebook