mNo edit summary |
m (Adding backup links) |
||
| (86 intermediate revisions by 18 users not shown) | |||
| Line 1: | Line 1: | ||
| − | {{Eras|imp|featured}} |
+ | {{Eras|imp|canon=Mission to Vassek 3|featured}} |
| ⚫ | |||
| ⚫ | |||
{{Twoconflicting|"[[Lair of Grievous]]"|''[[Star Wars: The Clone Wars: Republic Heroes]]''}} |
{{Twoconflicting|"[[Lair of Grievous]]"|''[[Star Wars: The Clone Wars: Republic Heroes]]''}} |
||
| ⚫ | |||
| ⚫ | |||
{{Mission |
{{Mission |
||
| − | |prev=*[[Mission to Geonosis (Barriss Offee)|Mission to Geonosis]] |
+ | |prev=*[[Mission to Geonosis (Barriss Offee)|Mission to Geonosis]]<ref name="Cloak of Darkness Decoded">{{TCW|Cloak of Darkness|d=y}}</ref> |
| − | *[[Rescue on the Tranquility|Rescue on the ''Tranquility'']] |
+ | *[[Rescue on the Tranquility/Legends|Rescue on the ''Tranquility'']]<ref name="Cloak of Darkness">{{TCW|Cloak of Darkness}}</ref> |
| − | |conc=[[Battle of |
+ | |conc=*[[Battle of Atraken]]<ref name="HNN 14:4:14">{{InsiderCite|67|Republic HoloNet News Core Edition 14:4:14}}</ref> |
| − | + | *[[Foerost Siege]]<ref name="NEC">''[[The New Essential Chronology]]''</ref> |
|
| + | *[[Battle of Ryloth/Legends|Battle of Ryloth]]<ref name="Visual Guide Updated">''[[Star Wars: The Ultimate Visual Guide: Updated and Expanded]]''</ref> |
||
| + | |next=[[Skirmish at Vanqor/Legends|Skirmish at Vanqor]]<ref name="Visual Guide Updated" /> |
||
|name=Mission to Vassek's third moon |
|name=Mission to Vassek's third moon |
||
| ⚫ | |||
| − | |imageBG= |
||
| + | |conflict=[[Clone Wars/Legends|Clone Wars]]<ref name="Lair of Grievous Ep Guide">{{SWArchive|url=theclonewars/guide/episode010.html|text=''The Clone Wars'' Episode Guide: Lair of Grievous|archivedate=20110629042618}}</ref> |
||
| ⚫ | |||
| − | | |
+ | |objective=Arrest [[Trade Federation Viceroy|Viceroy]] [[Nute Gunray/Legends|Nute Gunray]]<ref name="Lair of Grievous">{{TCW|Lair of Grievous}}</ref> |
| − | | |
+ | |date=[[22 BBY/Legends|22 BBY]]<ref name="Lair of Grievous Date">{{TCWdates|110}}</ref> |
| + | |place=[[Grievous's castle]], [[third moon of Vassek]]<ref name="Lair of Grievous Ep Guide" /> |
||
| − | |date=[[22 BBY]]{{Ref|<ref name="ERC">''[[The Essential Reader's Companion]]''</ref>}} |
||
| − | | |
+ | |result=All but [[Jedi Master/Legends|Jedi Master]] [[Kit Fisto/Legends|Kit Fisto]] [[Death/Legends|eliminated]]; Fisto escapes<ref name="Lair of Grievous" /> |
| − | | |
+ | |side1=*[[Galactic Republic/Legends|Galactic Republic]]<ref name="Lair of Grievous" /> |
| ⚫ | |||
| − | |BG2= |
||
| − | | |
+ | |side2=[[Confederacy of Independent Systems/Legends|Confederacy of Independent Systems]]<ref name="Lair of Grievous" /> |
| ⚫ | |||
| − | |side2=[[Confederacy of Independent Systems]]{{Ref|<ref name="Lair of Grievous" />}} |
||
|side3= |
|side3= |
||
|side4= |
|side4= |
||
| − | |commanders1=*[[Jedi General|General]] Kit Fisto |
+ | |commanders1=*[[Jedi General/Legends|General]] Kit Fisto<ref name="Lair of Grievous" /> |
| − | *[[Jedi Knight]] [[Nahdar Vebb]]† |
+ | *[[Jedi Knight/Legends|Jedi Knight]] [[Nahdar Vebb/Legends|Nahdar Vebb]]†<ref name="Lair of Grievous" /> |
| − | *[[Clone trooper commander|Commander]] [[CC-3714]]<ref name="tcwce">''[[Star Wars: The Clone Wars Character Encyclopedia]]''</ref> † |
+ | *[[Clone trooper commander|Commander]] [[CC-3714]]<ref name="tcwce">''[[Star Wars: The Clone Wars Character Encyclopedia]]''</ref> †<ref name="Lair of Grievous Ep Guide" /> |
| − | |commanders2=*[[General]] [[Grievous]] |
+ | |commanders2=*[[General/Legends|General]] [[Grievous/Legends|Grievous]]<ref name="Lair of Grievous" /> |
| − | *[[Unidentified B1 battle droid lieutenant|B1 battle droid lieutenant]]† |
+ | *[[Unidentified B1 battle droid lieutenant|B1 battle droid lieutenant]]†<ref name="Lair of Grievous" /> |
|commanders3= |
|commanders3= |
||
|commanders4= |
|commanders4= |
||
| − | |ppl1=*2 [[Jedi]] |
+ | |ppl1=*2 [[Jedi/Legends|Jedi]]<ref name="Lair of Grievous" /> |
| − | *6 [[ |
+ | *6 [[Clone trooper/Legends|clone troopers]]<ref name="Lair of Grievous" /> |
| − | *1 [[Nu-class attack shuttle|''Nu''-class attack shuttle]] |
+ | *1 [[Nu-class attack shuttle|''Nu''-class attack shuttle]]<ref name="Lair of Grievous" /> |
| − | *1 [[Delta-7B Aethersprite-class light interceptor|Delta-7B ''Aethersprite''-class light interceptor]] |
+ | *1 [[Delta-7B Aethersprite-class light interceptor/Legends|Delta-7B ''Aethersprite''-class light interceptor]]<ref name="Lair of Grievous" /> |
| − | |ppl2=*1 [[cyborg]] general |
+ | |ppl2=*1 [[Cyborg/Legends|cyborg]] general<ref name="Lair of Grievous" /> |
| − | *5 [[B1 battle droid]] |
+ | *5 [[B1 battle droid/Legends|B1 battle droids]]<ref name="Lair of Grievous" /> |
| − | *[[IG-100 MagnaGuard]] |
+ | *[[IG-100 MagnaGuard/Legends|IG-100 MagnaGuards]]<ref name="Lair of Grievous" /> |
| − | *1 [[roggwart]] |
+ | *1 [[Roggwart/Legends|roggwart]]<ref name="Lair of Grievous" /> |
|ppl3= |
|ppl3= |
||
|ppl4= |
|ppl4= |
||
| − | |casual1=All forces except Fisto and [[Kit Fisto's Delta-7B Aethersprite-class light interceptor|his fighter]] |
+ | |casual1=All forces except Fisto and [[Kit Fisto's Delta-7B Aethersprite-class light interceptor/Legends|his fighter]]<ref name="Lair of Grievous" /> |
| − | |casual2=*All B1 [[ |
+ | |casual2=*All B1 [[Battle droid/Legends|battle droids]]<ref name="Lair of Grievous" /> |
| − | *4 IG-100 MagnaGuards |
+ | *4 IG-100 MagnaGuards<ref name="Lair of Grievous" /> |
| − | *[[Gor]] |
+ | *[[Gor/Legends|Gor]]<ref name="Lair of Grievous" /> |
|casual3= |
|casual3= |
||
|casual4= |
|casual4= |
||
|civilian=}} |
|civilian=}} |
||
{{Quote|This is the lair of General Grievous!|Kit Fisto|audio=LairOfGeneralGrievous-LoG.ogg|Lair of Grievous}} |
{{Quote|This is the lair of General Grievous!|Kit Fisto|audio=LairOfGeneralGrievous-LoG.ogg|Lair of Grievous}} |
||
| − | [[Jedi Master]] [[Kit Fisto]], [[Jedi Knight]] [[Nahdar Vebb]], and a [[squad]] of [[ |
+ | [[Jedi Master/Legends|Jedi Master]] [[Kit Fisto/Legends|Kit Fisto]], [[Jedi Knight/Legends|Jedi Knight]] [[Nahdar Vebb/Legends|Nahdar Vebb]], and a [[Squad/Legends|squad]] of [[Clone trooper/Legends|clone troopers]] undertook a '''mission''' in [[22 BBY/Legends|22 BBY]] during the [[Clone Wars/Legends|Clone Wars]] to recapture [[Trade Federation Viceroy]] [[Nute Gunray/Legends|Nute Gunray]], who had recently [[Rescue on the Tranquility/Legends|escaped]] from [[Galactic Republic/Legends|Republic]] custody. However, [[Confederacy of Independent Systems/Legends|Confederate]] [[Head of State/Legends|Head of State]] [[Count of Serenno/Legends|Count]] [[Dooku/Legends|Dooku]], displeased with [[General/Legends|General]] [[Grievous/Legends|Grievous's]] recent failures in the war, used a Republic [[Homing beacon/Legends|homing beacon]] to lure the [[Jedi/Legends|Jedi]] and [[Cloning/Legends|clones]] to the general's [[Grievous's castle|castle]] on the [[third moon of Vassek]] as a test for Grievous. Gunray deceived the Jedi and [[Trooper/Legends|troopers]] through a [[Hologram/Legends|holotransmission]], and once they uncovered the ploy, Dooku contacted the Republic agents and put them on the trail of the "alternative prize" of Grievous. |
| − | The Jedi and their [[ |
+ | The Jedi and their [[Troop/Legends|troops]] set a trap for Grievous and confronted the [[Cyborg/Legends|cyborg]] general once he arrived. However, Grievous was able to [[Death/Legends|eliminate]] several clone troopers, and after sustaining injuries, escape to the castle's secret command center. Sealing off the exits, the Confederate general trapped the Jedi and clones inside his castle. While Grievous was repaired by [[EV-A4-D/Legends|his caretaker droid]], the general pitted the Jedi and the remaining clones against the castle's defenses—a molten incinerator pit and the general's pet [[Roggwart/Legends|roggwart]], [[Gor/Legends|Gor]]. The clones were killed, but the Jedi were able to eliminate Gor. As Grievous resolved to personally confront the Jedi, Fisto and Vebb infiltrated the castle's command center. Vebb remained outside, however, and fought Grievous himself, but was killed by the general. After Fisto [[Lightsaber combat/Legends|dueled]] Grievous on the castle's outer platform, the Jedi Master was able to escape. |
==Prelude== |
==Prelude== |
||
| − | {{Quote|General, the ongoing stalemate in the war has become unacceptable. There is concern you |
+ | {{Quote|General, the ongoing stalemate in the war has become unacceptable. There is concern you've lost your focus. Lord Sidious demands more dramatic results. ''More dead Jedi''.''"<br />"''You expect victory over Jedi, but all you give me to fight them is battle droids!|Count Dooku and General Grievous|audio=MoreDramaticResults-LoG.ogg|Lair of Grievous}} |
[[File:ArgyusGunrayEscape-CoD.png|thumb|left|250px|Gunray and Argyus escape aboard their stolen Republic frigate.]] |
[[File:ArgyusGunrayEscape-CoD.png|thumb|left|250px|Gunray and Argyus escape aboard their stolen Republic frigate.]] |
||
| − | In [[22 BBY]]<ref name=" |
+ | In [[22 BBY/Legends|22 BBY]]<ref name="Lair of Grievous Date" /> during the [[Clone Wars/Legends|Clone Wars]], [[Trade Federation Viceroy]] [[Nute Gunray/Legends|Nute Gunray]]—who had been [[Mission to Rodia/Legends|captured]] by [[Galactic Republic/Legends|Republic]] forces on [[Rodia/Legends|Rodia]]—was to be transferred aboard the [[Venator-class Star Destroyer/Legends|Star Destroyer]] [[Tranquility/Legends|''Tranquility'']] to [[Coruscant/Legends|Coruscant]] for trial. The [[Viceroy/Legends|viceroy]] was kept under heavy guard by [[Jedi Master/Legends|Jedi Master]] [[Luminara Unduli/Legends|Luminara Unduli]] and [[Padawan/Legends|Padawan]] [[Ahsoka Tano/Legends|Ahsoka Tano]]; however, Gunray was able to [[Rescue on the Tranquility/Legends|escape]] with the help of [[Dark Acolyte]] [[Asajj Ventress/Legends|Asajj Ventress]] and turncoat [[Senate Commando/Legends|Senate Commando]] [[Captain/Legends|Captain]] [[Faro Argyus]]. The [[Confederacy of Independent Systems/Legends|Confederate]] agents stole a [[Unidentified Consular-class cruiser (Rodia)|Republic frigate]] to make their getaway, and the [[Starship/Legends|ship's]] [[Homing beacon/Legends|homing beacon]] allowed the Republic to track the stolen [[Consular-class cruiser (Charger c70 retrofit)/Legends|cruiser]]. Since [[Jedi General/Legends|Jedi General]] [[Kit Fisto/Legends|Kit Fisto]] and his [[Fleet/Legends|fleet]] were near Gunray's last known position, Unduli contacted the [[Nautolan/Legends|Nautolan]] [[Jedi/Legends|Jedi]] Master to follow and recapture Gunray.<ref name="Cloak of Darkness" /> |
| − | Meanwhile, the Confederate [[Head of State]], [[Count]] [[Dooku]], had become displeased with the ongoing stalemate in the war between his best [[general]], [[Grievous]], and the Republic and [[Jedi Order]]. As Dooku's [[Sith Master]], [[Palpatine|Darth Sidious]], demanded more [[Death|dead]] Jedi, Dooku decided to arrange a trap for Grievous in order to reassess the [[cyborg |
+ | Meanwhile, the Confederate [[Head of State/Legends|Head of State]], [[Count of Serenno/Legends|Count]] [[Dooku/Legends|Dooku]], had become displeased with the ongoing stalemate in the war between his best [[General/Legends|general]], [[Grievous/Legends|Grievous]], and the Republic and [[Jedi Order/Legends|Jedi Order]].<ref name="Lair of Grievous" /> Grievous had failed in several recent operations, resulting in Confederate defeats at the [[Battle of the Kaliida Nebula/Legends|Battle of the Kaliida Nebula]] and the [[Battle of Bothawui/Legends|Battle of Bothawui]], as well as the [[Mission to Skytop Station/Legends|loss]] of the [[Listening post/Legends|listening post]] [[Skytop Station/Legends|Skytop Station]].<ref name="Chronicling TCW 4">{{Blog|official=true|2012/10/26/chronicling-the-clone-wars%C2%A0-4/|Chronicling ''The Clone Wars'' #4|int=Chronicling The Clone Wars}}</ref> As Dooku's [[Sith Master/Legends|Sith Master]], [[Palpatine/Legends|Darth Sidious]], demanded more [[Death/Legends|dead]] Jedi, Dooku decided to arrange a trap for Grievous in order to reassess the [[Cyborg/Legends|cyborg's]] abilities. The [[Sith Lord/Legends|Sith Lord]] remotely deactivated the general's personal [[IG-100 MagnaGuard/Legends|IG-100 MagnaGuard]] [[Bodyguard/Legends|bodyguards]] in [[Grievous's castle|his castle]] on the [[third moon of Vassek]] and deployed the Republic tracking beacon from Gunray's stolen ship to the general's lair, seeking to lure the Jedi to the castle so that Grievous would be able to [[Jedi hunter/Legends|hunt]] them for sport.<ref name="Lair of Grievous Ep Guide" /><ref name="Lair of Grievous" /> |
==The mission== |
==The mission== |
||
===Bait for the Jedi=== |
===Bait for the Jedi=== |
||
| − | {{Quote|I apologize for the deception, Master Jedi.''"<br />"''Count Dooku. You have a great talent for unexpected appearances.''"<br />"''It's a shame you came so far to be frustrated. While the |
+ | {{Quote|I apologize for the deception, Master Jedi.''"<br />"''Count Dooku. You have a great talent for unexpected appearances.''"<br />"''It's a shame you came so far to be frustrated. While the viceroy is unavailable for capture, allow me to offer you an alternative prize.|Count Dooku directs Kit Fisto and his comrades to Grievous|audio=AlternativePrize-LoG.ogg|Lair of Grievous}} |
| − | Fisto took [[Kit Fisto's Delta-7B Aethersprite-class light interceptor|his Delta-7B starfighter]] and his [[astromech droid]], [[R6-H5]], and followed the signal of the Republic beacon to the [[Vassek system]], deep in Confederate-held [[Realspace|space]]. The Jedi Master contacted Unduli and Tano at the [[Outer Rim Command Center]], and they reported that Fisto's former Padawan, [[Nahdar Vebb]], had also tracked the beacon to the [[Star system|system]]. Vebb had already arrived on Vassek's third [[moon]]—where the beacon had been located—with a [[Nu-class attack shuttle|shuttle]] and several [[ |
+ | Fisto took [[Kit Fisto's Delta-7B Aethersprite-class light interceptor/Legends|his Delta-7B starfighter]] and his [[Astromech droid/Legends|astromech droid]], [[R6-H5/Legends|R6-H5]], and followed the signal of the Republic beacon to the [[Vassek system/Legends|Vassek system]], deep in Confederate-held [[Realspace/Legends|space]]. The Jedi Master contacted Unduli and Tano at the [[Outer Rim Command Center/Legends|Outer Rim Command Center]], and they reported that Fisto's former Padawan, [[Nahdar Vebb/Legends|Nahdar Vebb]], had also tracked the beacon to the [[Star system/Legends|system]]. Vebb had already arrived on Vassek's third [[Moon/Legends|moon]]—where the beacon had been located—with a [[Nu-class attack shuttle|shuttle]] and several [[Clone trooper/Legends|clone troopers]]. Fisto detached his [[Starfighter/Legends|starfighter]] from its [[Syliure-31 long-range hyperdrive module|hyperspace docking ring]], and proceeded to the moon to rendezvous with Vebb.<ref name="Lair of Grievous Ep Guide" /><ref name="Lair of Grievous Decoded">{{TCW|Lair of Grievous|d=y}}</ref> |
| − | [[File: |
+ | [[File:Dooku_deception.png|thumb|right|250px|Dooku directs the Jedi toward an "alternative prize."]] |
| − | Once Fisto had landed and left R6-H5 to look after his fighter, the Jedi Master met with Vebb. [[Clone trooper commander|Clone Commander]] [[CC-3714|Fil]] had tracked the beacon to the south end of the gorge, and, leaving [[ |
+ | Once Fisto had landed and left R6-H5 to look after his fighter, the Jedi Master met with Vebb. [[Clone trooper commander|Clone Commander]] [[CC-3714|Fil]] had tracked the beacon to the south end of the gorge, and, leaving [[Trooper/Legends|troopers]] [[Bel/Legends|Bel]] and [[Niner/Legends|Niner]] to guard the [[Shuttle/Legends|shuttle]], the group proceeded to the castle. While Vebb and Fil intended to use [[Lightsaber/Legends|lightsabers]] and [[Thermal detonator/Legends|thermal detonators]], respectively, to forcefully open the entrance to the building, Fisto was able to find a secret switch that activated a mechanism that opened the castle's door. Approaching the sanctum overlook chamber of the castle, the Jedi and [[Cloning/Legends|clones]] overheard a [[Hologram/Legends|hologram]] of Gunray giving orders to a [[Squad/Legends|squad]] of [[B1 battle droid/Legends|B1 battle droids]], led by a [[Unidentified B1 battle droid lieutenant|Lieutenant]], from behind a high-backed chair. Unaware that Gunray was not actually present, Fisto and Vebb led the attack on the [[Droid/Legends|droids]] and were able to eliminate their opponents. However, when Vebb [[Telekinesis/Legends|turned]] the chair around with [[The Force/Legends|the Force]], the group discovered Gunray's hologram, and the viceroy taunted the Jedi before severing the connection.<ref name="Lair of Grievous" /><ref name="Lair of Grievous Decoded" /> |
| − | Count Dooku contacted the Jedi and directed them toward an "alternative prize" to compensate for their failed attempt to recapture Gunray. The Jedi were uncertain of who their offered quarry was, and Vebb activated a mechanism through the chair that revealed another hallway. As the Jedi and clones walked through the castle, rooms opened along the way; inside the rooms were statues of [[Kaleesh]] [[ |
+ | [[Count/Legends|Count]] Dooku contacted the Jedi and directed them toward an "alternative prize" to compensate for their failed attempt to recapture Gunray. The Jedi were uncertain of who their offered quarry was, and Vebb activated a mechanism through the chair that revealed another hallway. As the Jedi and clones walked through the castle, rooms opened along the way; inside the rooms were statues of [[Kaleesh/Legends|Kaleesh]] [[warrior]]s—some featuring [[Cybernetics/Legends|cybernetics]]—that resembled Grievous himself. The group finally entered Grievous's secret armory and workshop, and deduced that the castle belonged to the general. While inspecting Grievous's trophy room, home to a collection of trophies from the Jedi that the general had murdered, Fisto received a report from Bel and Niner that Grievous's personal starfighter, [[Soulless One/Legends|''Soulless One'']], was approaching the castle. Fisto ordered the two clones protecting the shuttle to keep out of sight, while the Republic infiltrators decided to capture Grievous in an attempt to satisfy the "dead or alive" warrant on the Confederate general.<ref name="Lair of Grievous" /><ref name="Lair of Grievous Decoded" /> |
===Capturing a cyborg=== |
===Capturing a cyborg=== |
||
{{Quote|Cooperate, Grievous, and perhaps the Senate will be merciful.''"<br />"''It is ''you'' who shall get no mercy!|Kit Fisto and Grievous|audio=NoMercy-LoG.ogg|Lair of Grievous}} |
{{Quote|Cooperate, Grievous, and perhaps the Senate will be merciful.''"<br />"''It is ''you'' who shall get no mercy!|Kit Fisto and Grievous|audio=NoMercy-LoG.ogg|Lair of Grievous}} |
||
| − | [[File: |
+ | [[File:Vebb_Fisto_Grievous.png|thumb|left|250px|Fisto and Vebb duel Grievous.]] |
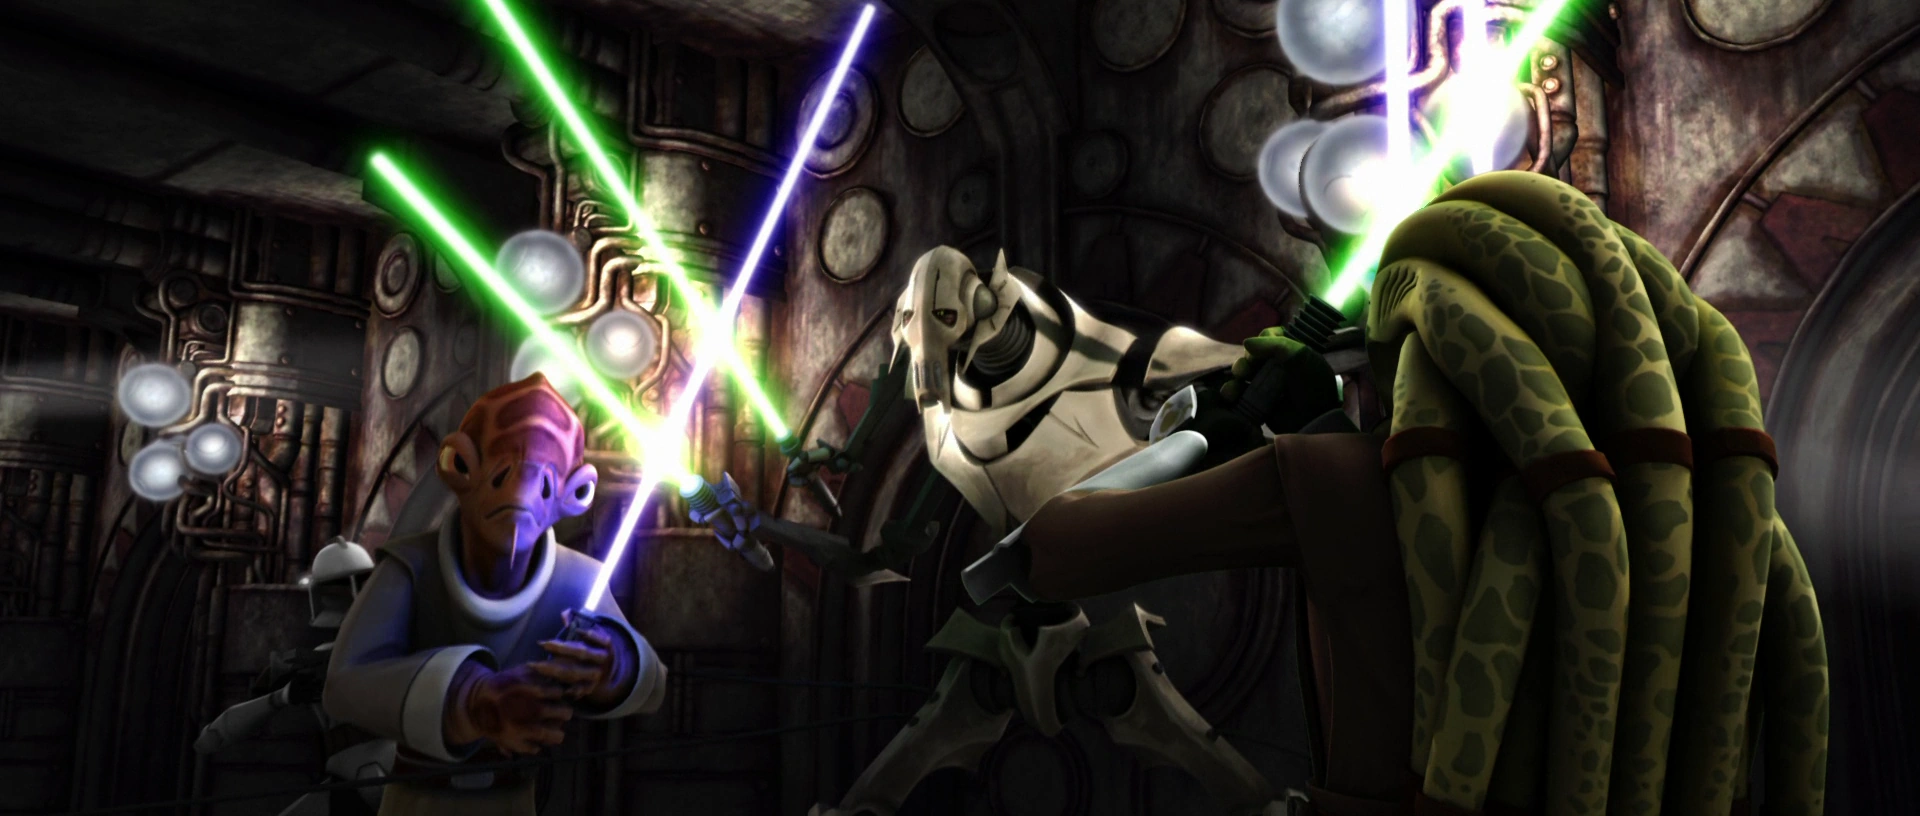
| − | As Grievous entered his castle, the Jedi and clones appeared and surrounded the cyborg general. Grievous activated two of his stolen Jedi lightsabers, and [[Lightsaber duel|engaged]] Fisto and Vebb in [[Lightsaber combat|combat]]. However, as the two Jedi saberlocked with the general, Grievous split his arms and activated two more of his lightsabers. The two Jedi were forced to break the bladelock as they avoided being slashed by the extra weapons, and Fisto ordered the clones to fire their [[DC-15A blaster rifle|blaster rifles']] [[Grappling hook|cables]] at Grievous. The clones aimed their grappling hooks at the general's legs, and as Grievous engaged the Jedi in another saberlock, Fisto used his lightsaber to sever the cyborg's legs.<ref name="Lair of Grievous" /> |
+ | As Grievous entered his castle, the Jedi and clones appeared and surrounded the cyborg general. Grievous activated two of his stolen Jedi lightsabers, and [[Lightsaber duel/Legends|engaged]] Fisto and Vebb in [[Lightsaber combat/Legends|combat]]. However, as the two Jedi saberlocked with the general, Grievous split his arms and activated two more of his lightsabers. The two Jedi were forced to break the bladelock as they avoided being slashed by the extra weapons, and Fisto ordered the clones to fire their [[DC-15A blaster rifle|blaster rifles']] [[Grappling hook/Legends|cables]] at Grievous. The clones aimed their grappling hooks at the general's legs, and as Grievous engaged the Jedi in another saberlock, Fisto used his lightsaber to sever the cyborg's legs.<ref name="Lair of Grievous" /> |
| − | Although crippled, Grievous was able to jump up and hold onto one of the beams attached to the roof. The clones' grappling hooks were still attached to the general, and the [[ |
+ | Although crippled, Grievous was able to jump up and hold onto one of the beams attached to the roof. The clones' grappling hooks were still attached to the general, and the [[Troop/Legends|troops]] were able to pull Grievous to the ground. As Vebb crossed blades with the cyborg, the lightsaber that Grievous was holding spun out of his hand. The general jumped back up, and one of the clones holding the grappling hooks was thrown backward, while the other was pulled toward Grievous. The general batted the dead clone against Fisto, forcing the Jedi Master backward, before throwing the trooper on top of Vebb. Grievous's faceplate was damaged from one of the clones' [[Laser/Legends|laser]] shots, and as the general escaped, Vebb and several of the troopers gave pursuit. However, Grievous killed two more of the clones before entering the castle's secret command center; of the clone troopers, only Fil and [[Unidentified clone trooper (Vassek moon)|another trooper]] remained alive.<ref name="Lair of Grievous Ep Guide" /><ref name="Lair of Grievous" /> |
| − | The Confederate general discovered from his personal caretaker droid, [[EV-A4-D]], that his IG-100 MagnaGuards had been remotely turned off for recharge. Grievous reactivated his droid bodyguards and ordered them to lock down the perimeter. As Fisto, Vebb, and the clones headed to escape from the castle, the general sealed off the building's exits, trapping the Jedi and clones inside his lair. [[Commander]] Fil contacted Niner and Bel back with the shuttle and ordered the two clones to signal the Republic outpost at [[Bestine]] that they required reinforcements. However, as Niner and Bel entered the shuttle, Grievous's MagnaGuards fired a rocket at the craft, causing the shuttle to explode. The droids closed in on R6-H5 and Fisto's fighter, and the astromech droid escaped with the Jedi starfighter, spinning the ship and throwing off a MagnaGuard clinging to the fighter's hull.<ref name="Lair of Grievous Ep Guide" /><ref name="Lair of Grievous" /> |
+ | The Confederate general discovered from his personal caretaker droid, [[EV-A4-D/Legends|EV-A4-D]], that his IG-100 MagnaGuards had been remotely turned off for recharge. Grievous reactivated his droid bodyguards and ordered them to lock down the perimeter. As Fisto, Vebb, and the clones headed to escape from the castle, the general sealed off the building's exits, trapping the Jedi and clones inside his lair. [[Commander/Legends|Commander]] Fil contacted Niner and Bel back with the shuttle and ordered the two clones to signal the Republic outpost at [[Bestine IV/Legends|Bestine]] that they required reinforcements. However, as Niner and Bel entered the shuttle, Grievous's MagnaGuards fired a rocket at the craft, causing the shuttle to explode. The droids closed in on R6-H5 and Fisto's fighter, and the astromech droid escaped with the Jedi starfighter, spinning the ship and throwing off a MagnaGuard clinging to the fighter's hull.<ref name="Lair of Grievous Ep Guide" /><ref name="Lair of Grievous" /> |
===Hunted=== |
===Hunted=== |
||
| − | {{Quote|Greetings, young Jedi. Where is your Master?''"<br />"''You will find out soon enough. You can't defeat us all.''"<br />"''Of course I can |
+ | {{Quote|Greetings, young Jedi. Where is your Master?''"<br />"''You will find out soon enough. You can't defeat us all.''"<br />"''Of course I can!|Grievous and Nahdar Vebb|audio=NahdarVebbHunted-LoG.ogg|Lair of Grievous}} |
| − | Grievous opened a hololink and contacted the Jedi and clones, encouraging them to "experience all his home had to offer," before severing the connection. The general then opened up a molten incinerator pit, and while Fisto and Vebb were able to jump to safer ground, the two clones fell into the pit. Fil fired a grappling hook to the ceiling, and the Jedi were able to rescue him, but the other trooper plunged into the incinerator. Fisto then destroyed a [[TT-8L gatekeeper droid|holocam]] that Grievous was using to watch his opponents, and the Confederate general signaled his ravenous pet [[roggwart]], [[Gor]], to "entertain their guests." EV-A4-D began to repair Grievous from the injuries he had sustained.<ref name="Lair of Grievous" /><ref name="Lair of Grievous Decoded" /> |
+ | Grievous opened a hololink and contacted the Jedi and clones, encouraging them to "experience all his home had to offer," before severing the connection. The general then opened up a molten incinerator pit, and while Fisto and Vebb were able to jump to safer ground, the two clones fell into the pit. Fil fired a grappling hook to the ceiling, and the Jedi were able to rescue him, but the other trooper plunged into the incinerator. Fisto then destroyed a [[TT-8L gatekeeper droid|holocam]] that Grievous was using to watch his opponents, and the Confederate general signaled his ravenous pet [[Roggwart/Legends|roggwart]], [[Gor/Legends|Gor]], to "entertain their guests." EV-A4-D began to repair Grievous from the injuries he had sustained.<ref name="Lair of Grievous" /><ref name="Lair of Grievous Decoded" /> |
| − | As the Jedi and the clone trooper grouped together in the middle of a hallway junction, Gor appeared and approached the group. Fil opened fire on the roggwart, but Fisto's lightsaber was knocked out of his hand. Gor lunged at Fil and the two Jedi and the three quickly split up, surrounding the creature while Fisto retrieved his weapon. The clone commander directed [[blaster]] fire at Gor's neck and Vebb jumped onto the roggwart, plunging his lightsaber into Gor's back until he was bucked off. The roggwart swung its tail and seized Fil, batting Vebb with the captured clone. Fisto slashed the roggwart in the head, and Fil was slammed against the ground before Vebb severed Gor's tail. The Jedi Master cut off the roggwart's arms, and as Gor fell to the ground, Fisto killed the roggwart by driving his lightsaber into the back of the creature's neck. Vebb was shaken by Fil's death, but left the fallen clone and followed Fisto to the castle's command center.<ref name="Lair of Grievous" /> |
+ | As the Jedi and the clone trooper grouped together in the middle of a hallway junction, Gor appeared and approached the group. Fil opened fire on the roggwart, but Fisto's lightsaber was knocked out of his hand. Gor lunged at Fil and the two Jedi and the three quickly split up, surrounding the creature while Fisto retrieved his weapon. The clone commander directed [[Blaster/Legends|blaster]] fire at Gor's neck and Vebb jumped onto the roggwart, plunging his lightsaber into Gor's back until he was bucked off. The roggwart swung its tail and seized Fil, batting Vebb with the captured clone. Fisto slashed the roggwart in the head, and Fil was slammed against the ground before Vebb severed Gor's tail. The Jedi Master cut off the roggwart's arms, and as Gor fell to the ground, Fisto killed the roggwart by driving his lightsaber into the back of the creature's neck. Vebb was shaken by Fil's death, but left the fallen clone and followed Fisto to the castle's command center.<ref name="Lair of Grievous" /> |
| − | [[File: |
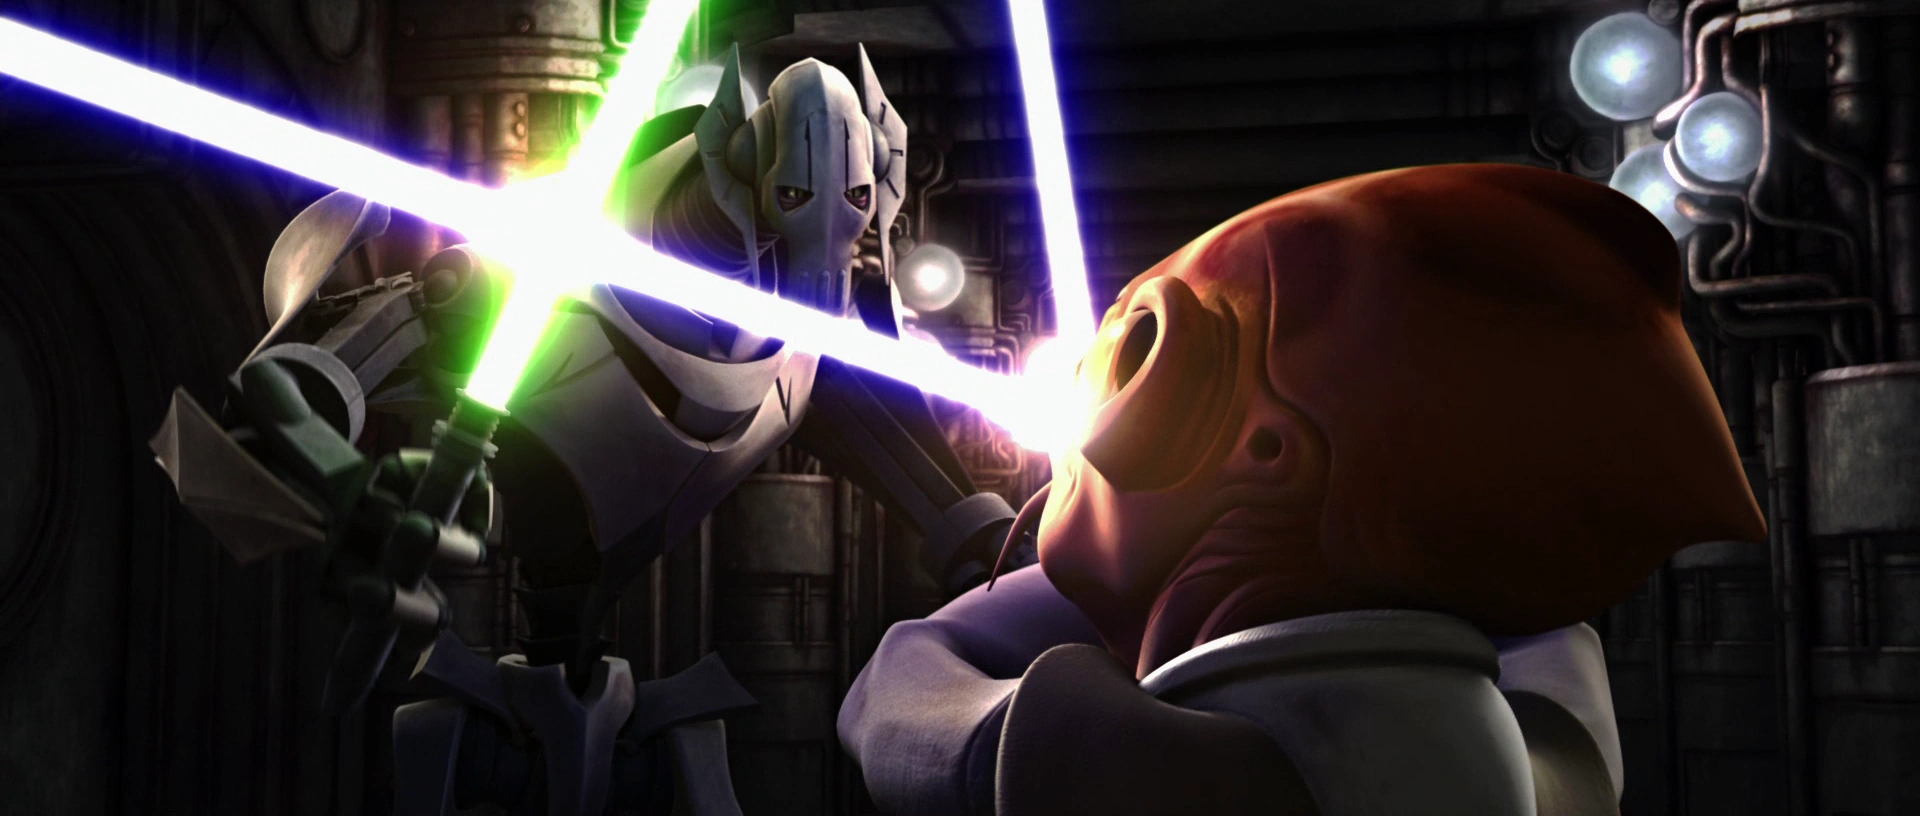
+ | [[File:Nahdar_vs_Grievous.png|thumb|right|250px|Vebb and Grievous engage in a saberlock.]] |
A repaired Grievous was angered upon learning of Gor's death, and the general soon discovered from Count Dooku that the Sith Lord himself had set the trap for him as a test. Resolving to personally eliminate the Jedi, Grievous left the command center with three MagnaGuards, despite EV-A4-D's admonition that he required rest. As Grievous started to head away, Fisto and Vebb sneaked up to the entrance to the command center and the Jedi Master tried to figure out the secret mechanism that opened the door. However, EV-A4-D was watching the events from inside the chamber and alerted Grievous to the Jedi's presence. As the general spun around and headed over to confront the intruders, Vebb decided to remain outside of the command center and fight Grievous himself, despite Fisto's protest. Before the Jedi Master could convince Vebb otherwise, EV-A4-D remotely closed the door, separating Fisto from his former Padawan.<ref name="Lair of Grievous" /> |
A repaired Grievous was angered upon learning of Gor's death, and the general soon discovered from Count Dooku that the Sith Lord himself had set the trap for him as a test. Resolving to personally eliminate the Jedi, Grievous left the command center with three MagnaGuards, despite EV-A4-D's admonition that he required rest. As Grievous started to head away, Fisto and Vebb sneaked up to the entrance to the command center and the Jedi Master tried to figure out the secret mechanism that opened the door. However, EV-A4-D was watching the events from inside the chamber and alerted Grievous to the Jedi's presence. As the general spun around and headed over to confront the intruders, Vebb decided to remain outside of the command center and fight Grievous himself, despite Fisto's protest. Before the Jedi Master could convince Vebb otherwise, EV-A4-D remotely closed the door, separating Fisto from his former Padawan.<ref name="Lair of Grievous" /> |
||
| Line 89: | Line 89: | ||
===Duel outside the castle=== |
===Duel outside the castle=== |
||
| − | {{Quote|You might have been a proud warrior once, but now you are just a pawn in Dooku's game.''"<br />"''I wield great power, Jedi fool |
+ | {{Quote|You might have been a proud warrior once, but now you are just a pawn in Dooku's game.''"<br />"''I wield great power, Jedi fool.''"<br />"''That power will only consume you.|Kit Fisto and Grievous|audio=ProudWarrior-LoG.ogg|Lair of Grievous}} |
[[File:FistovsGrievous.png|thumb|left|250px|Fisto duels Grievous outside the castle.]] |
[[File:FistovsGrievous.png|thumb|left|250px|Fisto duels Grievous outside the castle.]] |
||
| − | Fisto exited the castle and walked out onto the outer platform. However, Grievous climbed onto the platform from below to confront the Jedi Master, and as both duelists activated their lightsabers, Fisto saberlocked with the cyborg general. Taking advantage of the moon's foggy [[atmosphere]], the Jedi Master deactivated his lightsaber and disappeared into the mist. A confused Grievous spun his lightsabers in a defensive maneuver, and Fisto attacked the general from behind. The two bladelocked once more, and Grievous pushed Fisto backward, slashing at the Jedi Master. Fisto was able to avoid the blow, and as he ran forward he severed the hand of the cyborg that held Vebb's lightsaber. Catching the weapon of his former Padawan, the Jedi Master used the two lightsabers in [[ |
+ | Fisto exited the castle and walked out onto the outer platform. However, Grievous climbed onto the platform from below to confront the Jedi Master, and as both duelists activated their lightsabers, Fisto saberlocked with the cyborg general. Taking advantage of the moon's foggy [[Atmosphere/Legends|atmosphere]], the Jedi Master deactivated his lightsaber and disappeared into the mist. A confused Grievous spun his lightsabers in a defensive maneuver, and Fisto attacked the general from behind. The two bladelocked once more, and Grievous pushed Fisto backward, slashing at the Jedi Master. Fisto was able to avoid the blow, and as he ran forward he severed the hand of the cyborg that held Vebb's lightsaber. Catching the weapon of his former Padawan, the Jedi Master used the two lightsabers in [[Jar'Kai/Legends|combat]] against his opponent.<ref name="Lair of Grievous" /><ref name="Lair of Grievous Decoded" /> |
| − | The Jedi Master was able to land a blow on the general and Force-pushed Grievous to the ground. However, as the cyborg got to his feet and continued the duel, three of the general's MagnaGuards appeared and advanced toward the Jedi, forcing Fisto to break off from fighting Grievous and confront the droids. With the Jedi Master surrounded and outnumbered, the general ordered Fisto to surrender. However, as the Jedi deactivated his lightsabers, R6-H5 [[ |
+ | The Jedi Master was able to land a blow on the general and Force-pushed Grievous to the ground. However, as the cyborg got to his feet and continued the duel, three of the general's MagnaGuards appeared and advanced toward the Jedi, forcing Fisto to break off from fighting Grievous and confront the droids. With the Jedi Master surrounded and outnumbered, the general ordered Fisto to surrender. However, as the Jedi deactivated his lightsabers, R6-H5 [[Pilot/Legends|piloted]] Fisto's fighter to rise up to the platform. The MagnaGuards slashed at the Jedi, but Fisto backflipped onto his fighter and, once they were heading away from the castle, the Jedi Master entered the ship's cockpit and escaped the moon of Vassek.<ref name="Lair of Grievous" /> |
==Aftermath== |
==Aftermath== |
||
{{Dialogue|Windu|What about your former Padawan?|Fisto|His heart was in the right place, but he tried to answer Grievous's power with his own.|Yoda|To answer power with power, the Jedi way this is not. In this war, a danger there is of losing who we are.|attr=Kit Fisto reports to Masters Yoda and Mace Windu of the Jedi Council|src=Lair of Grievous}} |
{{Dialogue|Windu|What about your former Padawan?|Fisto|His heart was in the right place, but he tried to answer Grievous's power with his own.|Yoda|To answer power with power, the Jedi way this is not. In this war, a danger there is of losing who we are.|attr=Kit Fisto reports to Masters Yoda and Mace Windu of the Jedi Council|src=Lair of Grievous}} |
||
| − | [[File: |
+ | [[File:Council_report.png|thumb|right|250px|Master Fisto reports to the Jedi Council.]] |
| − | Returning to his castle, Grievous proceeded to the sanctum overlook chamber, where Count Dooku awaited a report via hololink. Grievous stated that the Jedi had been defeated, and while Dooku revealed that victory over Vebb and the clones had been expected, the Sith Lord was pleased, believing that the general had bested the Jedi Master Fisto. However, Dooku was disappointed when he learned that Fisto had escaped and stated that there was "room for improvement" before severing the connection. Fisto himself returned to the [[Jedi Temple]] on Coruscant and reported his mission to Masters [[Yoda]] and [[Mace Windu]] of the [[Jedi High Council]]. Upon learning of Vebb's intent to answer Grievous's power with that of himself and his deviation from the Jedi way in doing so, Yoda stated that the war presented the Jedi with a danger of "losing who they were."<ref name="Lair of Grievous" /> |
+ | Returning to his castle, Grievous proceeded to the sanctum overlook chamber, where Count Dooku awaited a report via hololink. Grievous stated that the Jedi had been defeated, and while Dooku revealed that victory over Vebb and the clones had been expected, the Sith Lord was pleased, believing that the general had bested the Jedi Master Fisto. However, Dooku was disappointed when he learned that Fisto had escaped and stated that there was "room for improvement" before severing the connection. Fisto himself returned to the [[Jedi Temple]] on Coruscant and reported his mission to Masters [[Yoda/Legends|Yoda]] and [[Mace Windu/Legends|Mace Windu]] of the [[Jedi High Council/Legends|Jedi High Council]]. Upon learning of Vebb's intent to answer Grievous's power with that of himself and his deviation from the Jedi way in doing so, Yoda stated that the war presented the Jedi with a danger of "losing who they were."<ref name="Lair of Grievous" /> |
==Behind the scenes== |
==Behind the scenes== |
||
| − | The mission first appeared in "[[Lair of Grievous]]," an episode in the [[2008]] [[The Clone Wars: Season One|first season]] of the [[Star Wars: The Clone Wars (TV series)|''Star Wars: The Clone Wars'' television series]],<ref name="Lair of Grievous Ep Guide" /> and was also featured in the young readers' book |
+ | The mission first appeared in "[[Lair of Grievous]]," an episode in the [[2008]] [[The Clone Wars: Season One|first season]] of the [[Star Wars: The Clone Wars (TV series)|''Star Wars: The Clone Wars'' television series]],<ref name="Lair of Grievous Ep Guide" /> and was also featured in the young readers' book [[The Clone Wars: Grievous Attacks!|''Grievous Attacks!'']] It introduced the character of Nahdar Vebb as well as General Grievous's castle and featured the series introduction of Jedi Master Kit Fisto.<ref name="Lair of Grievous Ep Guide" /> The episode also completed a three-episode story arc centered around the capture of Viceroy Nute Gunray that began with the episodes "[[Bombad Jedi]]" and "[[Cloak of Darkness]]." |
| − | There has been much controversy regarding whether the mission took place on the third moon of Vassek or the world of Vassek itself. Both the series' |
+ | There has been much controversy regarding whether the mission took place on the third moon of Vassek or the world of Vassek itself. Both the series' [[Star Wars: The Clone Wars: The Visual Guide|''The Visual Guide'']] and [[Star Wars: The Clone Wars: Visual Guide Ultimate Battles|''Visual Guide Ultimate Battles'']] state that it was on Vassek, while the online guide for "Lair of Grievous" states that it was on the third moon.<ref name="Lair of Grievous Ep Guide" /> Because of the online guide's closer relations to the episode, this article assumes that the mission was to Vassek's third moon. |
===Different portrayals=== |
===Different portrayals=== |
||
| − | The non-[[canon]] computer game |
+ | The non-[[canon]] computer game [[Path of the Jedi (video game)|''Path of the Jedi'']], released on [[Cartoon Network]]'s official site, depicts an alternate storyline with either the Jedi Ahsoka Tano, [[Anakin Skywalker/Legends|Anakin Skywalker]], or Yoda being sent to aid Fisto. |
| − | The [[Nintendo DS]] version of the [[2009]] [[video game]] ''[[Star Wars: The Clone Wars: Republic Heroes]]'' presents a different portrayal of the mission. Nahdar Vebb is completely absent from the story; instead, Kit Fisto is assisted only by [[Clone trooper captain|Clone Captain]] [[CT-7567]]—nicknamed "Rex"—and two clone troopers. While the two troopers remain outside, Fisto and Rex infiltrate Grievous's castle, and, after navigating through its mazes and fighting numerous B1 battle droids and [[B2 super battle droid]] |
+ | The [[Nintendo DS]] version of the [[2009]] [[video game]] ''[[Star Wars: The Clone Wars: Republic Heroes]]'' presents a different portrayal of the mission. Nahdar Vebb is completely absent from the story; instead, Kit Fisto is assisted only by [[Clone trooper captain|Clone Captain]] [[CT-7567/Legends|CT-7567]]—nicknamed "Rex"—and two clone troopers. While the two troopers remain outside, Fisto and Rex infiltrate Grievous's castle, and, after navigating through its mazes and fighting numerous B1 battle droids and [[B2 super battle droid/Legends|B2 super battle droids]], confront the general himself. After a brief duel with Fisto, Grievous retreats further into the castle, and Rex tells the troopers outside to contact the Republic fleet at the planet Bestine and ask for reinforcements. The troopers, however, fail their mission as the only means to contact Bestine—their ''Nu''-class attack shuttle—is destroyed by a [[Variable Geometry Self-Propelled Battle Droid, Mark I/Legends|Vulture droid]]. Fisto and Rex continue their pursuit of Grievous, but are forced to split up. Fisto then defeats an IG-100 MagnaGuard and faces the Separatist general for the second time. |
| − | After a lengthy battle with Grievous and the droids that assist him, Fisto escapes aboard his interceptor. Following this encounter, Grievous leaves the base, but increases the security inside it. Later, when the Republic faces the need to obtain recent Confederate clearance codes in order to bypass the defensive perimeter of the Separatist-controlled [[space station]] [[Juma 9]], Kit Fisto remembers that during the mission to Vassek his starfighter's scanners had picked up an energy reading coming from within the castle. Believing that such energy levels could only mean the presence of a Separatist archive containing the codes, the Jedi [[Second Mission to Vassek's third moon|dispatch]] Jedi Master Luminara Unduli and Clone Commander [[CC-1004]] to retrieve them. Because of such a confusing storyline that would take too much [[Fanon|speculation]] to implement into the pre-existing story, this article assumes that the video game's mission is non-canon. |
+ | After a lengthy battle with Grievous and the droids that assist him, Fisto escapes aboard his interceptor. Following this encounter, Grievous leaves the base, but increases the security inside it. Later, when the Republic faces the need to obtain recent Confederate clearance codes in order to bypass the defensive perimeter of the Separatist-controlled [[Space station/Legends|space station]] [[Juma 9]], Kit Fisto remembers that during the mission to Vassek his starfighter's scanners had picked up an energy reading coming from within the castle. Believing that such energy levels could only mean the presence of a Separatist archive containing the codes, the Jedi [[Second Mission to Vassek's third moon|dispatch]] Jedi Master Luminara Unduli and Clone Commander [[CC-1004/Legends|CC-1004]] to retrieve them. Because of such a confusing storyline that would take too much [[Fanon|speculation]] to implement into the pre-existing story, this article assumes that the video game's mission is non-canon. |
The [[2011]] non-canonical video game ''[[LEGO Star Wars III: The Clone Wars]]'' features the mission in its humorous depiction of "Lair of Grievous." In the game, Fisto and Vebb engage Grievous's forces—several MagnaGuards—before even fighting Grievous himself. |
The [[2011]] non-canonical video game ''[[LEGO Star Wars III: The Clone Wars]]'' features the mission in its humorous depiction of "Lair of Grievous." In the game, Fisto and Vebb engage Grievous's forces—several MagnaGuards—before even fighting Grievous himself. |
||
| Line 116: | Line 116: | ||
==Appearances== |
==Appearances== |
||
*{{TCW|Rookies}} {{Flash}} |
*{{TCW|Rookies}} {{Flash}} |
||
| − | *''[[ |
+ | *''[[The Clone Wars: Grievous Attacks!]]'' |
*{{TCW|Lair of Grievous}} {{1st}} |
*{{TCW|Lair of Grievous}} {{1st}} |
||
| − | *''[[ |
+ | *''[[The Clone Wars: Forces of Darkness]]'' |
| − | *''[[ |
+ | *''[[The Clone Wars: Jedi Heroes]]'' |
*''[[Star Wars: The Clone Wars: Republic Heroes]]'' {{C|[[Nintendo DS]] edition}} |
*''[[Star Wars: The Clone Wars: Republic Heroes]]'' {{C|[[Nintendo DS]] edition}} |
||
| − | *''[[ |
+ | *''[[The Clone Wars: Strange Allies]]'' {{Imo}} |
===Non-canon appearances=== |
===Non-canon appearances=== |
||
*''[[LEGO Star Wars III: The Clone Wars]]'' |
*''[[LEGO Star Wars III: The Clone Wars]]'' |
||
| − | * |
+ | *[[Path of the Jedi (video game)|''Path of the Jedi'']] |
==Sources== |
==Sources== |
||
| − | {{Scroll_box |
+ | {{Scroll_box|content= |
| − | *{{InsiderCite|104| |
+ | *{{InsiderCite|104|Launchpad}} {{1stm}} {{Imo}} |
*''[[Star Wars: The Clone Wars: The Visual Guide]]'' |
*''[[Star Wars: The Clone Wars: The Visual Guide]]'' |
||
*{{SWArchive|url=theclonewars/news20081208.html|text=Jedi Master Kit Fisto Explores the Heart of Evil in 'Lair of Grievous'}} |
*{{SWArchive|url=theclonewars/news20081208.html|text=Jedi Master Kit Fisto Explores the Heart of Evil in 'Lair of Grievous'}} |
||
| − | *{{SWArchive|url=theclonewars/guide/episode010.html|text=''The Clone Wars'' Episode Guide: Lair of Grievous}} |
+ | *{{SWArchive|url=theclonewars/guide/episode010.html|text=''The Clone Wars'' Episode Guide: Lair of Grievous|archivedate=20110629042618}} |
*{{CN|url=tv_shows/starwars/?episodeID=8a2505961e168a66011e26841ce20004|text=Dataclip: Lair of Grievous}} |
*{{CN|url=tv_shows/starwars/?episodeID=8a2505961e168a66011e26841ce20004|text=Dataclip: Lair of Grievous}} |
||
*{{InsiderCite|106|Star Wars: The Clone Wars Season One Episode Guide, Part One}} |
*{{InsiderCite|106|Star Wars: The Clone Wars Season One Episode Guide, Part One}} |
||
*''[[Star Wars: The Clone Wars Comic UK 5.9]]'' |
*''[[Star Wars: The Clone Wars Comic UK 5.9]]'' |
||
| − | *{{HasbroCite|set=Star Wars: The Clone Wars (toy line)|text=''Star Wars: The Clone Wars''|pack=Nahdar Vebb|link=TCWEXNahdarVebb.asp}} |
+ | *{{HasbroCite|set=Star Wars: The Clone Wars (toy line)|text=''Star Wars: The Clone Wars''|pack=Nahdar Vebb|link=TCWEXNahdarVebb.asp|archiveurl=https://web.archive.org/web/20190831060602/http://www.rebelscum.com/TCWexNahdarVebb.asp}} |
*''[[The Art of Star Wars: The Clone Wars]]'' |
*''[[The Art of Star Wars: The Clone Wars]]'' |
||
*''[[Star Wars: The Clone Wars: Visual Guide Ultimate Battles]]'' |
*''[[Star Wars: The Clone Wars: Visual Guide Ultimate Battles]]'' |
||
| Line 142: | Line 142: | ||
*''[[Star Wars: The Clone Wars Comic UK 5.13]]'' |
*''[[Star Wars: The Clone Wars Comic UK 5.13]]'' |
||
*''[[Star Wars: The Clone Wars: The Official Episode Guide: Season 1]]'' |
*''[[Star Wars: The Clone Wars: The Official Episode Guide: Season 1]]'' |
||
| − | * |
+ | *[[Star Wars: The Clone Wars The Complete Season One|''Star Wars: The Clone Wars'' The Complete Season One]] |
*''[[Star Wars: The Official Starships & Vehicles Collection 37]]'' |
*''[[Star Wars: The Official Starships & Vehicles Collection 37]]'' |
||
| + | *''[[Star Wars: The Clone Wars: Heroes and Villains Flip Book]]'' {{Po}} |
||
*''[[Star Wars: The Clone Wars Character Encyclopedia]]'' |
*''[[Star Wars: The Clone Wars Character Encyclopedia]]'' |
||
*{{CN|url=promos/201007_secretcode/tools/downloads/video4/index.html|text="Droids" Video}} |
*{{CN|url=promos/201007_secretcode/tools/downloads/video4/index.html|text="Droids" Video}} |
||
| − | *{{HasbroCite|set=Star Wars: The Clone Wars (toy line)|text=''Star Wars: The Clone Wars''|pack=Kit Fisto|link=TCW23-KitFisto.asp}} |
+ | *{{HasbroCite|set=Star Wars: The Clone Wars (toy line)|text=''Star Wars: The Clone Wars''|pack=Kit Fisto|link=TCW23-KitFisto.asp|archiveurl=https://web.archive.org/web/20190920144059/http://www.rebelscum.com/TCW23-KitFisto.asp}} |
*''[[Star Wars Year by Year: A Visual Chronicle]]'' |
*''[[Star Wars Year by Year: A Visual Chronicle]]'' |
||
*''[[The Sounds of Star Wars]]'' {{Po}} |
*''[[The Sounds of Star Wars]]'' {{Po}} |
||
| Line 152: | Line 153: | ||
*''[[LEGO Star Wars III: The Clone Wars: Prima Official Game Guide]]'' |
*''[[LEGO Star Wars III: The Clone Wars: Prima Official Game Guide]]'' |
||
*''[[Star Wars: The Clone Wars Comic UK 6.24]]'' |
*''[[Star Wars: The Clone Wars Comic UK 6.24]]'' |
||
| − | *{{SW|url=explore/the-clone-wars/ep110/#!/about|text=Lair of Grievous|org=theclonewars/guide/episode010.html}} |
+ | *{{SW|url=explore/the-clone-wars/ep110/#!/about|text="Lair of Grievous" - ''The Clone Wars'' Episode Guide|org=theclonewars/guide/episode010.html}} |
*''[[Star Wars: The Clone Wars Magazine 7]]'' |
*''[[Star Wars: The Clone Wars Magazine 7]]'' |
||
*''[[Star Wars: The Clone Wars Comic UK 6.31]]'' |
*''[[Star Wars: The Clone Wars Comic UK 6.31]]'' |
||
*''[[Star Wars: The Clone Wars Magazine 11]]'' |
*''[[Star Wars: The Clone Wars Magazine 11]]'' |
||
| + | *{{Blog|official=true|2012/10/26/chronicling-the-clone-wars%C2%A0-4/|Chronicling ''The Clone Wars'' #4|int=Chronicling The Clone Wars}} |
||
| ⚫ | |||
| + | *''[[Star Wars: The Clone Wars Comic UK 6.40]]'' {{Imo}} |
||
| ⚫ | |||
| + | *''[[Star Wars: The Clone Wars: What Is a Sith Warrior?]]'' |
||
| + | *''[[Star Wars: The Clone Wars: Who Are the Jedi?]]'' |
||
| + | *{{InsiderCite|139|100 and Counting}} |
||
| + | *''[[Star Wars: The Clone Wars Magazine 16]]'' {{Imo}} |
||
| + | *''[[Star Wars: The Clone Wars: Episode Guide]]'' |
||
| + | *{{InsiderCite|149|General Grievous: Beneath the Armor}} {{Imo}} |
||
| ⚫ | |||
| ⚫ | |||
| + | *{{FFCite|y=2014|28|FIS4, ''Jedi General''}} |
||
| + | *{{FFCite|y=2014|29|GRI7–8, ''Perpetual Enemies''}} |
||
| + | *{{FFCite|y=2014|52|VAS1–4, ''The Third Moon of Vassek''}} |
||
| + | *{{FFCite|y=2014|69|GRI9, ''Redemption''}} {{Imo}} |
||
| + | *{{FFCite|y=2014|73|DOO7, ''Testing Times''}}}} |
||
==Notes and references== |
==Notes and references== |
||
{{Reflist}} |
{{Reflist}} |
||
| + | |||
| + | ==External links== |
||
| + | *{{SW|url=news/drawing-from-the-imagination-mythological-creatures-in-star-wars-part-1|int=Drawing from the Imagination: Mythological Creatures in Star Wars|text=Drawing from the Imagination: Mythological Creatures in ''Star Wars'', Part 1|archivedate=20170908061455}} |
||
| + | *{{Blog|official=true|2014/01/22/the-starwars-com-10-best-jedi/|The StarWars.com 10: Best Jedi}} |
||
{{Interlang |
{{Interlang |
||
| − | |de=Mission von Vasseks drittem Mond |
+ | |de=Mission von Vasseks drittem Mond#legends |
|es=Misión a la tercera luna de Vassek |
|es=Misión a la tercera luna de Vassek |
||
|nl=Mission on Vassek |
|nl=Mission on Vassek |
||
|pl=Misja na trzecim księżycu Vassek |
|pl=Misja na trzecim księżycu Vassek |
||
| + | |ru=Миссия на третьей луне Вассека |
||
| − | |deGA=1 |
+ | |deGA=1 |
| + | }} |
||
| − | {{DEFAULTSORT: |
+ | {{DEFAULTSORT:Vassek's third moon, Mission to}} |
| − | [[Category:Battles |
+ | [[Category:Battles in the Wazta sector]] |
| ⚫ | |||
[[Category:Duels]] |
[[Category:Duels]] |
||
[[Category:Jedi missions]] |
[[Category:Jedi missions]] |
||
| ⚫ | |||
Revision as of 18:21, 1 April 2020
| | |
Warning: This infobox is missing the following parameters: unit1, unit2, unit4, unit3
- "This is the lair of General Grievous!"
- ―Kit Fisto
Jedi Master Kit Fisto, Jedi Knight Nahdar Vebb, and a squad of clone troopers undertook a mission in 22 BBY during the Clone Wars to recapture Trade Federation Viceroy Nute Gunray, who had recently escaped from Republic custody. However, Confederate Head of State Count Dooku, displeased with General Grievous's recent failures in the war, used a Republic homing beacon to lure the Jedi and clones to the general's castle on the third moon of Vassek as a test for Grievous. Gunray deceived the Jedi and troopers through a holotransmission, and once they uncovered the ploy, Dooku contacted the Republic agents and put them on the trail of the "alternative prize" of Grievous.
The Jedi and their troops set a trap for Grievous and confronted the cyborg general once he arrived. However, Grievous was able to eliminate several clone troopers, and after sustaining injuries, escape to the castle's secret command center. Sealing off the exits, the Confederate general trapped the Jedi and clones inside his castle. While Grievous was repaired by his caretaker droid, the general pitted the Jedi and the remaining clones against the castle's defenses—a molten incinerator pit and the general's pet roggwart, Gor. The clones were killed, but the Jedi were able to eliminate Gor. As Grievous resolved to personally confront the Jedi, Fisto and Vebb infiltrated the castle's command center. Vebb remained outside, however, and fought Grievous himself, but was killed by the general. After Fisto dueled Grievous on the castle's outer platform, the Jedi Master was able to escape.
Prelude
- "General, the ongoing stalemate in the war has become unacceptable. There is concern you've lost your focus. Lord Sidious demands more dramatic results. More dead Jedi."
"You expect victory over Jedi, but all you give me to fight them is battle droids!" - ―Count Dooku and General Grievous

Gunray and Argyus escape aboard their stolen Republic frigate.
In 22 BBY[8] during the Clone Wars, Trade Federation Viceroy Nute Gunray—who had been captured by Republic forces on Rodia—was to be transferred aboard the Star Destroyer Tranquility to Coruscant for trial. The viceroy was kept under heavy guard by Jedi Master Luminara Unduli and Padawan Ahsoka Tano; however, Gunray was able to escape with the help of Dark Acolyte Asajj Ventress and turncoat Senate Commando Captain Faro Argyus. The Confederate agents stole a Republic frigate to make their getaway, and the ship's homing beacon allowed the Republic to track the stolen cruiser. Since Jedi General Kit Fisto and his fleet were near Gunray's last known position, Unduli contacted the Nautolan Jedi Master to follow and recapture Gunray.[2]
Meanwhile, the Confederate Head of State, Count Dooku, had become displeased with the ongoing stalemate in the war between his best general, Grievous, and the Republic and Jedi Order.[7] Grievous had failed in several recent operations, resulting in Confederate defeats at the Battle of the Kaliida Nebula and the Battle of Bothawui, as well as the loss of the listening post Skytop Station.[10] As Dooku's Sith Master, Darth Sidious, demanded more dead Jedi, Dooku decided to arrange a trap for Grievous in order to reassess the cyborg's abilities. The Sith Lord remotely deactivated the general's personal IG-100 MagnaGuard bodyguards in his castle on the third moon of Vassek and deployed the Republic tracking beacon from Gunray's stolen ship to the general's lair, seeking to lure the Jedi to the castle so that Grievous would be able to hunt them for sport.[6][7]
The mission
Bait for the Jedi
- "I apologize for the deception, Master Jedi."
"Count Dooku. You have a great talent for unexpected appearances."
"It's a shame you came so far to be frustrated. While the viceroy is unavailable for capture, allow me to offer you an alternative prize." - ―Count Dooku directs Kit Fisto and his comrades to Grievous
Fisto took his Delta-7B starfighter and his astromech droid, R6-H5, and followed the signal of the Republic beacon to the Vassek system, deep in Confederate-held space. The Jedi Master contacted Unduli and Tano at the Outer Rim Command Center, and they reported that Fisto's former Padawan, Nahdar Vebb, had also tracked the beacon to the system. Vebb had already arrived on Vassek's third moon—where the beacon had been located—with a shuttle and several clone troopers. Fisto detached his starfighter from its hyperspace docking ring, and proceeded to the moon to rendezvous with Vebb.[6][11]

Dooku directs the Jedi toward an "alternative prize."
Once Fisto had landed and left R6-H5 to look after his fighter, the Jedi Master met with Vebb. Clone Commander Fil had tracked the beacon to the south end of the gorge, and, leaving troopers Bel and Niner to guard the shuttle, the group proceeded to the castle. While Vebb and Fil intended to use lightsabers and thermal detonators, respectively, to forcefully open the entrance to the building, Fisto was able to find a secret switch that activated a mechanism that opened the castle's door. Approaching the sanctum overlook chamber of the castle, the Jedi and clones overheard a hologram of Gunray giving orders to a squad of B1 battle droids, led by a Lieutenant, from behind a high-backed chair. Unaware that Gunray was not actually present, Fisto and Vebb led the attack on the droids and were able to eliminate their opponents. However, when Vebb turned the chair around with the Force, the group discovered Gunray's hologram, and the viceroy taunted the Jedi before severing the connection.[7][11]
Count Dooku contacted the Jedi and directed them toward an "alternative prize" to compensate for their failed attempt to recapture Gunray. The Jedi were uncertain of who their offered quarry was, and Vebb activated a mechanism through the chair that revealed another hallway. As the Jedi and clones walked through the castle, rooms opened along the way; inside the rooms were statues of Kaleesh warriors—some featuring cybernetics—that resembled Grievous himself. The group finally entered Grievous's secret armory and workshop, and deduced that the castle belonged to the general. While inspecting Grievous's trophy room, home to a collection of trophies from the Jedi that the general had murdered, Fisto received a report from Bel and Niner that Grievous's personal starfighter, Soulless One, was approaching the castle. Fisto ordered the two clones protecting the shuttle to keep out of sight, while the Republic infiltrators decided to capture Grievous in an attempt to satisfy the "dead or alive" warrant on the Confederate general.[7][11]
Capturing a cyborg
- "Cooperate, Grievous, and perhaps the Senate will be merciful."
"It is you who shall get no mercy!" - ―Kit Fisto and Grievous

Fisto and Vebb duel Grievous.
As Grievous entered his castle, the Jedi and clones appeared and surrounded the cyborg general. Grievous activated two of his stolen Jedi lightsabers, and engaged Fisto and Vebb in combat. However, as the two Jedi saberlocked with the general, Grievous split his arms and activated two more of his lightsabers. The two Jedi were forced to break the bladelock as they avoided being slashed by the extra weapons, and Fisto ordered the clones to fire their blaster rifles' cables at Grievous. The clones aimed their grappling hooks at the general's legs, and as Grievous engaged the Jedi in another saberlock, Fisto used his lightsaber to sever the cyborg's legs.[7]
Although crippled, Grievous was able to jump up and hold onto one of the beams attached to the roof. The clones' grappling hooks were still attached to the general, and the troops were able to pull Grievous to the ground. As Vebb crossed blades with the cyborg, the lightsaber that Grievous was holding spun out of his hand. The general jumped back up, and one of the clones holding the grappling hooks was thrown backward, while the other was pulled toward Grievous. The general batted the dead clone against Fisto, forcing the Jedi Master backward, before throwing the trooper on top of Vebb. Grievous's faceplate was damaged from one of the clones' laser shots, and as the general escaped, Vebb and several of the troopers gave pursuit. However, Grievous killed two more of the clones before entering the castle's secret command center; of the clone troopers, only Fil and another trooper remained alive.[6][7]
The Confederate general discovered from his personal caretaker droid, EV-A4-D, that his IG-100 MagnaGuards had been remotely turned off for recharge. Grievous reactivated his droid bodyguards and ordered them to lock down the perimeter. As Fisto, Vebb, and the clones headed to escape from the castle, the general sealed off the building's exits, trapping the Jedi and clones inside his lair. Commander Fil contacted Niner and Bel back with the shuttle and ordered the two clones to signal the Republic outpost at Bestine that they required reinforcements. However, as Niner and Bel entered the shuttle, Grievous's MagnaGuards fired a rocket at the craft, causing the shuttle to explode. The droids closed in on R6-H5 and Fisto's fighter, and the astromech droid escaped with the Jedi starfighter, spinning the ship and throwing off a MagnaGuard clinging to the fighter's hull.[6][7]
Hunted
- "Greetings, young Jedi. Where is your Master?"
"You will find out soon enough. You can't defeat us all."
"Of course I can!" - ―Grievous and Nahdar Vebb
Grievous opened a hololink and contacted the Jedi and clones, encouraging them to "experience all his home had to offer," before severing the connection. The general then opened up a molten incinerator pit, and while Fisto and Vebb were able to jump to safer ground, the two clones fell into the pit. Fil fired a grappling hook to the ceiling, and the Jedi were able to rescue him, but the other trooper plunged into the incinerator. Fisto then destroyed a holocam that Grievous was using to watch his opponents, and the Confederate general signaled his ravenous pet roggwart, Gor, to "entertain their guests." EV-A4-D began to repair Grievous from the injuries he had sustained.[7][11]
As the Jedi and the clone trooper grouped together in the middle of a hallway junction, Gor appeared and approached the group. Fil opened fire on the roggwart, but Fisto's lightsaber was knocked out of his hand. Gor lunged at Fil and the two Jedi and the three quickly split up, surrounding the creature while Fisto retrieved his weapon. The clone commander directed blaster fire at Gor's neck and Vebb jumped onto the roggwart, plunging his lightsaber into Gor's back until he was bucked off. The roggwart swung its tail and seized Fil, batting Vebb with the captured clone. Fisto slashed the roggwart in the head, and Fil was slammed against the ground before Vebb severed Gor's tail. The Jedi Master cut off the roggwart's arms, and as Gor fell to the ground, Fisto killed the roggwart by driving his lightsaber into the back of the creature's neck. Vebb was shaken by Fil's death, but left the fallen clone and followed Fisto to the castle's command center.[7]

Vebb and Grievous engage in a saberlock.
A repaired Grievous was angered upon learning of Gor's death, and the general soon discovered from Count Dooku that the Sith Lord himself had set the trap for him as a test. Resolving to personally eliminate the Jedi, Grievous left the command center with three MagnaGuards, despite EV-A4-D's admonition that he required rest. As Grievous started to head away, Fisto and Vebb sneaked up to the entrance to the command center and the Jedi Master tried to figure out the secret mechanism that opened the door. However, EV-A4-D was watching the events from inside the chamber and alerted Grievous to the Jedi's presence. As the general spun around and headed over to confront the intruders, Vebb decided to remain outside of the command center and fight Grievous himself, despite Fisto's protest. Before the Jedi Master could convince Vebb otherwise, EV-A4-D remotely closed the door, separating Fisto from his former Padawan.[7]
Vebb quickly eliminated the three MagnaGuards, but turned to see Grievous with two more of his droid bodyguards. After eliminating the remaining MagnaGuards, Vebb engaged the general in lightsaber combat. EV-A4-D meanwhile spectated the duel from the command center; however, Fisto entered the room and eliminated the caretaker droid. Unable to help his former Padawan, Fisto watched as Vebb and Grievous engaged in a saberlock. The general took out a blaster with one of his extra arms and killed Vebb, stealing the fallen Jedi's lightsaber to add to his collection. R6-H5 soon contacted Fisto, and the Jedi Master told his astromech droid to meet him at the castle's south landing platform. Knowing that Fisto was watching from the command center, Grievous stated that the Jedi Master was his next target; however, Fisto damaged the command center's controls before escaping.[7]
Duel outside the castle
- "You might have been a proud warrior once, but now you are just a pawn in Dooku's game."
"I wield great power, Jedi fool."
"That power will only consume you." - ―Kit Fisto and Grievous


Fisto duels Grievous outside the castle.
Fisto exited the castle and walked out onto the outer platform. However, Grievous climbed onto the platform from below to confront the Jedi Master, and as both duelists activated their lightsabers, Fisto saberlocked with the cyborg general. Taking advantage of the moon's foggy atmosphere, the Jedi Master deactivated his lightsaber and disappeared into the mist. A confused Grievous spun his lightsabers in a defensive maneuver, and Fisto attacked the general from behind. The two bladelocked once more, and Grievous pushed Fisto backward, slashing at the Jedi Master. Fisto was able to avoid the blow, and as he ran forward he severed the hand of the cyborg that held Vebb's lightsaber. Catching the weapon of his former Padawan, the Jedi Master used the two lightsabers in combat against his opponent.[7][11]
The Jedi Master was able to land a blow on the general and Force-pushed Grievous to the ground. However, as the cyborg got to his feet and continued the duel, three of the general's MagnaGuards appeared and advanced toward the Jedi, forcing Fisto to break off from fighting Grievous and confront the droids. With the Jedi Master surrounded and outnumbered, the general ordered Fisto to surrender. However, as the Jedi deactivated his lightsabers, R6-H5 piloted Fisto's fighter to rise up to the platform. The MagnaGuards slashed at the Jedi, but Fisto backflipped onto his fighter and, once they were heading away from the castle, the Jedi Master entered the ship's cockpit and escaped the moon of Vassek.[7]
Aftermath
- Windu: "What about your former Padawan?"
- Fisto: "His heart was in the right place, but he tried to answer Grievous's power with his own."
- Yoda: "To answer power with power, the Jedi way this is not. In this war, a danger there is of losing who we are."
- ―Kit Fisto reports to Masters Yoda and Mace Windu of the Jedi Council[src]
Master Fisto reports to the Jedi Council.
Returning to his castle, Grievous proceeded to the sanctum overlook chamber, where Count Dooku awaited a report via hololink. Grievous stated that the Jedi had been defeated, and while Dooku revealed that victory over Vebb and the clones had been expected, the Sith Lord was pleased, believing that the general had bested the Jedi Master Fisto. However, Dooku was disappointed when he learned that Fisto had escaped and stated that there was "room for improvement" before severing the connection. Fisto himself returned to the Jedi Temple on Coruscant and reported his mission to Masters Yoda and Mace Windu of the Jedi High Council. Upon learning of Vebb's intent to answer Grievous's power with that of himself and his deviation from the Jedi way in doing so, Yoda stated that the war presented the Jedi with a danger of "losing who they were."[7]
Behind the scenes
The mission first appeared in "Lair of Grievous," an episode in the 2008 first season of the Star Wars: The Clone Wars television series,[6] and was also featured in the young readers' book Grievous Attacks! It introduced the character of Nahdar Vebb as well as General Grievous's castle and featured the series introduction of Jedi Master Kit Fisto.[6] The episode also completed a three-episode story arc centered around the capture of Viceroy Nute Gunray that began with the episodes "Bombad Jedi" and "Cloak of Darkness."
There has been much controversy regarding whether the mission took place on the third moon of Vassek or the world of Vassek itself. Both the series' The Visual Guide and Visual Guide Ultimate Battles state that it was on Vassek, while the online guide for "Lair of Grievous" states that it was on the third moon.[6] Because of the online guide's closer relations to the episode, this article assumes that the mission was to Vassek's third moon.
Different portrayals
The non-canon computer game Path of the Jedi, released on Cartoon Network's official site, depicts an alternate storyline with either the Jedi Ahsoka Tano, Anakin Skywalker, or Yoda being sent to aid Fisto.
The Nintendo DS version of the 2009 video game Star Wars: The Clone Wars: Republic Heroes presents a different portrayal of the mission. Nahdar Vebb is completely absent from the story; instead, Kit Fisto is assisted only by Clone Captain CT-7567—nicknamed "Rex"—and two clone troopers. While the two troopers remain outside, Fisto and Rex infiltrate Grievous's castle, and, after navigating through its mazes and fighting numerous B1 battle droids and B2 super battle droids, confront the general himself. After a brief duel with Fisto, Grievous retreats further into the castle, and Rex tells the troopers outside to contact the Republic fleet at the planet Bestine and ask for reinforcements. The troopers, however, fail their mission as the only means to contact Bestine—their Nu-class attack shuttle—is destroyed by a Vulture droid. Fisto and Rex continue their pursuit of Grievous, but are forced to split up. Fisto then defeats an IG-100 MagnaGuard and faces the Separatist general for the second time.
After a lengthy battle with Grievous and the droids that assist him, Fisto escapes aboard his interceptor. Following this encounter, Grievous leaves the base, but increases the security inside it. Later, when the Republic faces the need to obtain recent Confederate clearance codes in order to bypass the defensive perimeter of the Separatist-controlled space station Juma 9, Kit Fisto remembers that during the mission to Vassek his starfighter's scanners had picked up an energy reading coming from within the castle. Believing that such energy levels could only mean the presence of a Separatist archive containing the codes, the Jedi dispatch Jedi Master Luminara Unduli and Clone Commander CC-1004 to retrieve them. Because of such a confusing storyline that would take too much speculation to implement into the pre-existing story, this article assumes that the video game's mission is non-canon.
The 2011 non-canonical video game LEGO Star Wars III: The Clone Wars features the mission in its humorous depiction of "Lair of Grievous." In the game, Fisto and Vebb engage Grievous's forces—several MagnaGuards—before even fighting Grievous himself.
Appearances
 Star Wars: The Clone Wars — "Rookies" (In flashback(s))
- The Clone Wars: Grievous Attacks!
- Star Wars: The Clone Wars — "Lair of Grievous" (First appearance)
- The Clone Wars: Forces of Darkness
- The Clone Wars: Jedi Heroes
- Star Wars: The Clone Wars: Republic Heroes (Nintendo DS edition)
- The Clone Wars: Strange Allies (Indirect mention only)
Non-canon appearances
Sources
Notes and references
- ↑
 Star Wars: The Clone Wars — "Cloak of Darkness" (Decoded)
- ↑ 2.0 2.1 Star Wars: The Clone Wars — "Cloak of Darkness"
- ↑ "Republic HoloNet News Core Edition 14:4:14" — Star Wars Insider 67
- ↑ The New Essential Chronology
- ↑ 5.0 5.1 Star Wars: The Ultimate Visual Guide: Updated and Expanded
- ↑ 6.0 6.1 6.2 6.3 6.4 6.5 6.6 6.7 6.8 6.9 The Clone Wars Episode Guide: Lair of Grievous on StarWars.com (content now obsolete; backup link)
- ↑ 7.00 7.01 7.02 7.03 7.04 7.05 7.06 7.07 7.08 7.09 7.10 7.11 7.12 7.13 7.14 7.15 7.16 7.17 7.18 7.19 7.20 7.21 7.22 7.23 7.24 7.25 7.26 7.27 7.28 7.29 7.30 7.31 7.32 7.33 7.34 Star Wars: The Clone Wars — "Lair of Grievous"
- ↑ 8.0 8.1 The Essential Reader's Companion dates the Star Wars: The Clone Wars film and The Clone Wars: Secret Missions 4: Guardians of the Chiss Key to 22 BBY. In addition, in Guardians of the Chiss Key, Count Dooku mentions a recent run-in with a group of Weequay pirates, which refers in part to the events of the Star Wars: The Clone Wars episode "The Gungan General." Since Star Wars: The Clone Wars Chronological Episode Order on StarWars.com (backup link) places "Lair of Grievous" between The Clone Wars film and "The Gungan General," it can be concluded that "Lair of Grievous" also takes place in 22 BBY.
- ↑ Star Wars: The Clone Wars Character Encyclopedia
- ↑ "The Clone Wars #4 {{{3}}}" — {{{4}}} — [[{{{5}}}|{{{5}}}'s]] StarWars.com Blog (The Clone Wars #4 backup link (2012/10/26/chronicling-the-clone-wars%C2%A0-4//Chronicling The Clone Wars #4) not verified!)
- ↑ 11.0 11.1 11.2 11.3 11.4 Star Wars: The Clone Wars — "Lair of Grievous" (Decoded)
External links
- Drawing from the Imagination: Mythological Creatures in Star Wars, Part 1 on StarWars.com (article) (backup link)
- "StarWars.com 10: Best Jedi {{{3}}}" — {{{4}}} — [[{{{5}}}|{{{5}}}'s]] StarWars.com Blog (StarWars.com 10: Best Jedi backup link (2014/01/22/the-starwars-com-10-best-jedi//The StarWars.com 10: Best Jedi) not verified!)