| | |
- "With all due respect, the ambassadors for the Supreme Chancellor wish to board immediately."
"Yes, of course. As you know, our blockade is perfectly legal, and we'd be happy to receive the ambassadors." - ―Maoi Madakor and Nute Gunray
Saak'ak, known as Profiteer in Basic, was the flagship of the Trade Federation blockade fleet over the planet Naboo. During that time, it was captained by Daultay Dofine. The vessel started as a Lucrehulk-class freighter before being extensively modified to become a battleship. The Saak'ak retained its basic outward shape of two cargo arms in a crescent shape with a center sphere connected to the engine blocks. During the blockade of Naboo, the Saak'ak was visited by two Jedi Knights, ambassadors to the Galactic Republic's Supreme Chancellor. Darth Sidious ordered the Jedi's destruction, and Viceroy Nute Gunray attempted to carry out the order. The Jedi escaped the dioxis gas and tried to cut through the bridge's blast doors, but were forced to escape the vessel after an ambush by destroyer droids. After the occupation was complete, the Saak'ak's commanders transferred to the Lucrehulk-class Droid Control Ship Vuutun Palaa.
Characteristics[]

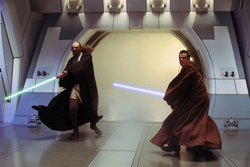
Jinn and Kenobi escape the conference room.
Saak'ak started its life as an Lucrehulk-class LH-3210 cargo freighter before being converted to a battleship, although it retained its outward appearance of a crescent-shaped commercial vessel. Profiteer was the vessel's name in Basic. The ship was equipped with heavy durasteel armor plating, quad turbolaser cannons, and military-strength communications array, revealed to unwary enemies once in firing range. The Saak'ak also carried a cloaking device.[2] The Saak'ak's 42 turbolaser cannons were on rotatable mounts to hide until needed. The cargo arms were divided into three zones. The war forces were carried in the inner hangars, along with their munitions. Embarked forces included 50 C-9979 landing craft, 6250 Armored Assault Tanks, 550 Multi-Troop Transports, and 1500 Platoon Attack Craft. Electrified racks were installed on the outermost hangar zones to support the fleet of 1500 droid starfighters. Tractor beams guided smaller vessels into the hangar. Smaller hangars were also available inside the inner walls of the cargo arms for shuttles. Sealed hangars below the main hangar zones held dangerous materials. The primary docking claw on the outer crescent had reinforced bracing. A massive acceleration compensator secured the centersphere to the stern of the ship, and the deck structures in the centersphere provided living space for the crew, and the sphere also had its own reactor assemblies. The bridge was in a tower on the centersphere. The engine units on a Lucrehulk-class vessel such as the Saak'ak consisted of three primary Rendili StarDrive proton 2 and four secondary proton 12 engines, and the ship was 3170 meters in diameter.[1] The centersphere was also a detachable core ship.[9] The ship's pilot sat at the navigation station and controls the ship through data goggles and hand-operated instrument panels. Pilot battle droids were stationed at a recessed floor at navigation computers. A viewscreen was situated at one side of the bridge.[8] The bridge could be sealed off by two blast doors.[5] The Saak'ak was also equipped with 50 conference rooms in the centersphere. The Neimoidians adjusted the rooms to their benefit when dealing with clients—the chairs were remote-operated "concentration deficit" units, and the rooms contained gas emitters. The Trade Federation had replaced much of the crew with droid labor,[8] such as PK-series worker droids[5] and Loader Droids.[6] The Saak'ak also contained holoprojectors for real-time communications.[5]
History[]
- "Offhand, I'd say this mission is past the negotiation stage."
- ―Kenobi to Jinn after escaping the conference room
MTTs loading for the Invasion of Naboo
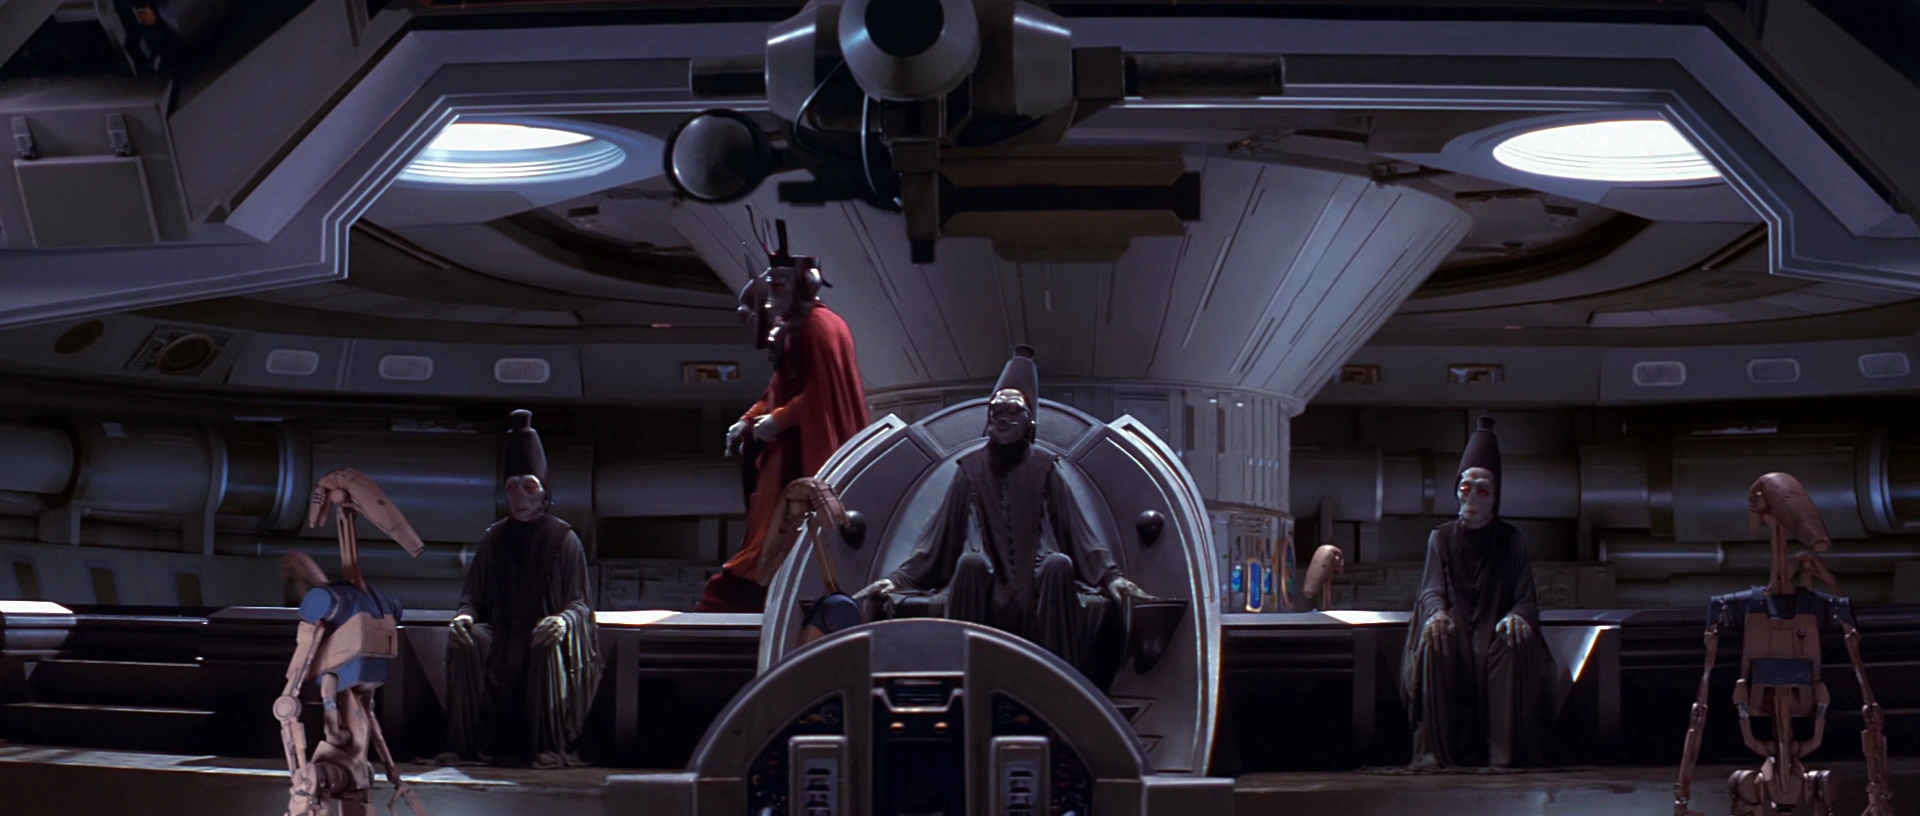
A Lucrehulk-class battleship, Saak'ak, known as Profiteer in Basic, was captained by Daultay Dofine and the Communications officers Tey How and Sil Unch.[5] In 33 BBY it was aboard the Saak'ak that Darth Sidious contacted Trade Federation Viceroy Nute Gunray and Captain Dofine to suggest that they blockade of the planet Naboo in response to Senate Resolution BR-0371 and the assassination of the Trade Federation Directorate on Eriadu.[14] Six months later, from on board Saak'ak, Viceroy Gunray and Settlement Officer Rune Haako launched[5] the invasion of Naboo in 32 BBY.[10] At the time, DFS Starfighter Squadron was embarked.[4]
Jedi Master Qui-Gon Jinn and his Padawan, Obi-Wan Kenobi, landed in Saak'ak's hangar as negotiators, shortly after the dispute arose, sent by Supreme Chancellor Finis Valorum to help resolve the blockade. Once on board, they were greeted by TC-14, a TC-series protocol droid. When the Trade Federation learned the Republic had sent Jedi as negotiators, they ordered the immediate termination of their guests under orders from Darth Sidious using Dioxis gas.[5] Although their ship, Radiant VII, was destroyed by Jull Dremon's gunnery team,[11] the two Jedi escaped, as the OOM security battle droids led by OWO-1 proved no match for the power of the Force.[5]
When they escaped, they went down the corridor, and Kenobi ducked into a service closet to work the controls to open the door at the end of the hallway. Proceeding through the next hallway, Kenobi unlocked the doors in his way. The two then tried to break onto the bridge of the battleship, but were disrupted by two destroyer droids. They ran off and went into the vessel's extensive ventilation shafts. Kenobi fell through into an air vent and ran through. He saw the Radiant VII explode.[15] Kenobi continued in the ship's underbelly and defended himself from several Trade Federation maintenance droids and used a control panel to open one door, which he went through to use another button to open a door nearby. He continued further into the air vent, and fell through the grating and into a corridor. Kenobi went into a generator room and took out several battle droids. There he met a Neimoidian controller who told him he needed to destroy a power generator to open the door to the hangar, which the young Jedi did before continuing to the hangar. In the corridor, he faced three droid starfighters. After that, he met back up with Jinn, who ordered him to stow away on separate landing craft. Kenobi went along the upper catwalks, defending himself from the droids stationed there, and hit switches to maneuver himself over one of the landing craft and enter it.[7]
After escaping from the conference room, the Jedi[16] fought through the next corridors. They then went through a command center. They traveled along a conveyor and Force Jumped over the gaps, ending up in a hangar, where they destroyed a Loader Droid. After taking several lightsaber strikes, the Loader Droid malfunctioned and crashed into the wall. The two Jedi traveled through the hole and went deeper into the ship near the static discharge chamber. The two Jedi then traveled through a corridor filled with electronodes. They jumped across a series of large pistons and went into the next corridor, then came out on the upper catwalks in the hangar. They were engaged by a droid starfighter. After deflecting its blasts back at it, the Jedi destroyed the starfighter's thrust dampers, forcing it to chance to its walker mode. The starfighter continued to strafe them, eventually falling prey to its own deflected blasts, allowing the Jedi to continue their mission inside the Saak'ak.[6]

Nute Gunray on the bridge of Saak'ak
The two Jedi fought their way through the flagship to reach the ship's bridge to discover why the Viceroy wanted them dead. Leaving the conference room, they moved through the hallways and to the hangar, where they came under fire from the hangar turret. Taking cover under the wreckage of the Radiant VII, Jinn ordered Kenobi to cover him while he disabled the turret. When the turret was disabled, the two Jedi continued to the bridge. Three droid starfighters harassed the Jedi from the side of the hangar. The two Jedi then moved into a cargo bay and went through a battle droid factory. In the factory they faced two more droid starfighters and bomb droids. In the next hallway, they were trapped by force fields. Jinn ordered Kenobi to jump up into the ventilation shafts. The two fought through the shafts, traveling along by riding the updrafts at two points, and came out in a walkway, where they found the invasion fleet in the hangar. They ended up in in an observation deck before going to the bridge. Kenobi covered Jinn while the latter cut through the blast doors. Kenobi destroyed the battle droids and bomb droid interlocutors.[3]
The two Jedi were interrupted by the arrival of two P-series destroyer droids, P-59 and P-60. The two Jedi used Force speed to escape into the ventilation shafts and make their way to the hangar, where they discovered the Federation was preparing for invasion. Jinn decided to stow aboard separate landing craft.[5] To cover for the buildup for the invasion from customs officials in the Galactic Republic when the ship was inspected beforehand, the Neimoidians convinced the agents that the suspicious hardware was next-generation and expensive binary loadlifters, although the Jedi knew better when they witnessed the preparations.[8] The cavernous hangars of the ship were also cleared of all cargo specifically to prepare for the invasion. Kenobi boarded one of the invasion ships.[3]
The pair of Jedi then made their escape from the ship by stowing aboard separate droid C-9979 landing craft. Soon after their escape, Gunray, Dofine, Unch, and How transferred to the Lucrehulk-class Droid Control Ship Vuutun Palaa to manage the battle droid army.[5]
After Viceroy Gunray conquered the Royal Palace of Theed, the orbital blockade dispersed, leaving only the Droid Control Ship, Vuutun Palaa to coordinate the occupation forces and control the droid armies on Naboo. That ship was destroyed at the Naboo Space Battle by Anakin Skywalker, causing all battle droids on the surface to cease functioning.[5]
Behind the scenes[]
Saak'ak first appeared in 1999 with the release of Star Wars: Episode I The Phantom Menace and its tie-ins.
The first mission of the Star Wars: Episode I The Phantom Menace video game, Trade Federation Battleship, released in 1999, took place on the vessel. Players assume the role of Kenobi. The mission starts in the conference room and extends to the attack on the bridge, followed by their escape through the bowels of the ship and onto a landing craft. Aboard the battleship, the player may interact with TC-14 and other characters; although they have a choice of dialogue and may in fact kill these characters, their interaction has no affect on the outcome of the mission. The game contradicts the movie by showing the Radiant VII explode after escaping the conference room.
Saak'ak also serves as a setting in the mission Trade Federation Battleship in the video game Star Wars: Episode I Jedi Power Battles, released in 2000. The player takes the role of one Jedi, or two if engaging in cooperative play. The player(s) escape from the conference room and fight through the battleship before dueling a droid starfighter.
Star Wars: Obi-Wan, released in 2001, showed how Kenobi traveled through the Saak'ak during the mission Betrayal. The game contrasts the movie by having Jinn and Kenobi discover the Federation invasion force before trying to break into the bridge.
The preceding three games contradict each other and the Episode I movie to some extent. They all feature the Jedi's escape from the conference room up to escaping the swamps. This article includes all three pathways and notes specific contradictions where applicable.
In the 2005 video game LEGO Star Wars and its 2007 compilation, the Saak'ak serves as the location of the first mission, which re-images the opening scenes of The Phantom Menace into LEGO form. The levels offer "studs" to collect and various freeplay areas, which are hidden or blocked. Negotiations start just as the Federation tries to gas the Jedi. They escape using the game's telekinetic "Force powers" and travel through the battleship's hallways, fighting through battle droids. Rooms off of the first hallway are not part of the required path but offer hidden features. At the end of the hallway, the protocol droid TC-14 can be switched to and controlled to access other parts of the level. To enter the next room, the players must use their "Force powers" to open the door. In the next room, more battle droids attack. In the room's lower level, the Jedi face two destroyer droids. The last area is blocked by a shield. The Jedi must jump over the shield; the switches are on the other side, which both players must step on to open the shield and let TC-14 through. The droid can access the switch to open the MTT stationed there, which the Jedi enter to finish the level. The game's characters during the first playthrough are Jinn and Kenobi. If only one player is active, the other is AI-controlled. The ending cutscene to the mission contradicts the movie in that the two Jedi stow aboard the MTT on one landing craft instead of splitting up.
In Nute Gunray's entry in the 2002 reference book The New Essential Guide to Characters, the Saak'ak was mistakenly stated to be the ship that was destroyed during the space battle. Similarly, Star Wars: Complete Locations and Inside the Worlds of Star Wars: Episode I has some statements within the Trade Federation Droid Control Ship section that erroneously imply that they were located on the Saak'ak.
Appearances[]
- Darth Plagueis (Mentioned only)
- Darth Plagueis audiobook (Mentioned only)
- Cloak of Deception
- Darth Maul: Shadow Hunter
- Darth Maul: Shadow Hunter unabridged audiobook
- Star Wars: Obi-Wan
- Star Wars: Episode I The Phantom Menace novelization (First appearance)
- Star Wars: Episode I The Phantom Menace unabridged audiobook
- Star Wars: Episode I The Phantom Menace
- † Star Wars: Episode I — The Phantom Menace
- Star Wars: Episode I The Phantom Menace video game
- Star Wars: Episode I The Phantom Menace junior novelization
- Episode I: The Phantom Menace Movie Storybook
- Star Wars Episode I: The Phantom Menace script facsimile
- Star Wars: The Phantom Menace Cine-Manga
- Star Wars: Episode I Jedi Power Battles
- Episode I: Obi-Wan Kenobi (In flashback(s))
- The Wrath of Darth Maul (Mentioned only)
- Star Wars Episode I: I Am a Jedi (Picture only)
Non-canon appearances[]
- LEGO Star Wars: The Phantom Menace (Picture only)
- LEGO Star Wars: The Video Game
- LEGO Star Wars: The Complete Saga
- LEGO Star Wars: Darth Maul's Mission
Sources[]
Notes and references[]
- ↑ 1.00 1.01 1.02 1.03 1.04 1.05 1.06 1.07 1.08 1.09 1.10 1.11 1.12 1.13 1.14 1.15 1.16 Star Wars: Complete Cross-Sections
- ↑ 2.0 2.1 2.2 2.3 2.4 The Complete Star Wars Encyclopedia: Saak'ak entry
- ↑ 3.0 3.1 3.2 Star Wars: Obi-Wan
- ↑ 4.0 4.1 4.2 4.3 4.4 4.5
 Star Wars Customizable Card Game — Theed Palace Limited
- ↑ 5.00 5.01 5.02 5.03 5.04 5.05 5.06 5.07 5.08 5.09 5.10 5.11 5.12 5.13 5.14 5.15 5.16 5.17 5.18 5.19 5.20 5.21 Star Wars: Episode I The Phantom Menace
- ↑ 6.0 6.1 6.2 Star Wars: Episode I Jedi Power Battles
- ↑ 7.0 7.1 7.2 Star Wars: Episode I The Phantom Menace video game
- ↑ 8.0 8.1 8.2 8.3 Star Wars: Complete Locations
- ↑ 9.0 9.1 Star Wars: The Phantom Menace: The Expanded Visual Dictionary
- ↑ 10.0 10.1 The New Essential Chronology establishes on page 40 that the invasion happens in 32 BBY.
- ↑ 11.0 11.1 The New Essential Guide to Vehicles and Vessels, Consular-class cruiser entry
- ↑
 "The Devious Neimoidians Revealed" — Star Wars Insider 147
- ↑ Star Wars: Episode I The Phantom Menace novelization
- ↑ Cloak of Deception
- ↑ The game contradicts the movie at this point.
- ↑ Star Wars: Episode I Jedi Power Battles can be played with one or two characters; these characters are Qui-Gon Jinn, Obi-Wan Kenobi, Plo Koon, Mace Windu, and Adi Gallia. Any character can be selected from the loading screen for any of the game's 10 missions. This article assumes the selection of Jinn and Kenobi, per their appearance in Episode I.