No edit summary Tag: sourceedit |
mNo edit summary |
||
| (41 intermediate revisions by 17 users not shown) | |||
| Line 1: | Line 1: | ||
{{Eras}} |
{{Eras}} |
||
| − | {{Majorspoiler|Imperial Super Commandos (episode)}} |
||
| − | {{Youmay|the second mission undertaken by [[The rebellion]]|[[Mission to the third moon of Concord Dawn (disambugation)|other uses]]}} |
||
{{Conjecture}} |
{{Conjecture}} |
||
| + | {{Image}} |
||
{{Mission |
{{Mission |
||
| − | |prev=[[Mission to Agamar ( |
+ | |prev=[[Mission to Agamar (2 BBY)|Mission to Agamar]]<ref name="The Last Battle">{{Rebels|The Last Battle}}</ref> |
| + | |conc=[[Lothal campaign]]<ref name="Steps">''[[Star Wars Rebels: Steps Into Shadow]]''</ref> |
||
| − | |conc= |
||
| + | |next=[[Skirmish over Mykapo]]<ref name="Iron Squadron">{{Rebels|Iron Squadron (episode)|Iron Squadron}}</ref> |
||
| − | |next= |
||
|name=Second mission to the third moon of Concord Dawn |
|name=Second mission to the third moon of Concord Dawn |
||
|image=[[File:Lothal rebels vs Imperial super commandos.jpeg]] |
|image=[[File:Lothal rebels vs Imperial super commandos.jpeg]] |
||
| + | |conflict=[[Early rebellion against the Galactic Empire]]<ref name="ISC">{{Rebels|Imperial Super Commandos}}</ref> |
||
| − | |conflict= |
||
| − | |objective=Head to the [[ |
+ | |objective=Head to the [[third moon of Concord Dawn]] and find out why [[Phoenix Cell]] lost contact with the [[Mandalorian Protectors|Protectors]]<ref name="ISC" /> |
| − | |date=[[ |
+ | |date=[[2 BBY]]<ref name="Date note">''[[Dawn of Rebellion]]'' dates the events of ''[[Star Wars Rebels: Steps Into Shadow]]'' seventeen [[Standard year|years]] after the end of the [[Clone Wars]], which ''[[Star Wars: Galactic Atlas]]'' dates to [[19 BBY]]; therefore, the events of ''Steps Into Shadow'' must take place in [[2 BBY]]. According to ''[[Star Wars: On the Front Lines]]'', [[Mon Mothma]]'s denunciation of the [[Galactic Empire]] and the [[Declaration of the Rebel Alliance]] take place 2 years before the [[Battle of Yavin]] or [[2 BBY]]. As "[[Imperial Super Commandos]]" is set between ''Steps Into Shadow'' and "Secret Cargo," the events of the episode must also take place in 2 BBY.</ref> |
|place=Third moon of [[Concord Dawn]]<ref name="ISC" /> |
|place=Third moon of [[Concord Dawn]]<ref name="ISC" /> |
||
| − | |result= |
+ | |result=Phoenix Group finds out that the Protectors were wiped out by [[Viceroy]] [[Gar Saxon]] and his [[Imperial Super Commando]]s<ref name="ISC" /> |
| − | |side1=* |
+ | |side1=*Phoenix Group<ref name="ISC" /> |
| − | **[[ |
+ | **[[Spectres]]<ref name="ISC" /> |
| − | *Protectors<ref name="ISC" /> |
+ | *Mandalorian Protectors<ref name="ISC" /> |
|side2=*[[Galactic Empire]]<ref name="ISC" /> |
|side2=*[[Galactic Empire]]<ref name="ISC" /> |
||
**Imperial Super Commandos<ref name="ISC" /> |
**Imperial Super Commandos<ref name="ISC" /> |
||
|side3= |
|side3= |
||
|side4= |
|side4= |
||
| − | |commanders1=[[ |
+ | |commanders1=[[Lieutenant Commander]]/[[Padawan]] [[Ezra Bridger]]<ref name="ISC" /> |
|commanders2=Viceroy Gar Saxon<ref name="ISC" /> |
|commanders2=Viceroy Gar Saxon<ref name="ISC" /> |
||
|commanders3= |
|commanders3= |
||
| Line 35: | Line 34: | ||
|ppl2=*1 Imperial Viceroy<ref name="ISC" /> |
|ppl2=*1 Imperial Viceroy<ref name="ISC" /> |
||
**Gar Saxon<ref name="ISC" /> |
**Gar Saxon<ref name="ISC" /> |
||
| − | *5 Imperial |
+ | *5 Imperial Super Commandos<ref name="ISC" /> |
*1 [[Kom'rk-class fighter|''Kom'rk''-class fighter]]<ref name="ISC" /> |
*1 [[Kom'rk-class fighter|''Kom'rk''-class fighter]]<ref name="ISC" /> |
||
|ppl3= |
|ppl3= |
||
|ppl4= |
|ppl4= |
||
|casual1= |
|casual1= |
||
| − | |casual2=*At least one |
+ | |casual2=*At least one Imperial Super Commando<ref name="ISC" /> |
| − | *1 Kom'rk-class fighter<ref name="ISC" /> |
+ | *1 ''Kom'rk''-class fighter<ref name="ISC" /> |
|casual3= |
|casual3= |
||
|casual4= |
|casual4= |
||
|civilian=}} |
|civilian=}} |
||
| − | In [[ |
+ | In [[2 BBY]], [[Spectres|members]] of [[Phoenix Cell]] undertook a '''mission''' to the [[Third moon of Concord Dawn|third]] [[moon]] of [[Concord Dawn]]. After the Phoenix Cell lost contact with the [[Mandalorian Protectors]], [[Fenn Rau]], [[Sabine Wren]], [[Ezra Bridger]], and [[C1-10P|Chopper]] traveled to the third moon to investigate. They discovered that Imperial [[Mandalorian]]s under [[Viceroy]] [[Gar Saxon]] had attacked the encampment and massacred the Protectors. Working together, they managed to escape the Protectors and flee offworld. Due to their shared experiences, Rau decided to join the rebellion. |
==Prelude== |
==Prelude== |
||
| − | In [[ |
+ | In [[3 BBY]],{{Fact}} [[Sabine Wren]], [[Kanan Jarrus]], and the [[astromech droid]] [[C1-10P|Chopper]] kidnapped [[Fenn Rau]], the leader of the [[Mandalorian Protectors]], after he [[Dogfight over Concord Dawn|attacked]] a rebel delegation in the [[Concord Dawn system]]. Rau ordered the Protectors to allow the rebels safe passage through the system in return for keeping his captivity a secret.<ref name="Protector">{{Rebels|The Protector of Concord Dawn}}</ref> Rau was treated well by his rebel captors and eventually came to interact with Sabine, who tried to win him over to the rebellion.<ref name="ISC" /> |
On Mandalore, the ruling [[Viceroy]] [[Gar Saxon]] and his Mandalorian super commandos collaborated with the [[Galactic Empire]]. They believed that the Empire would make Mandalore great again and had an acrimonious relationship with the Protectors of Concord Dawn. After learning that the Protectors were allowing rebel ships to use the system as a thorough-way to avoid Imperial sector patrols, Saxon and his followers attacked the [[Protectors Camp]] on the [[Third moon of Concord Dawn|third moon]] of [[Concord Dawn]]. They slaughtered everyone at the camp but failed to find Rau, who was their primary target.<ref name="ISC" /> |
On Mandalore, the ruling [[Viceroy]] [[Gar Saxon]] and his Mandalorian super commandos collaborated with the [[Galactic Empire]]. They believed that the Empire would make Mandalore great again and had an acrimonious relationship with the Protectors of Concord Dawn. After learning that the Protectors were allowing rebel ships to use the system as a thorough-way to avoid Imperial sector patrols, Saxon and his followers attacked the [[Protectors Camp]] on the [[Third moon of Concord Dawn|third moon]] of [[Concord Dawn]]. They slaughtered everyone at the camp but failed to find Rau, who was their primary target.<ref name="ISC" /> |
||
| − | After losing contact with the Protectors, [[Hera Syndulla]] and the rebel [[commander]] [[Jun Sato]] summoned Rau and Sabine for a briefing. While Sato and other rebels leaders believed that the Protectors were trying to lure them into a trap, Rau suspected that something had befallen his followers and asked permission to investigate. Hera agreed but sent Sabine, [[Ezra Bridger]], and Chopper to keep an eye on him. The rebels and Rau traveled to the Concord Dawn system in the [[Sheathipede-class transport shuttle| |
+ | After losing contact with the Protectors, [[Hera Syndulla]] and the rebel [[commander]] [[Jun Sato]] summoned Rau and Sabine for a briefing. While Sato and other rebels leaders believed that the Protectors were trying to lure them into a trap, Rau suspected that something had befallen his followers and asked permission to investigate. Hera agreed but sent Sabine, [[Ezra Bridger]], and Chopper to keep an eye on him. The rebels and Rau traveled to the Concord Dawn system in the repurposed [[Sheathipede-class transport shuttle|''Sheathipede''-class shuttle]] ''[[Phantom II]]''.<ref name="ISC" /> |
==The mission== |
==The mission== |
||
| Line 63: | Line 62: | ||
Meanwhile, Gar Saxon interrogated Ezra and Chopper. Ezra tried to claim that he was a [[scavenger]] but Saxon disbelieved the boy and forced him to cooperate by threatening to shoot Chopper. Despite Ezra's attempts to mislead Saxon, the Viceroy managed to force the boy to reveal that Fenn Rau had sent him. Elsewhere, Sabine and Fenn debated the merits of rescuing Ezra and Chopper. Sabine was adamant on rescuing her friends and managed to convinced Fenn to retrieve the ''Phantom II'' in order to keep the ship out of Imperial hands. Sabine feared that the Empire would learn the [[Atollon|location]] of the Phoenix [[Chopper Base|rebel base]]. Due to his hatred for Saxon, Fenn agreed to a truce with Sabine.<ref name="ISC" /> |
Meanwhile, Gar Saxon interrogated Ezra and Chopper. Ezra tried to claim that he was a [[scavenger]] but Saxon disbelieved the boy and forced him to cooperate by threatening to shoot Chopper. Despite Ezra's attempts to mislead Saxon, the Viceroy managed to force the boy to reveal that Fenn Rau had sent him. Elsewhere, Sabine and Fenn debated the merits of rescuing Ezra and Chopper. Sabine was adamant on rescuing her friends and managed to convinced Fenn to retrieve the ''Phantom II'' in order to keep the ship out of Imperial hands. Sabine feared that the Empire would learn the [[Atollon|location]] of the Phoenix [[Chopper Base|rebel base]]. Due to his hatred for Saxon, Fenn agreed to a truce with Sabine.<ref name="ISC" /> |
||
| − | Back in the hut, Saxon discovered that Ezra was a Jedi after he managed to deflect Saxon's blasts from Chopper. Sabine managed to rescue her comrades by using smoke grenades to disorientate Saxon and his guards. The rebels then tried to escape aboard the ''Phoenix II'' only to find that Fenn had stolen the ship. Saxon and his super commandos then surrounded the rebels and confronted Sabine. Out of respect for [[ |
+ | Back in the hut, Saxon discovered that Ezra was a Jedi after he managed to deflect Saxon's blasts from Chopper. Sabine managed to rescue her comrades by using smoke grenades to disorientate Saxon and his guards. The rebels then tried to escape aboard the ''Phoenix II'' only to find that Fenn had stolen the ship. Saxon and his super commandos then surrounded the rebels and confronted Sabine. Out of respect for [[Ursa Wren|Sabine's mother]], he offered to spare Sabine's life if she helped them find Fenn and pledged her allegiance to Saxon. Sabine refused and got Chopper to activate Frequency 337 on her helmet, which temporarily disoriented Saxon and his men out.<ref name="ISC" /> |
===Escaping Gar Saxon=== |
===Escaping Gar Saxon=== |
||
| − | Chopper activated his rocket boosters while Sabine and Ezra shared a [[jetpack]]. The three rebels fled into a canyon but were pursued by Saxon's Mandalorian super commandos. Ezra managed to use his [[Ezra Bridger's second lightsaber|lightsaber]] to damage the jetpack of one of their pursuers, knocking him out of the pursuit. Sabine then used several [[grenade]]s to block the path of the super commandos. Saxon and his remaining men caught up with the rebels. At one point, Ezra was forced to ride on Chopper. Meanwhile, Sabine managed to shoot another |
+ | Chopper activated his rocket boosters while Sabine and Ezra shared a [[jetpack]]. The three rebels fled into a canyon but were pursued by Saxon's Mandalorian super commandos. Ezra managed to use his [[Ezra Bridger's second lightsaber|lightsaber]] to damage the jetpack of one of their pursuers, knocking him out of the pursuit. Sabine then used several [[grenade]]s to block the path of the super commandos. Saxon and his remaining men caught up with the rebels. At one point, Ezra was forced to ride on Chopper. Meanwhile, Sabine managed to shoot another Mandalorian super commando and blow up his jetpack.<ref name="ISC" /> |
After a perilous pursuit, the rebels reached Gar Saxon's [[starship]], which lay at the top of the plateau. The rebels planned to steal it and flee offworld. However, Saxon and his remaining super commando caught up with them and managed to disarm Sabine. Before they could execute the rebels, Rau experienced a change of heart and returned in the ''Phantom II''. Fenn managed to shoot the remaining super commando and blow up Fenn's ship. This allowed Ezra and Chopper to flee aboard. Following a struggle, Sabine managed to fight off Saxon and flee aboard the ''Phantom II''.<ref name="ISC" /> |
After a perilous pursuit, the rebels reached Gar Saxon's [[starship]], which lay at the top of the plateau. The rebels planned to steal it and flee offworld. However, Saxon and his remaining super commando caught up with them and managed to disarm Sabine. Before they could execute the rebels, Rau experienced a change of heart and returned in the ''Phantom II''. Fenn managed to shoot the remaining super commando and blow up Fenn's ship. This allowed Ezra and Chopper to flee aboard. Following a struggle, Sabine managed to fight off Saxon and flee aboard the ''Phantom II''.<ref name="ISC" /> |
||
| Line 74: | Line 73: | ||
==Appearances== |
==Appearances== |
||
| − | *{{Rebels |
+ | *{{Rebels|Imperial Super Commandos}} {{1st}} |
| + | *{{Rebels|Legacy of Mandalore}} {{Mo}} |
||
==Sources== |
==Sources== |
||
| Line 84: | Line 84: | ||
{{Early rebellion against the Galactic Empire}} |
{{Early rebellion against the Galactic Empire}} |
||
| + | |||
| + | {{Interlang |
||
| + | |es=Segunda misión a la tercera luna de Concord Dawn |
||
| + | |ja=第二次コンコード・ドーン第3衛星の任務 |
||
| + | }} |
||
{{DEFAULTSORT:third moon of Concord Dawn, Second mission to the}} |
{{DEFAULTSORT:third moon of Concord Dawn, Second mission to the}} |
||
| − | [[Category: |
+ | [[Category:Battles in the Mandalore sector]] |
| + | [[Category:Missions of the Early rebellion against the Galactic Empire]] |
||
Revision as of 01:31, 12 September 2019
Warning: This infobox is missing the following parameters: unit1, unit2, unit4, unit3
In 2 BBY, members of Phoenix Cell undertook a mission to the third moon of Concord Dawn. After the Phoenix Cell lost contact with the Mandalorian Protectors, Fenn Rau, Sabine Wren, Ezra Bridger, and Chopper traveled to the third moon to investigate. They discovered that Imperial Mandalorians under Viceroy Gar Saxon had attacked the encampment and massacred the Protectors. Working together, they managed to escape the Protectors and flee offworld. Due to their shared experiences, Rau decided to join the rebellion.
Prelude
In 3 BBY,[source?] Sabine Wren, Kanan Jarrus, and the astromech droid Chopper kidnapped Fenn Rau, the leader of the Mandalorian Protectors, after he attacked a rebel delegation in the Concord Dawn system. Rau ordered the Protectors to allow the rebels safe passage through the system in return for keeping his captivity a secret.[6] Rau was treated well by his rebel captors and eventually came to interact with Sabine, who tried to win him over to the rebellion.[4]
On Mandalore, the ruling Viceroy Gar Saxon and his Mandalorian super commandos collaborated with the Galactic Empire. They believed that the Empire would make Mandalore great again and had an acrimonious relationship with the Protectors of Concord Dawn. After learning that the Protectors were allowing rebel ships to use the system as a thorough-way to avoid Imperial sector patrols, Saxon and his followers attacked the Protectors Camp on the third moon of Concord Dawn. They slaughtered everyone at the camp but failed to find Rau, who was their primary target.[4]
After losing contact with the Protectors, Hera Syndulla and the rebel commander Jun Sato summoned Rau and Sabine for a briefing. While Sato and other rebels leaders believed that the Protectors were trying to lure them into a trap, Rau suspected that something had befallen his followers and asked permission to investigate. Hera agreed but sent Sabine, Ezra Bridger, and Chopper to keep an eye on him. The rebels and Rau traveled to the Concord Dawn system in the repurposed Sheathipede-class shuttle Phantom II.[4]
The mission
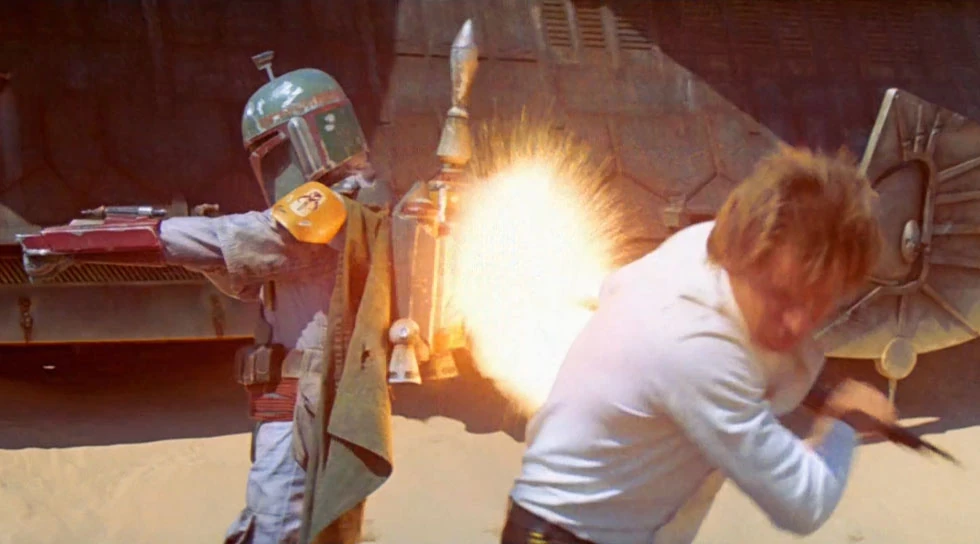
Scene of Desolation
During the journey to Concord Dawn, Fenn Rau managed to break free of his restraints and stunned Sabine and Ezra. After cuffing them, he departed the ship and went to the site of the Protectors' camp. There, he discovered that another Mandalorian faction had murdered his followers and burnt several buildings. Chopper managed to free Sabine and Ezra. Together, they found Fenn, who was despondent over the loss of his comrades. Following a brief argument between Fenn and Sabine, Chopper picked up a signal.[4]
The rebels were attacked by an Imperial probe droid but Sabine managed to destroy it. Before they could leave aboard the Phantom II, a column of Imperial super commandos led by Gar Saxon arrived. The rebels fled among the complex but Saxon and his men managed to capture Chopper and Ezra. Sabine and Fenn managed to escape and find a safe vantage point from where they could observe the enemy force.[4]
Counter-offensive
Meanwhile, Gar Saxon interrogated Ezra and Chopper. Ezra tried to claim that he was a scavenger but Saxon disbelieved the boy and forced him to cooperate by threatening to shoot Chopper. Despite Ezra's attempts to mislead Saxon, the Viceroy managed to force the boy to reveal that Fenn Rau had sent him. Elsewhere, Sabine and Fenn debated the merits of rescuing Ezra and Chopper. Sabine was adamant on rescuing her friends and managed to convinced Fenn to retrieve the Phantom II in order to keep the ship out of Imperial hands. Sabine feared that the Empire would learn the location of the Phoenix rebel base. Due to his hatred for Saxon, Fenn agreed to a truce with Sabine.[4]
Back in the hut, Saxon discovered that Ezra was a Jedi after he managed to deflect Saxon's blasts from Chopper. Sabine managed to rescue her comrades by using smoke grenades to disorientate Saxon and his guards. The rebels then tried to escape aboard the Phoenix II only to find that Fenn had stolen the ship. Saxon and his super commandos then surrounded the rebels and confronted Sabine. Out of respect for Sabine's mother, he offered to spare Sabine's life if she helped them find Fenn and pledged her allegiance to Saxon. Sabine refused and got Chopper to activate Frequency 337 on her helmet, which temporarily disoriented Saxon and his men out.[4]
Escaping Gar Saxon
Chopper activated his rocket boosters while Sabine and Ezra shared a jetpack. The three rebels fled into a canyon but were pursued by Saxon's Mandalorian super commandos. Ezra managed to use his lightsaber to damage the jetpack of one of their pursuers, knocking him out of the pursuit. Sabine then used several grenades to block the path of the super commandos. Saxon and his remaining men caught up with the rebels. At one point, Ezra was forced to ride on Chopper. Meanwhile, Sabine managed to shoot another Mandalorian super commando and blow up his jetpack.[4]
After a perilous pursuit, the rebels reached Gar Saxon's starship, which lay at the top of the plateau. The rebels planned to steal it and flee offworld. However, Saxon and his remaining super commando caught up with them and managed to disarm Sabine. Before they could execute the rebels, Rau experienced a change of heart and returned in the Phantom II. Fenn managed to shoot the remaining super commando and blow up Fenn's ship. This allowed Ezra and Chopper to flee aboard. Following a struggle, Sabine managed to fight off Saxon and flee aboard the Phantom II.[4]
Aftermath
As a result of the second mission to Concord Dawn, the rebellion learned that the Protectors of Concord Dawn had been killed by Imperial super commandos led by Viceroy Saxon. Sabine's efforts to save Ezra and Chopper despite them not being Mandalorians won her the respect of her former adversary Fenn Rau. With his followers dead and with Saxon vowing to kill him, Rau decided to join the rebellion. As a result, the rebels gained the support of a seasoned Mandalorian warrior and commander.[4]
Appearances
 Star Wars Rebels — "Imperial Super Commandos" (First appearance)
- Star Wars Rebels — "Legacy of Mandalore" (Mentioned only)
Sources
- Rebels Recon: Inside "The Last Battle" on StarWars.com (backup link)
- Star Wars Rebels: "Mandalorian Showdown" on StarWars.com (backup link)
Notes and references
- ↑
 Star Wars Rebels — "The Last Battle"
- ↑ Star Wars Rebels: Steps Into Shadow
- ↑ Star Wars Rebels — "Iron Squadron"
- ↑ 4.00 4.01 4.02 4.03 4.04 4.05 4.06 4.07 4.08 4.09 4.10 4.11 4.12 4.13 4.14 4.15 4.16 4.17 4.18 4.19 4.20 4.21 4.22 4.23 4.24 4.25 4.26 4.27 4.28 4.29 4.30 4.31 4.32 4.33 4.34 Star Wars Rebels — "Imperial Super Commandos"
- ↑ Dawn of Rebellion dates the events of Star Wars Rebels: Steps Into Shadow seventeen years after the end of the Clone Wars, which Star Wars: Galactic Atlas dates to 19 BBY; therefore, the events of Steps Into Shadow must take place in 2 BBY. According to Star Wars: On the Front Lines, Mon Mothma's denunciation of the Galactic Empire and the Declaration of the Rebel Alliance take place 2 years before the Battle of Yavin or 2 BBY. As "Imperial Super Commandos" is set between Steps Into Shadow and "Secret Cargo," the events of the episode must also take place in 2 BBY.
- ↑ Star Wars Rebels — "The Protector of Concord Dawn"